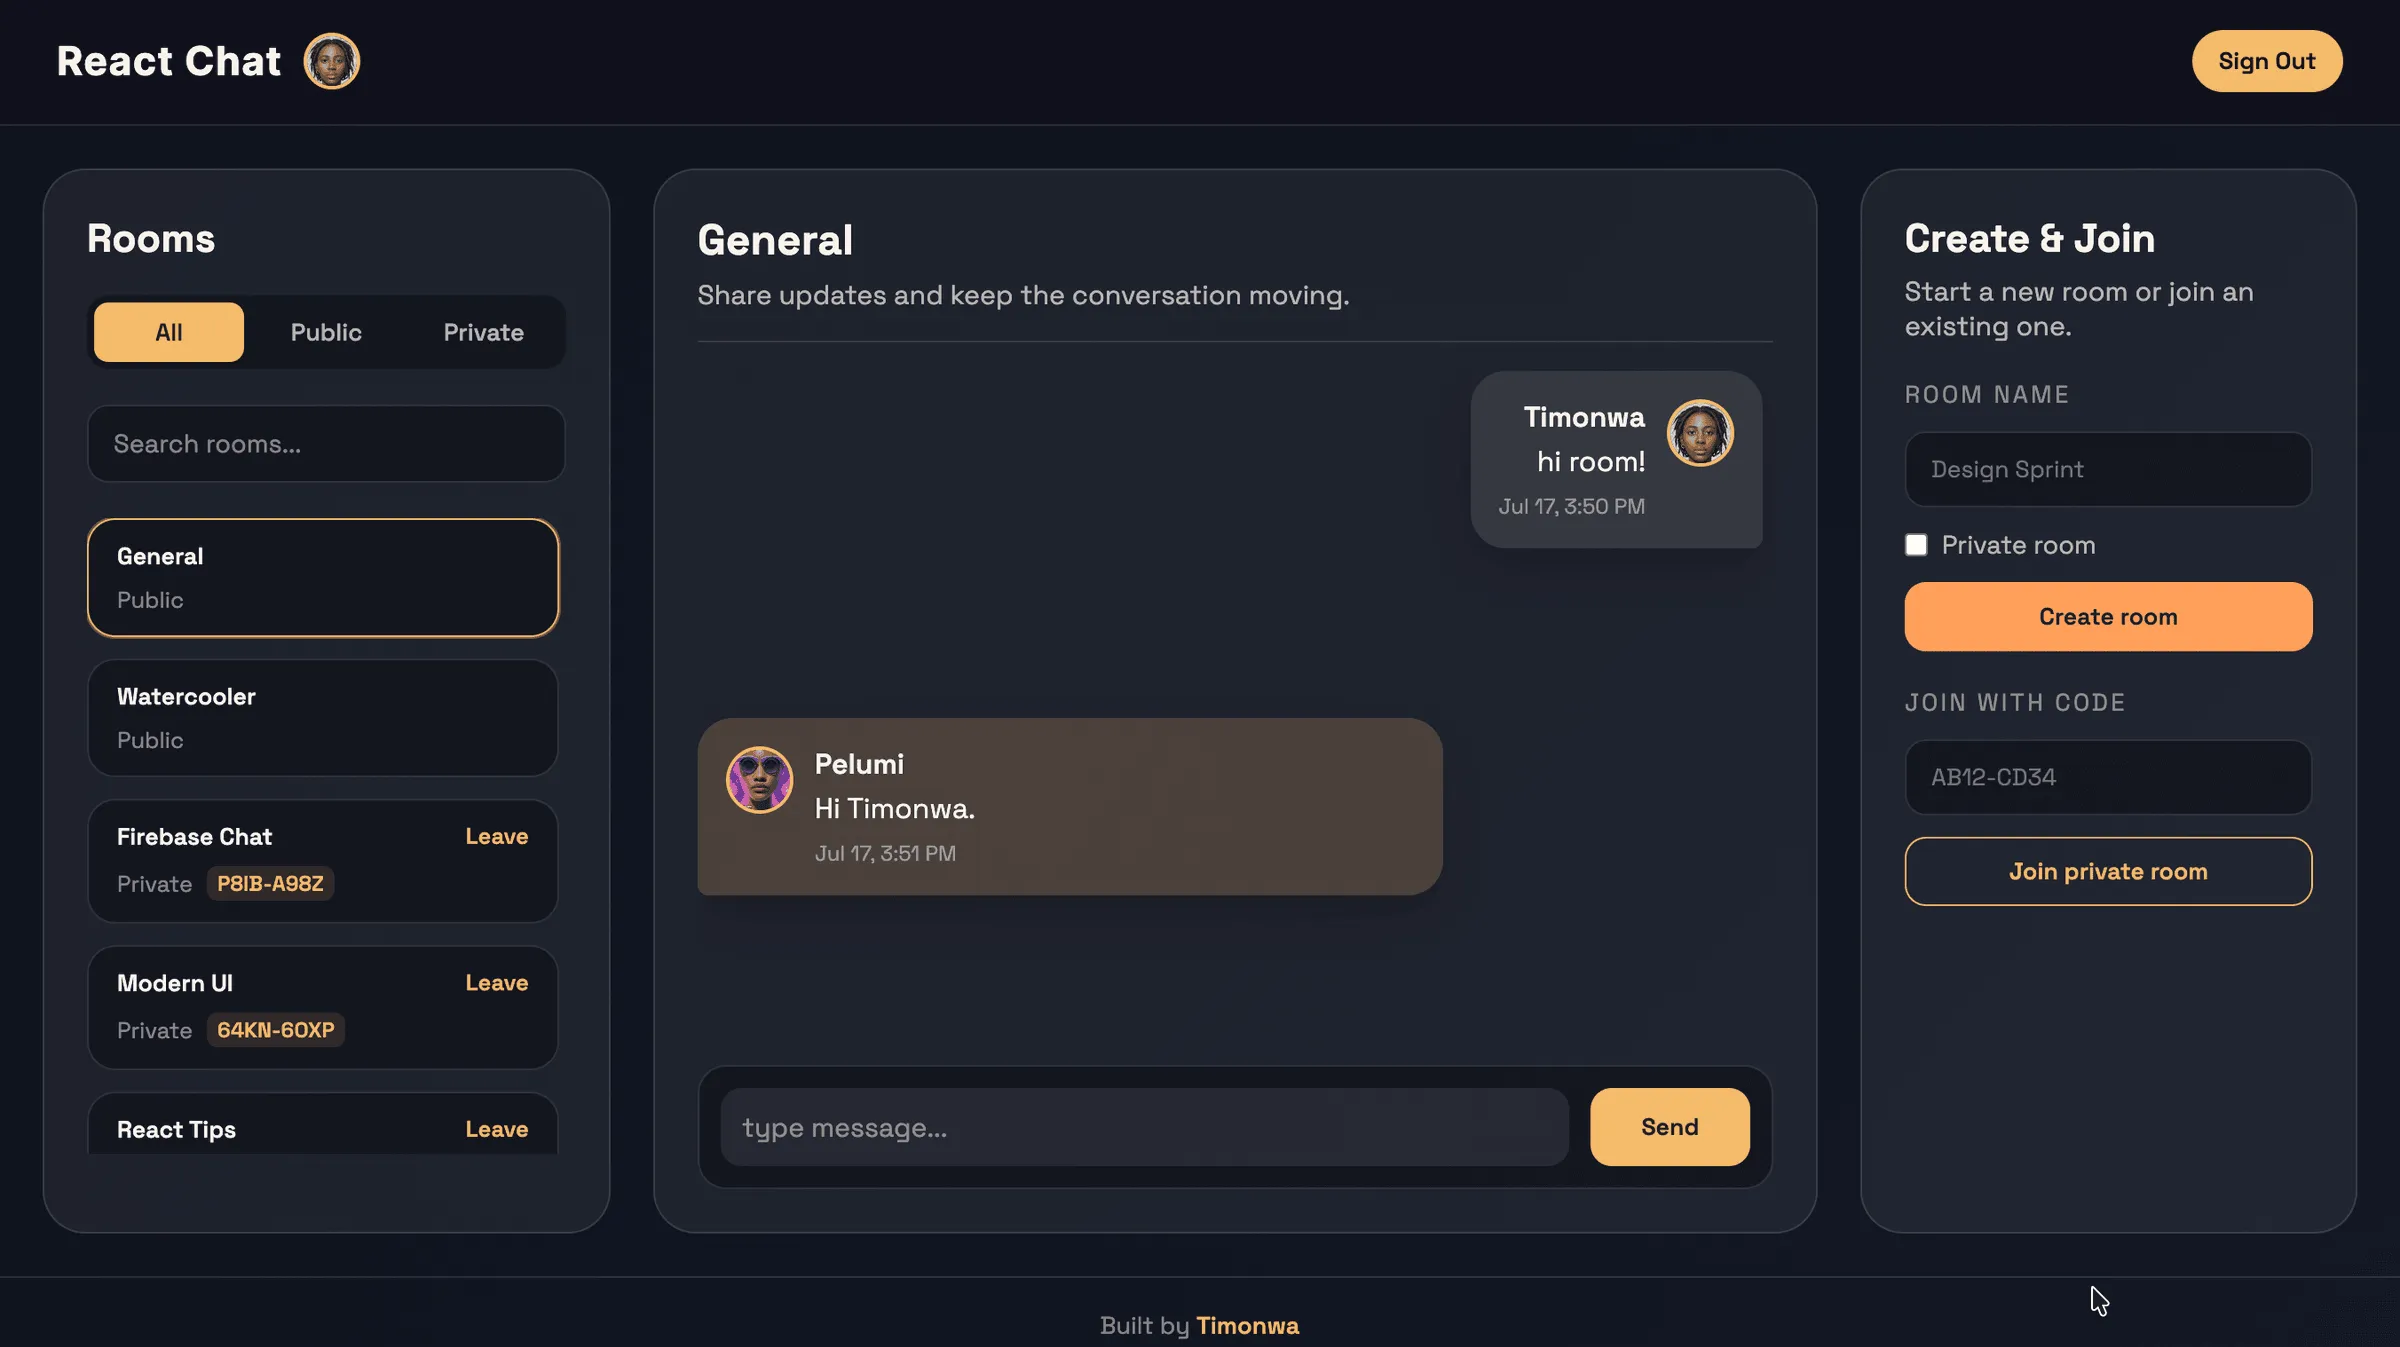
In this tutorial, we are going to build a real-time chat app with React and Firebase. Users will sign in with their Google account, hop into a General public room, create their own public or private rooms, and share a join code so friends can hop into private rooms with them. Every message you send appears in everyone’s chat instantly, with no page refresh.
TL;DR
- Set up a Firebase project with Google Authentication and Cloud Firestore.
- Design a room-based Firestore data model — a
roomscollection, amessagessubcollection inside each room, and amembershipscollection for private-room access. - Add Google sign-in with
useAuthState,GoogleAuthProvider, andsignInWithPopup. - Stream rooms and messages in real time with
onSnapshot, and let users create and join public or private rooms using shareable join codes. - Lock everything down with Firestore security rules before you deploy.
Prerequisites
To get the most out of this tutorial, you should have:
- Node.js 18 or newer installed on your machine.
- A Google account (Gmail) so you can create a Firebase project or/and sign in to the demo.
- Intermediate knowledge of React — you should be comfortable with components, props, state,
useState,useEffect, and a littleuseMemoanduseRef. - Basic familiarity with the command line for running
npmorpnpmcommands. - You do not need any prior Firebase experience. We’ll set everything up from scratch.
What is Firebase?
Firebase is a Backend-as-a-Service (BaaS) owned by Google. It gives developers a set of tools you’d normally have to build from scratch on a backend — things like authentication, a database, file storage, push notifications, analytics, and hosting — all behind a friendly SDK you can drop into a frontend app.
In this tutorial we’ll use two Firebase products:
-
Firebase Authentication — Firebase Authentication supports many different sign-in methods: email/password, phone, Google, Facebook, Apple, GitHub, X (Twitter), and more. We’ll use the Google sign-in method so users can log in with one click using their Gmail account.
-
Cloud Firestore — Cloud Firestore is a cloud-hosted, NoSQL document database. Instead of tables and rows like SQL, it stores data in documents (key-value pairs) that live inside collections. Documents can also contain subcollections, which lets you nest data when it makes sense. Firestore is real-time — when a document changes, every client listening to that document gets the update immediately. That real-time behaviour is what makes our chat work without any page refresh.
We’ll also be using react-firebase-hooks, a small community library that gives us React-friendly hooks like useAuthState for tracking the signed-in user.
Now that you have an idea of what Firebase is, let’s start building.
Cloning and Running the Starter Project
To save us from writing every line of HTML and CSS from scratch, I’ve prepared a starter project on a separate branch of the GitHub repo called setup. It already contains the prewritten CSS and all the React components (with the UI markup ready to go) but with no Firebase code yet. You’ll add the Firebase code yourself, step by step, as we go through the tutorial.
Open your terminal and run:
git clone https://github.com/Timonwa/react-chat.git
cd react-chat
git checkout setup
This clones the repository and switches to the setup branch.
Open it in your code editor and install the dependencies:
npm installSince you cloned the repo, that single command installs everything listed in package.json — including React, Firebase, and react-firebase-hooks.
Finally, start the development server:
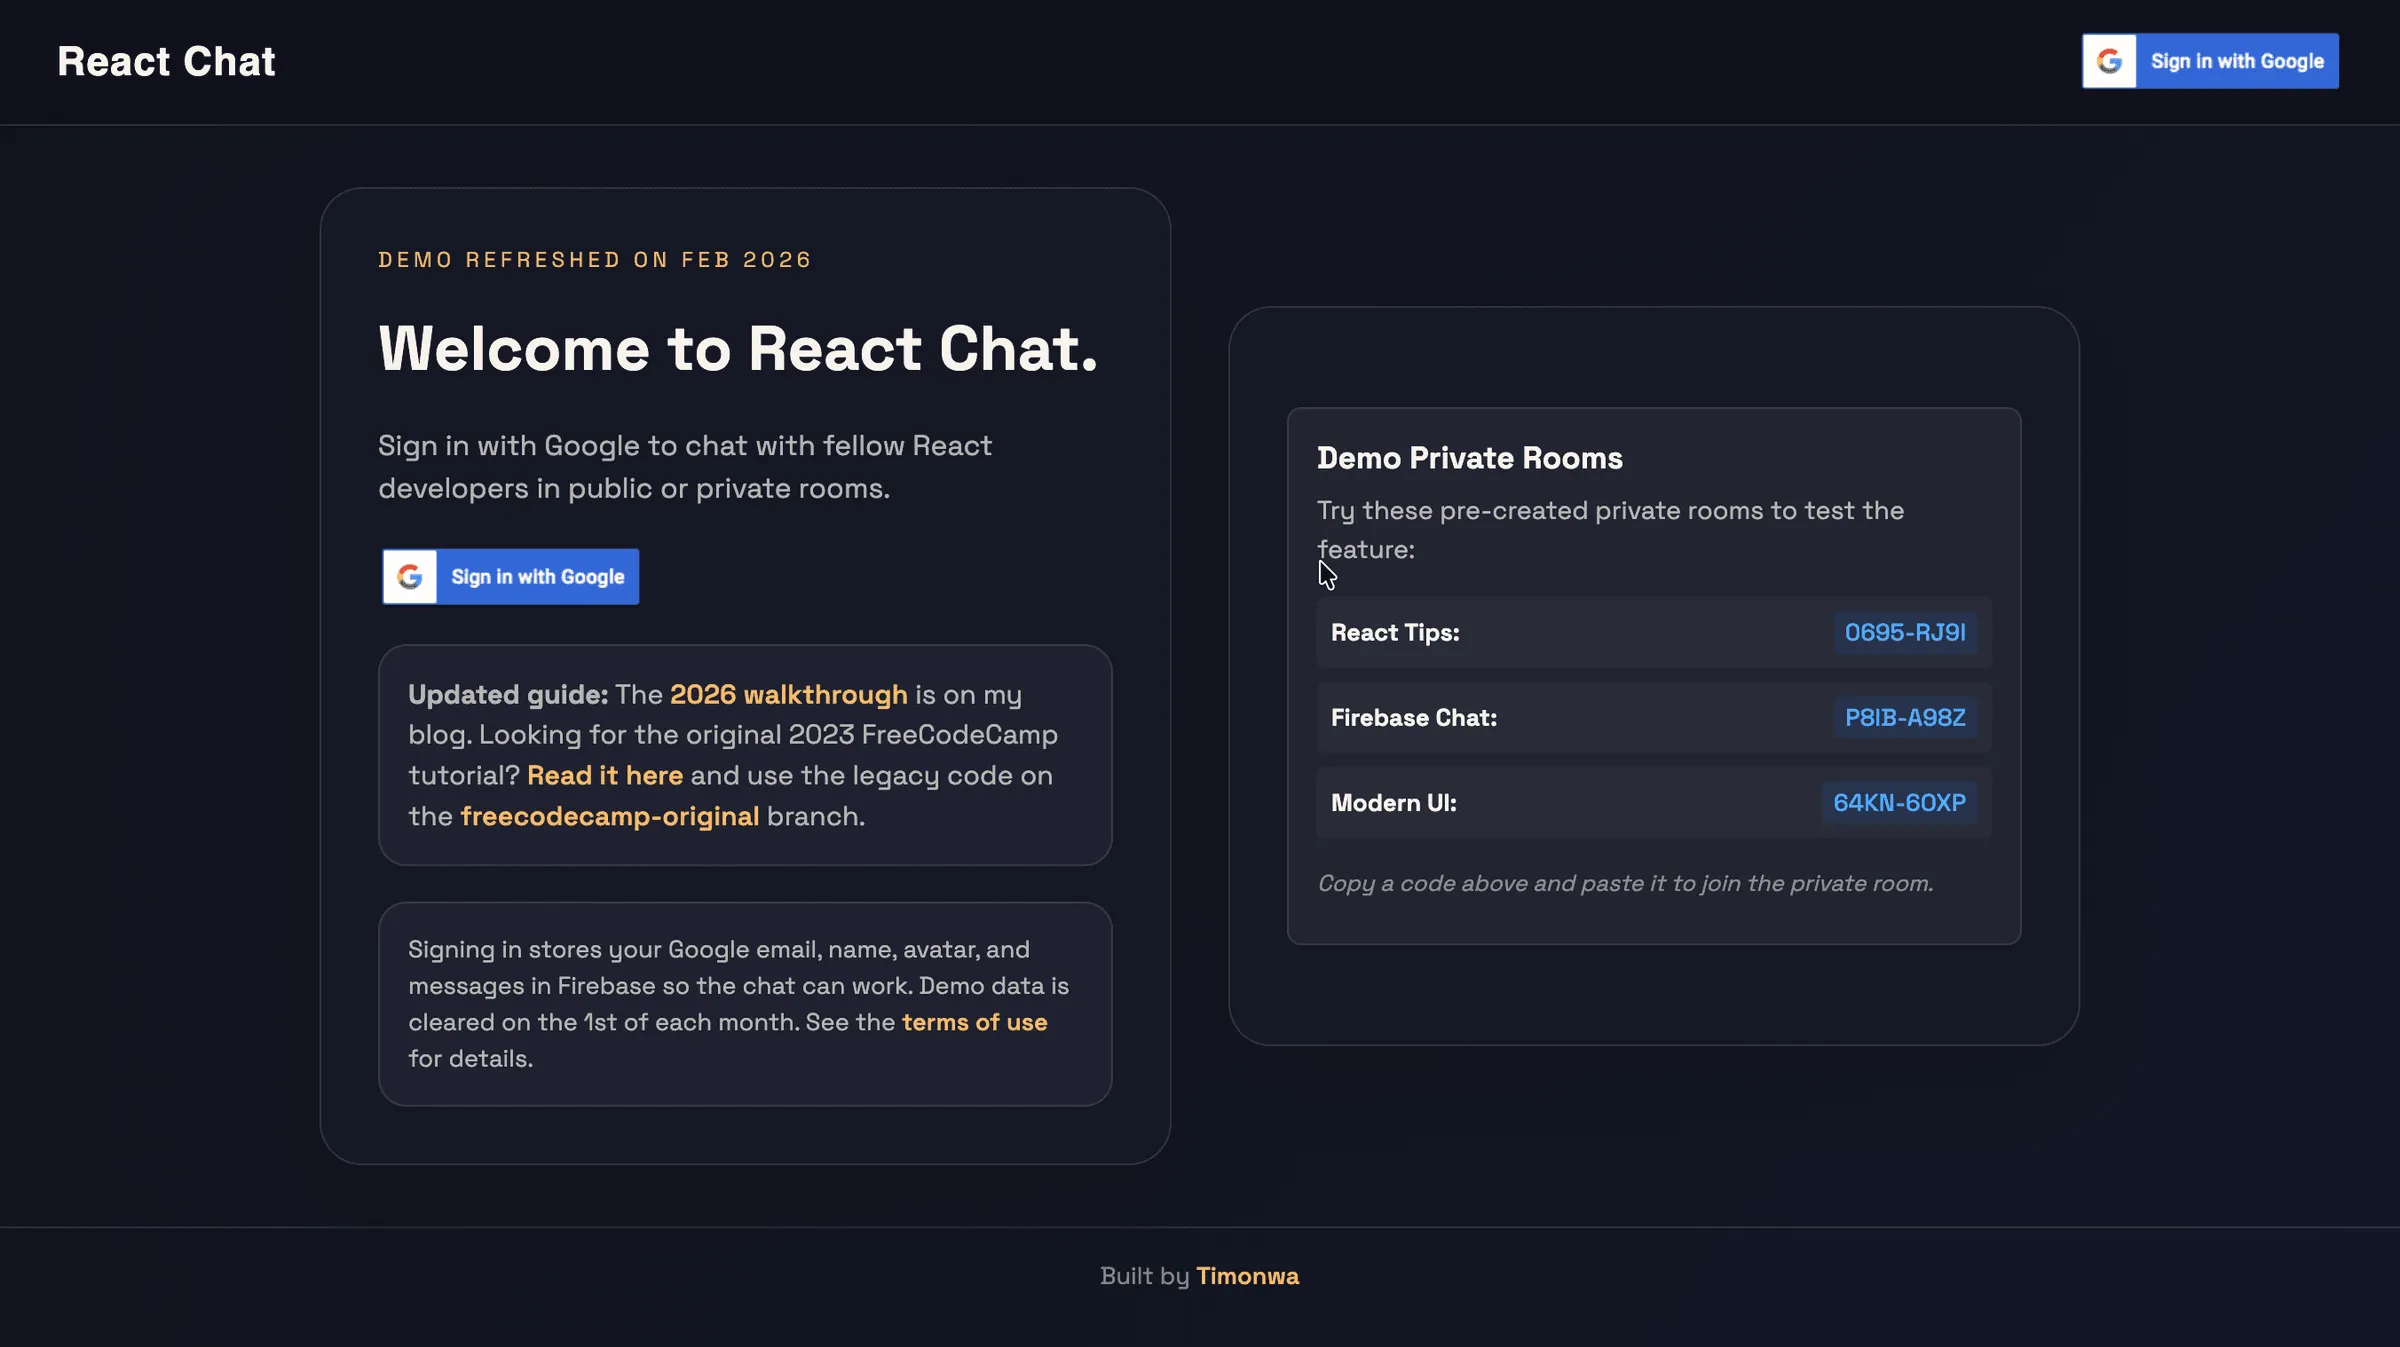
npm startOpen http://localhost:3000 in your browser. You should see the starter app — a navbar with a “Sign in with Google” button and a welcome screen with some demo info.
Clicking Sign in with Google (in the navbar or on the welcome card) drops you into the chat layout, which runs on hardcoded sample data. That sign-in is a placeholder we’ll replace with real Google auth later — none of the other buttons (creating or joining rooms, sending messages) do anything yet, because there’s no Firebase behind them.
A tour of the src folder
Before we start writing any code, let’s understand what’s already in the project. Open the src folder and you’ll see:
src/
├── App.css
├── App.js
├── components/
│   ├── Avatar.js
│   ├── ChatBox.js
│   ├── Message.js
│   ├── NavBar.js
│   ├── RoomsActionsPanel.js
│   ├── RoomsListPanel.js
│   ├── SendMessage.js
│   └── Welcome.js
├── img/
│   └── google-button.png
└── index.js
Here’s what each component does:
NavBar.js— The top navigation bar. It has the “React Chat” title on the left and, on the right, a button that toggles between “Sign in with Google” and “Sign Out” based on a placeholder sign-in state passed down fromApp. After we wire up auth, it’ll read the real signed-in user and also show their avatar.Welcome.js— The landing page that visitors see when they’re not signed in. It explains what the app does, has a big Google sign-in button, and lists a few demo private room codes.App.js— The main shell. It decides whether to show the Welcome page or the chat layout based on whether a user is signed in — currently a placeholder boolean that the sign-in buttons flip on and off. The chat layout has three panels: the rooms list on the left, the chat box in the middle, and the create/join panel on the right.RoomsListPanel.js— The left sidebar. Shows the list of rooms the user can see (all public rooms plus the private rooms they’ve joined), with tabs (“All”, “Public”, “Private”), a search input, and a “Join”/“Leave” button on each private room.ChatBox.js— The middle panel. Shows messages for the currently active room and contains the message input form.Message.js— A single chat bubble. Shows the user’s avatar, name, message text, and timestamp.SendMessage.js— The form at the bottom of the chat box for typing and sending a new message.RoomsActionsPanel.js— The right sidebar. Has two forms: one for creating a new room (with an optional “private” toggle) and one for joining a private room by code.Avatar.js— A reusable avatar component. If the user has a photo URL it shows the photo; otherwise it falls back to coloured initials.App.css— All the styling for the app. We won’t be writing any CSS in this tutorial — it’s all done for you.
Right now the app is mostly for show. The sign-in buttons flip a placeholder flag so you can see the chat layout, but everything inside it runs on hardcoded sample data — the chat box shows a couple of canned messages, and the room creation and join forms just clear themselves.
That’s because the starter project intentionally leaves out all the Firebase wiring. Our job in this tutorial is to add that wiring piece by piece — starting by replacing the placeholder sign-in with the real thing.
Let’s go set up Firebase.
Setting up the Firebase Project
Open a new browser tab and go to firebase.google.com. If you don’t have a Firebase account yet, sign in with your Gmail account.
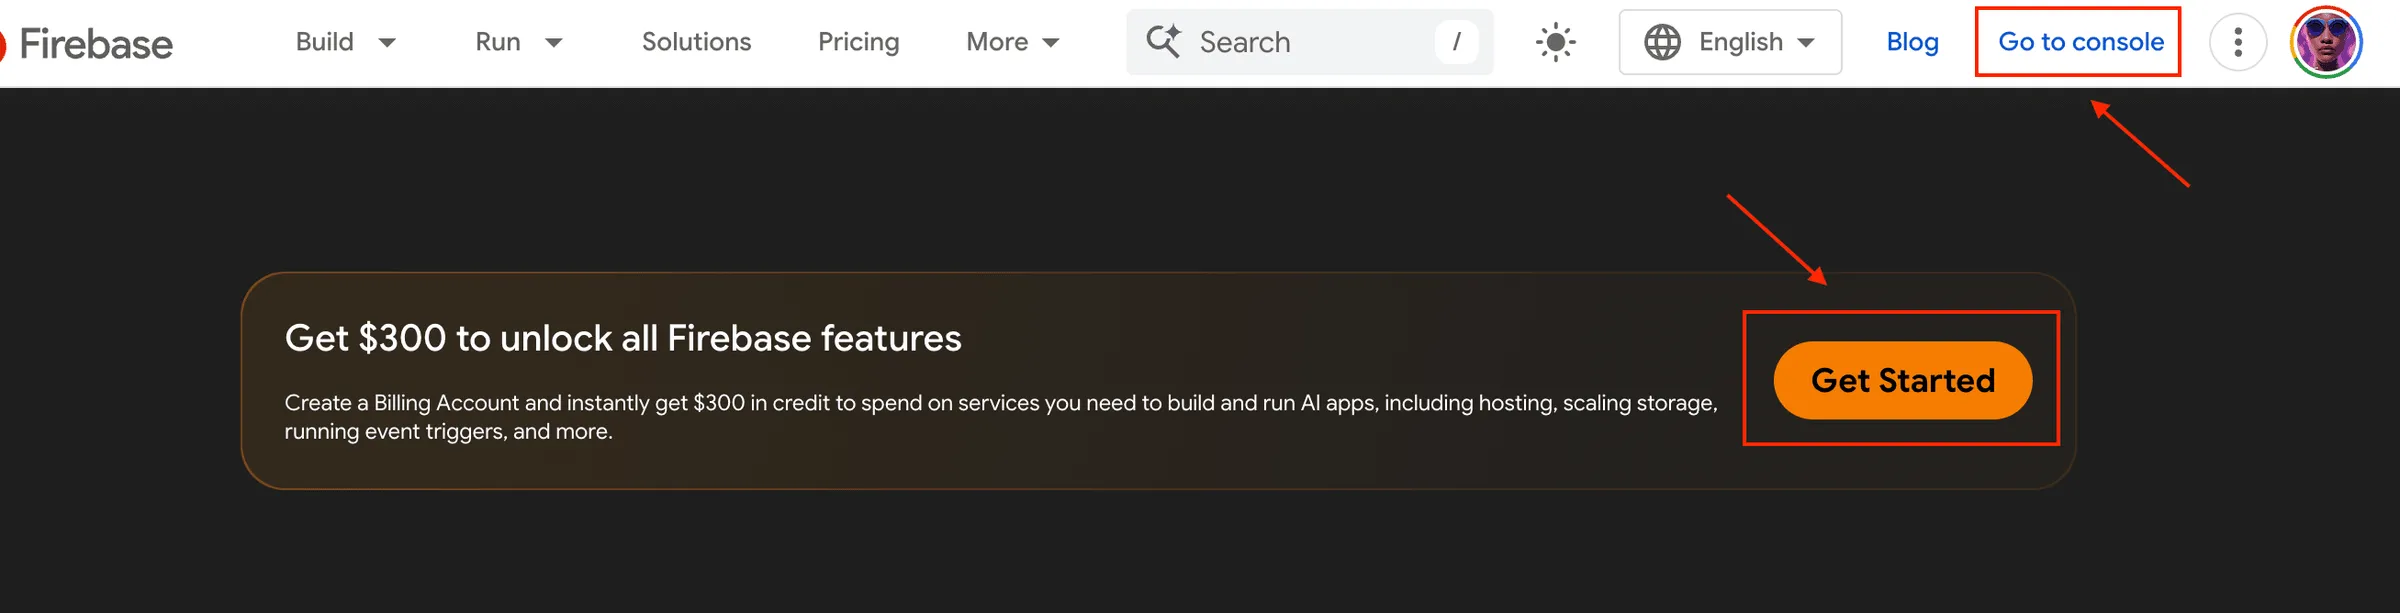
On the landing page, click Go to console on the navbar or click Get Started, and then on the Firebase console, click Add project (or Create a project if it’s your first one).
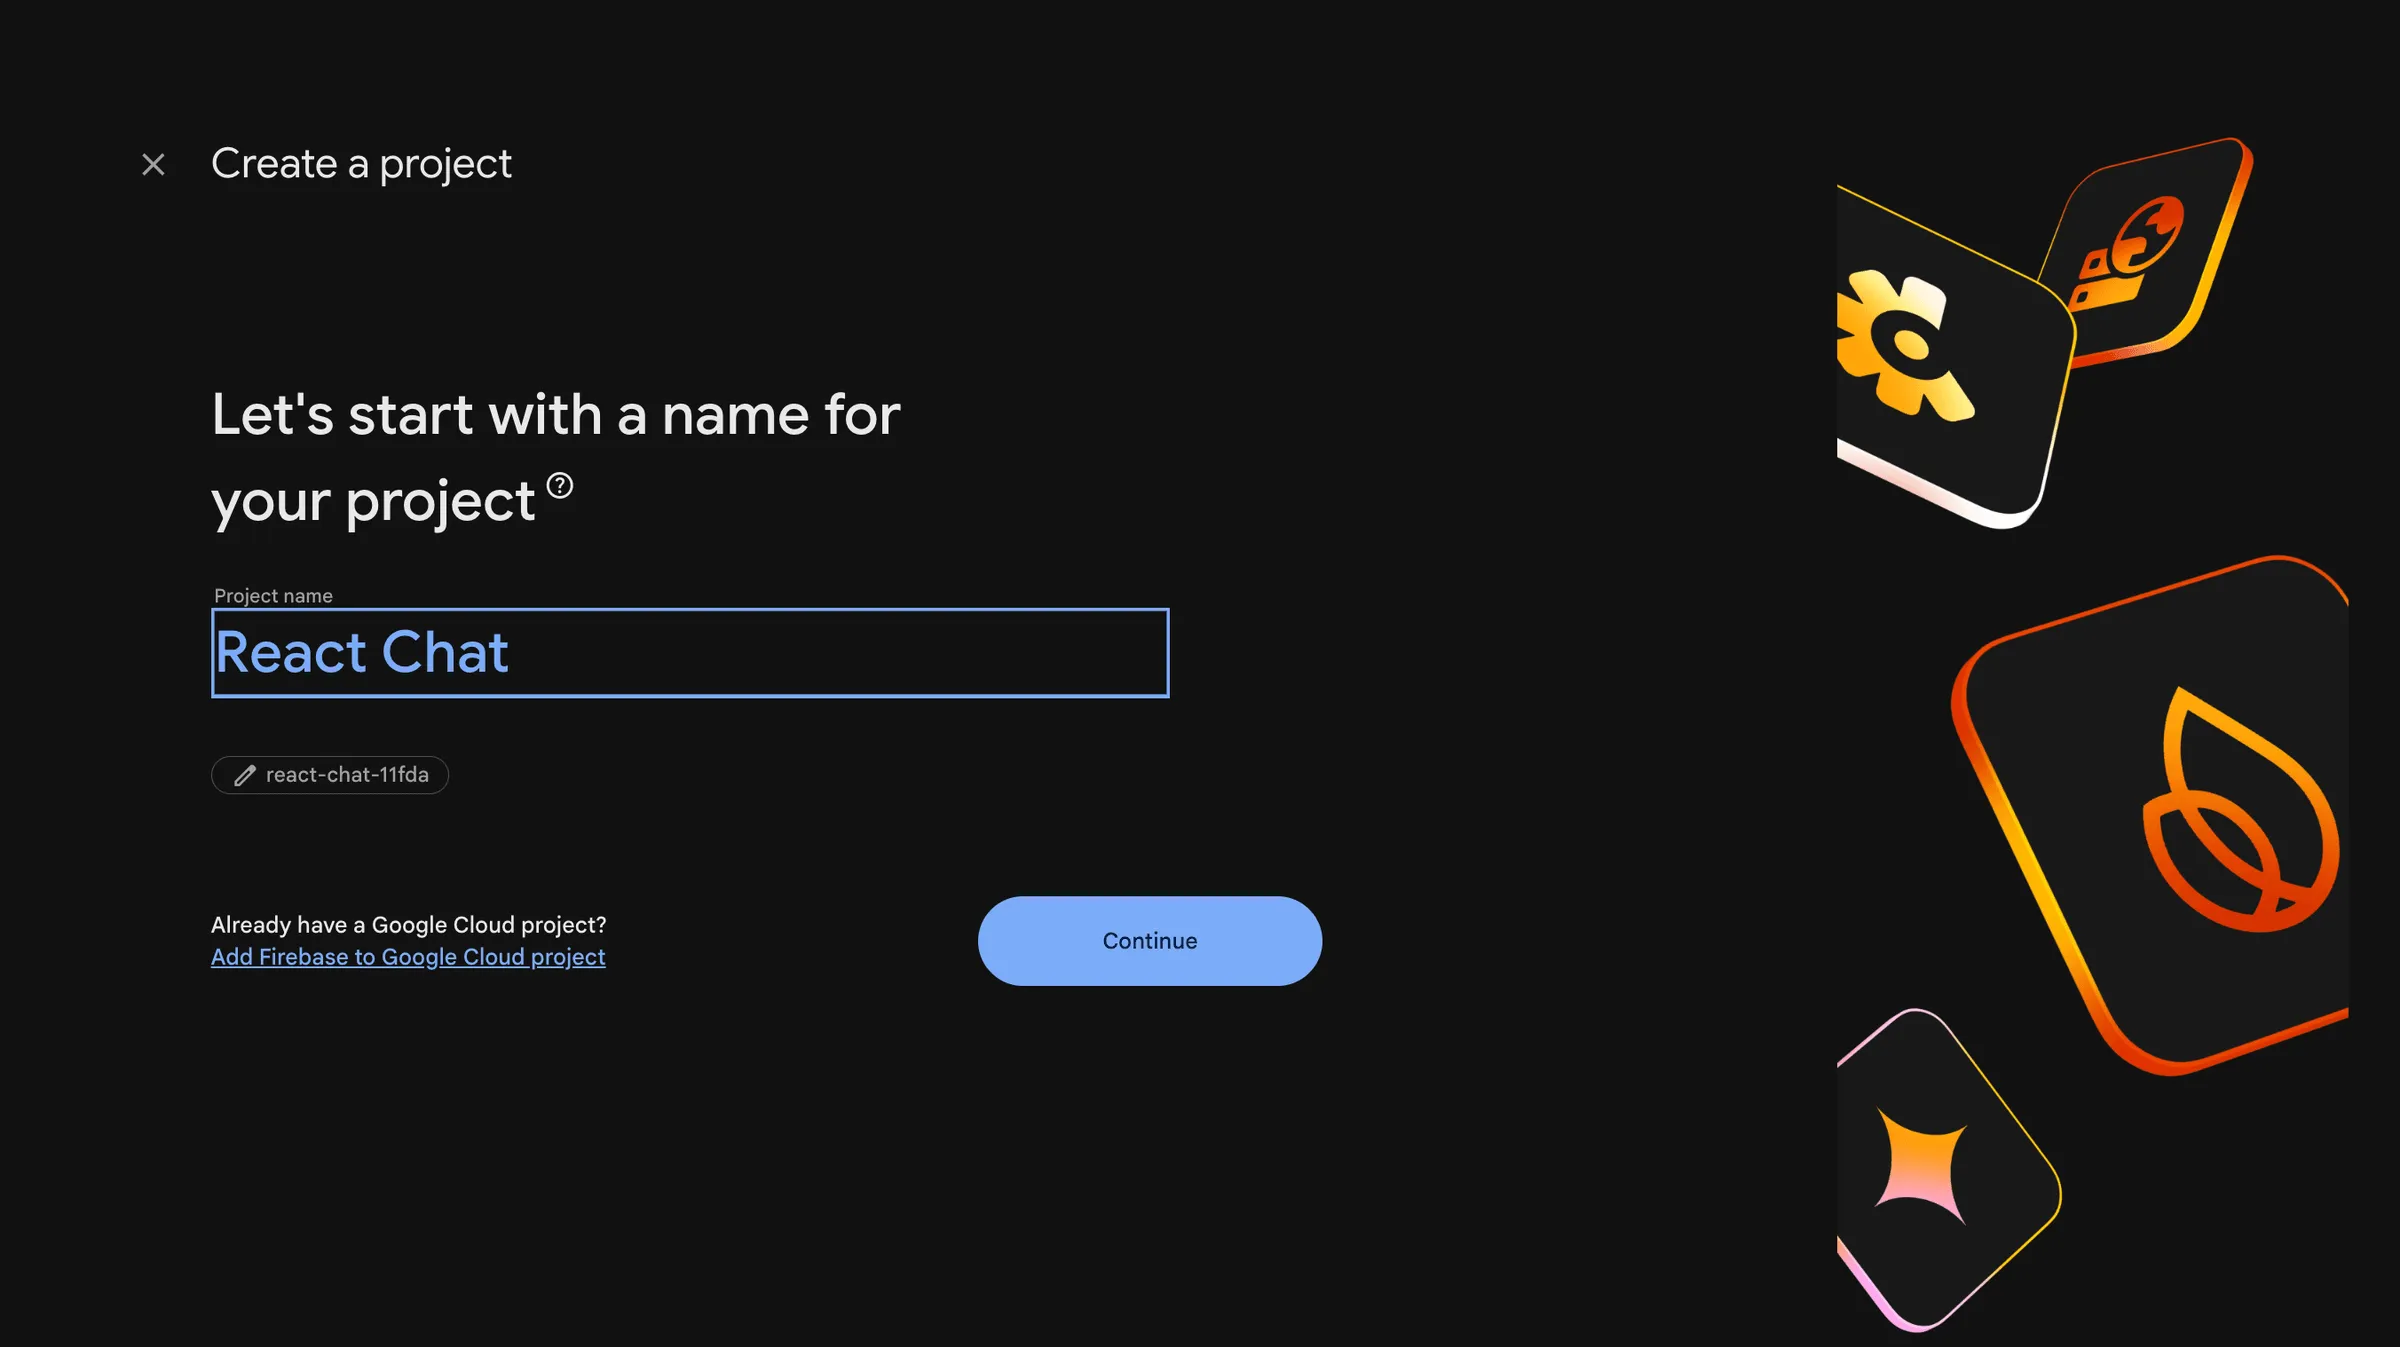
Give your project a name (something like react-chat). Firebase will suggest a unique project ID — you can leave the default or change it. Click Continue.
On the next steps Firebase will ask if you want to enable Google Gemini or Google Analytics for the project. For this tutorial they are not needed, so you can leave them enabled or disabled — your choice. Click Create project and wait for Firebase to provision everything (it takes about 30 seconds).
When the project is ready, click Continue to go to the project overview in the Firebase console. From there, we’ll register our web app, enable Google sign-in, and provision a Firestore database.
Registering the Web App
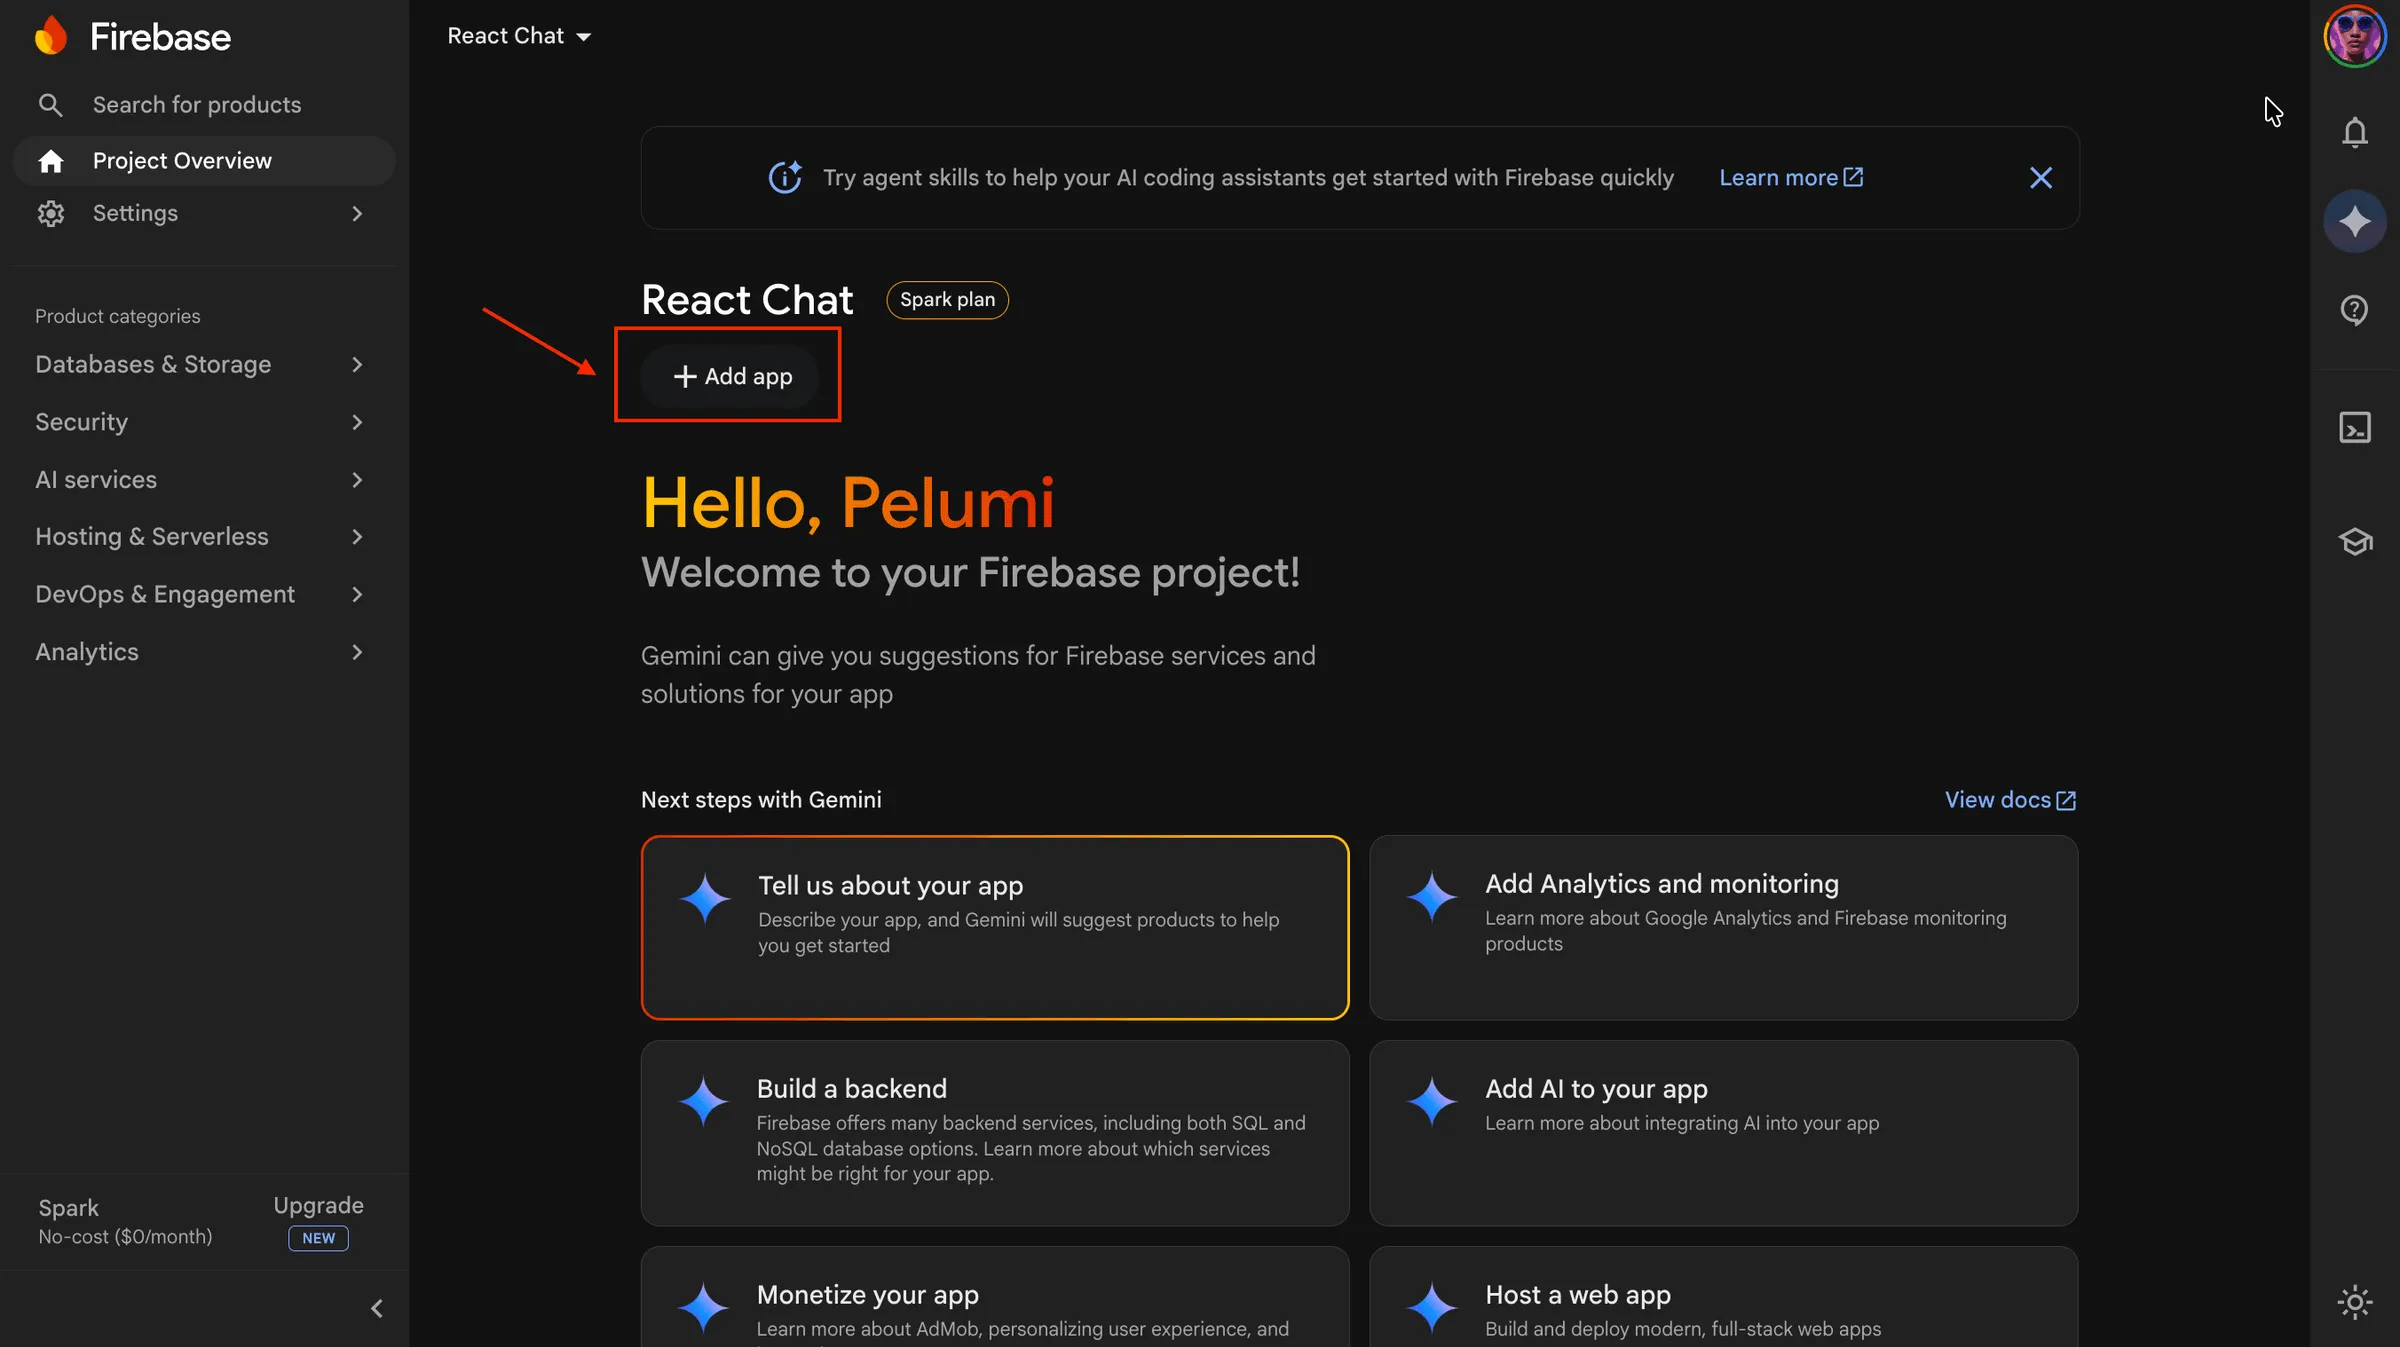
Firebase needs to know what kind of app you’re building so it can give you the right config. On the project dashboard, click the Add app button at the top of the sceeen to reveal the app type options. You will see a row of app icons. Click the Web icon (looks like </>).
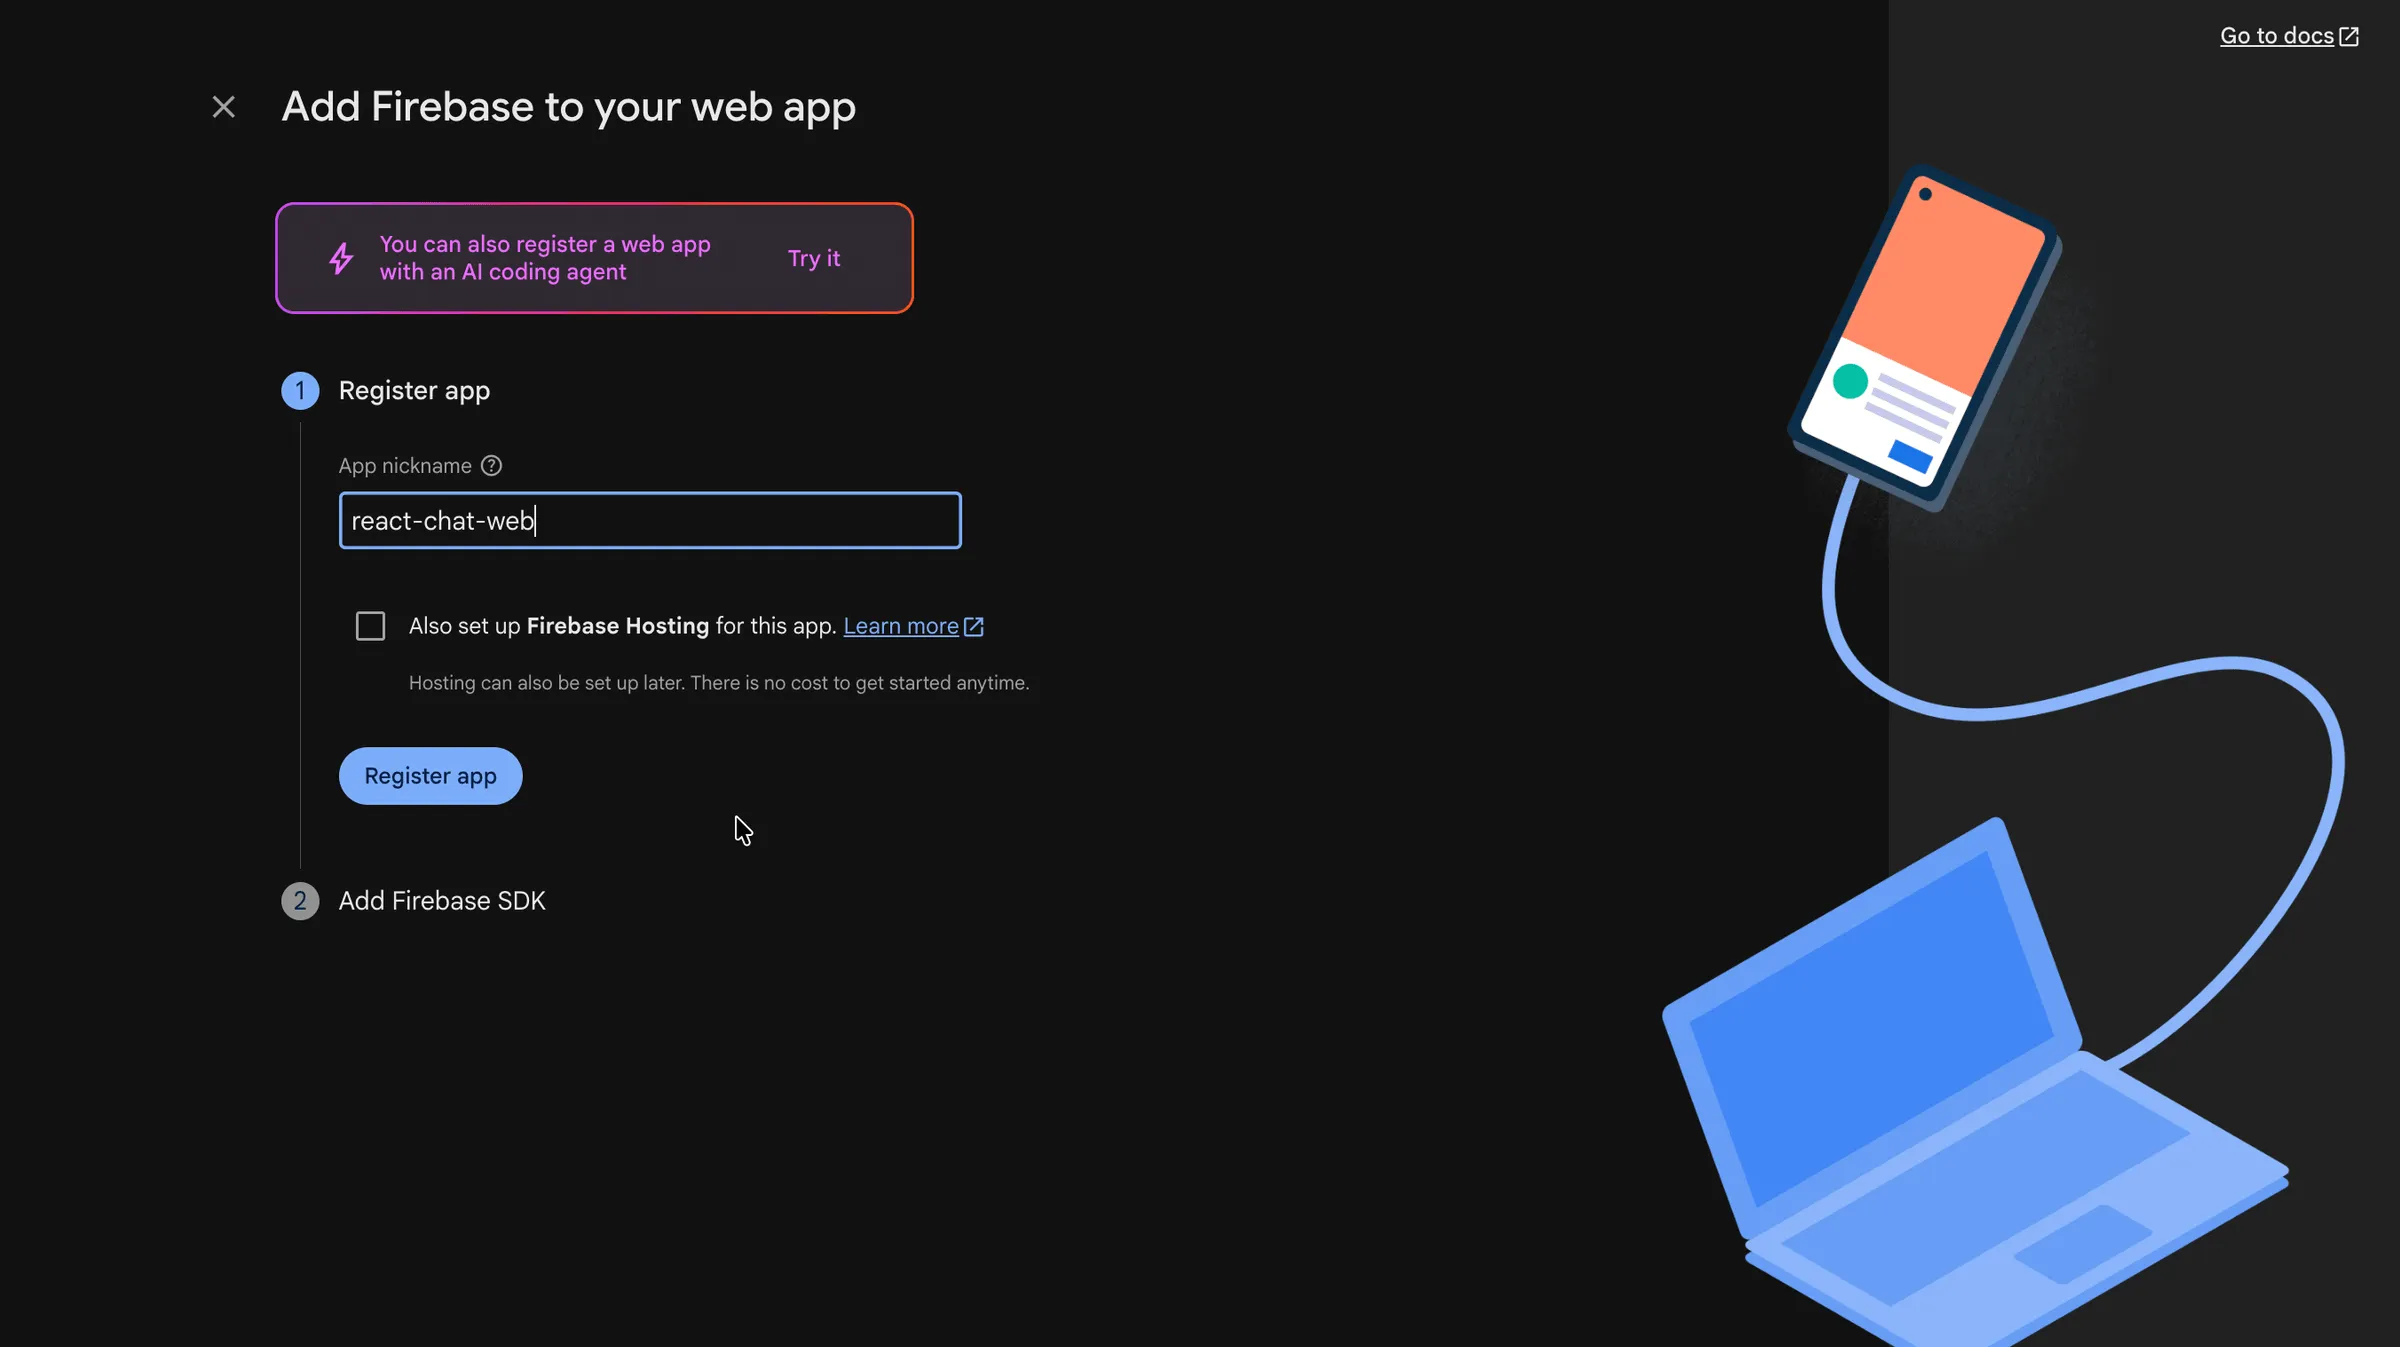
Give your app a nickname (any name you want, like react-chat-web). You don’t need to enable Firebase Hosting right now — we’ll handle deployment separately. Click Register app.
Firebase will now show you a code snippet that looks something like this:
const firebaseConfig = {
  apiKey: "AIza...",
  authDomain: "your-project-12345.firebaseapp.com",
  projectId: "your-project-12345",
  storageBucket: "your-project-12345.appspot.com",
  messagingSenderId: "123456789012",
  appId: "1:123456789012:web:abcdef123456",
  measurementId: "G-XXXXXXXXXX",
};
Copy this snippet and keep it somewhere safe — we’ll need it in a moment when we configure Firebase in our React app. Click Continue to console to go back to the project dashboard.
Enabling Google Authentication
We want users to sign into our app with their Google account. To enable that, head back to the Firebase console.
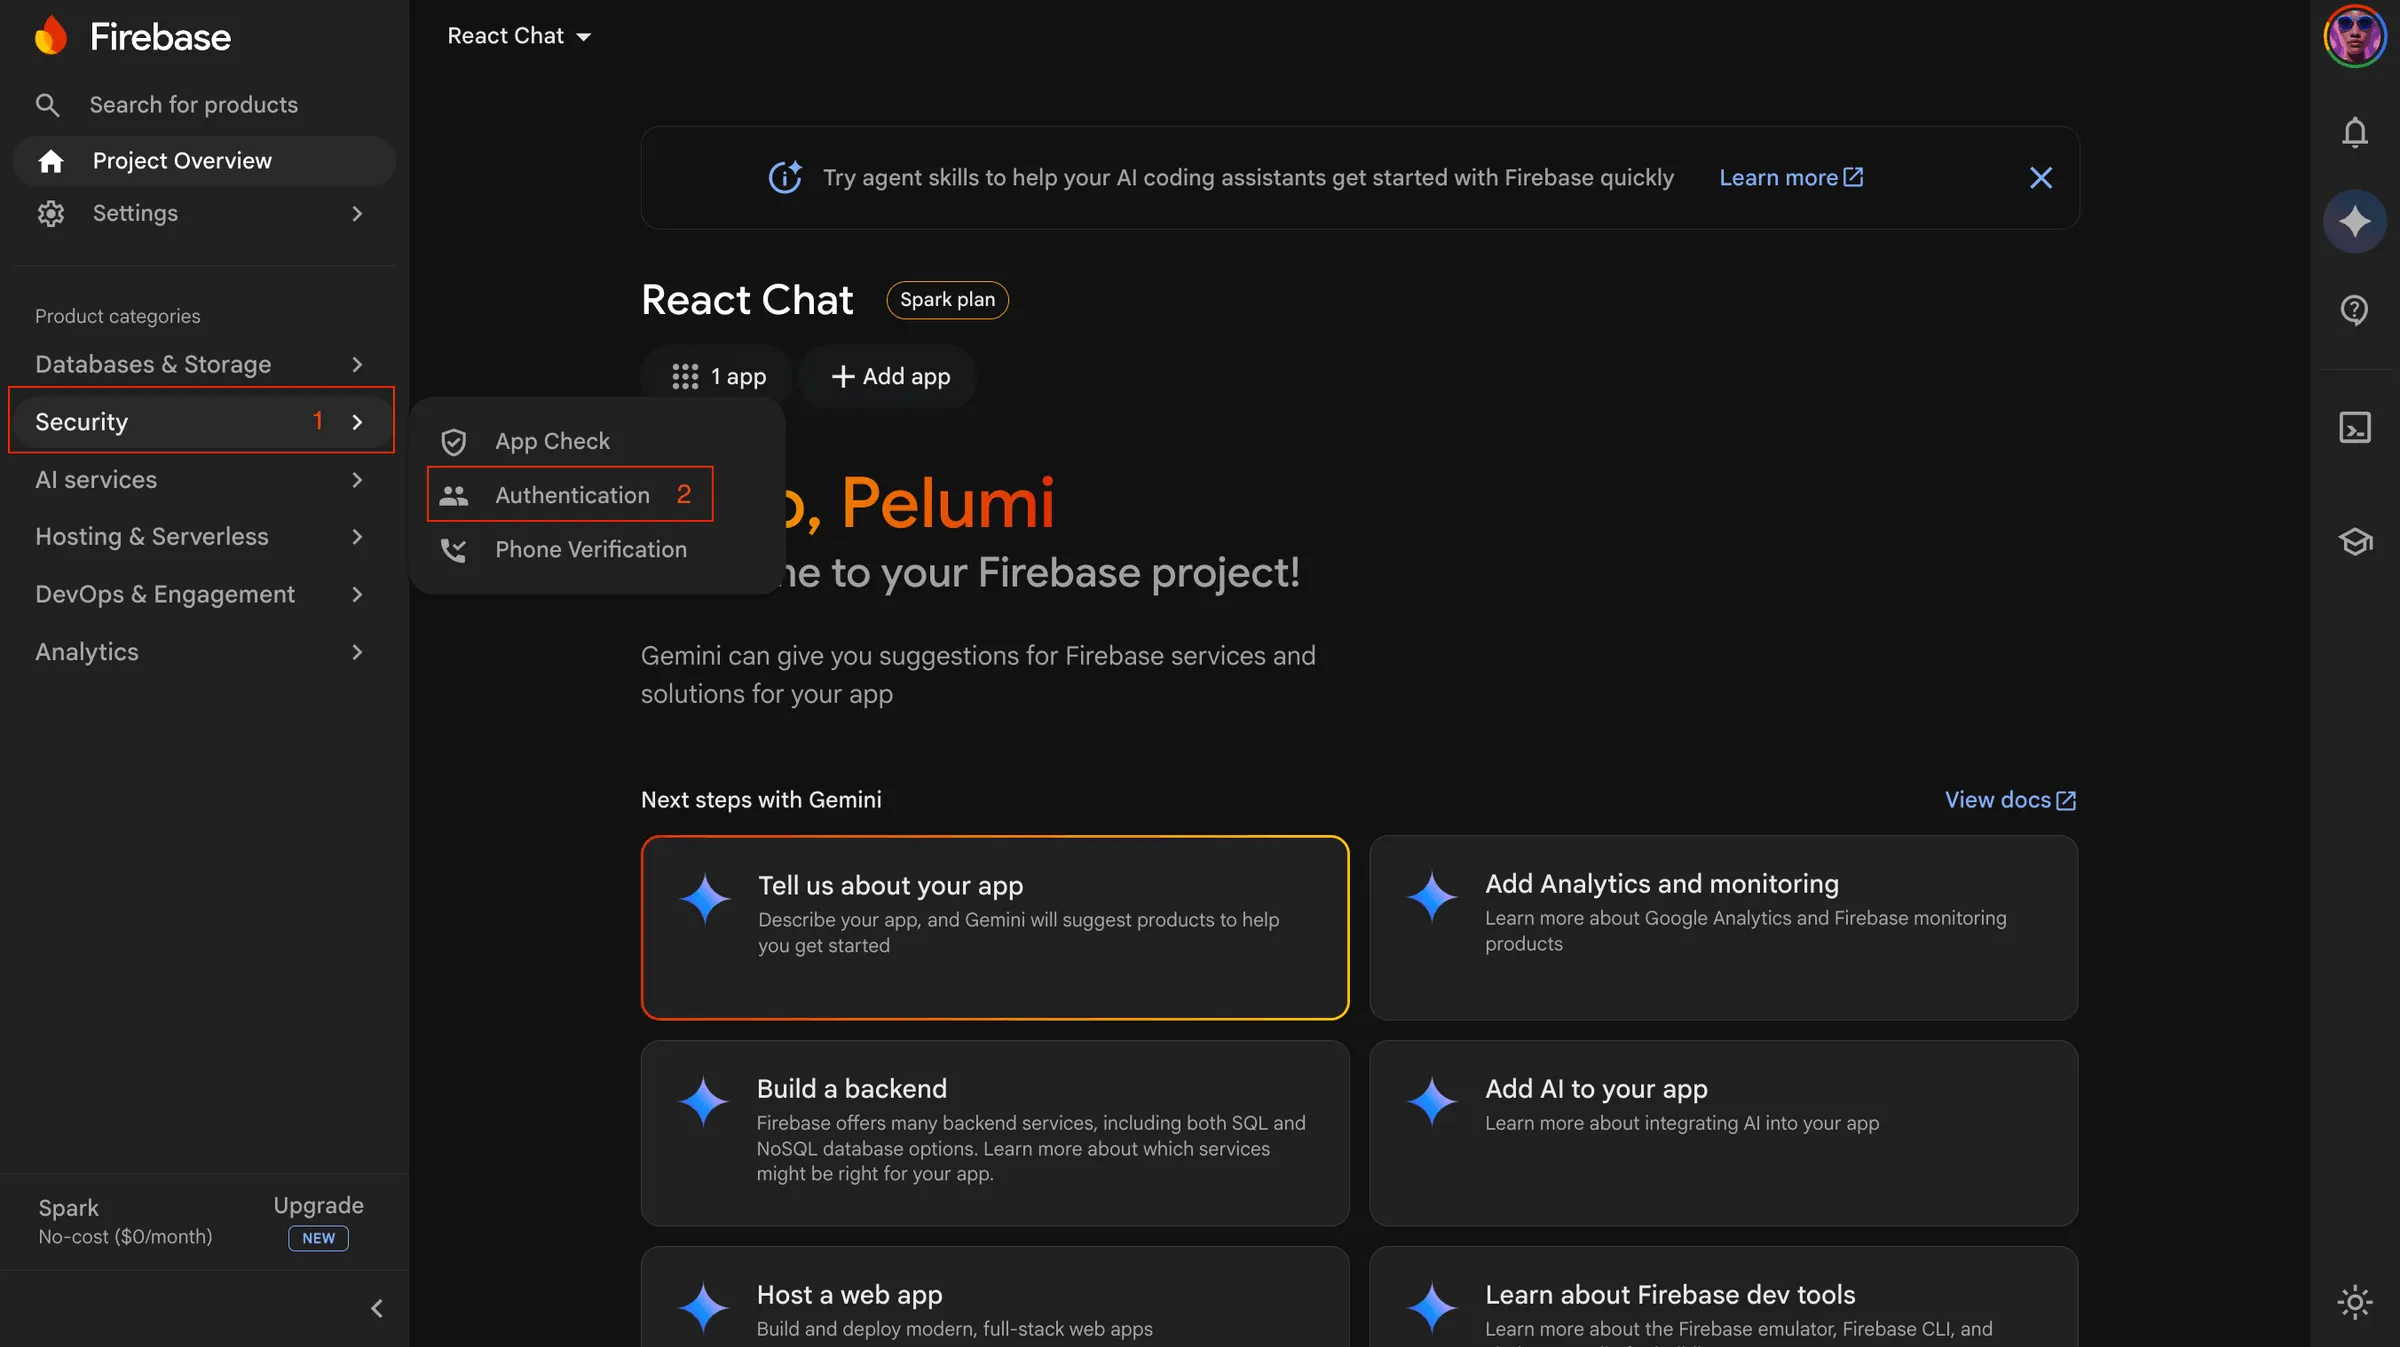
In the left sidebar, click Security → Authentication.
On the Authentication page, click Get started if it’s your first time, or navigate to the Sign-in method tab. You’ll see a list of sign-in providers. Click Google.
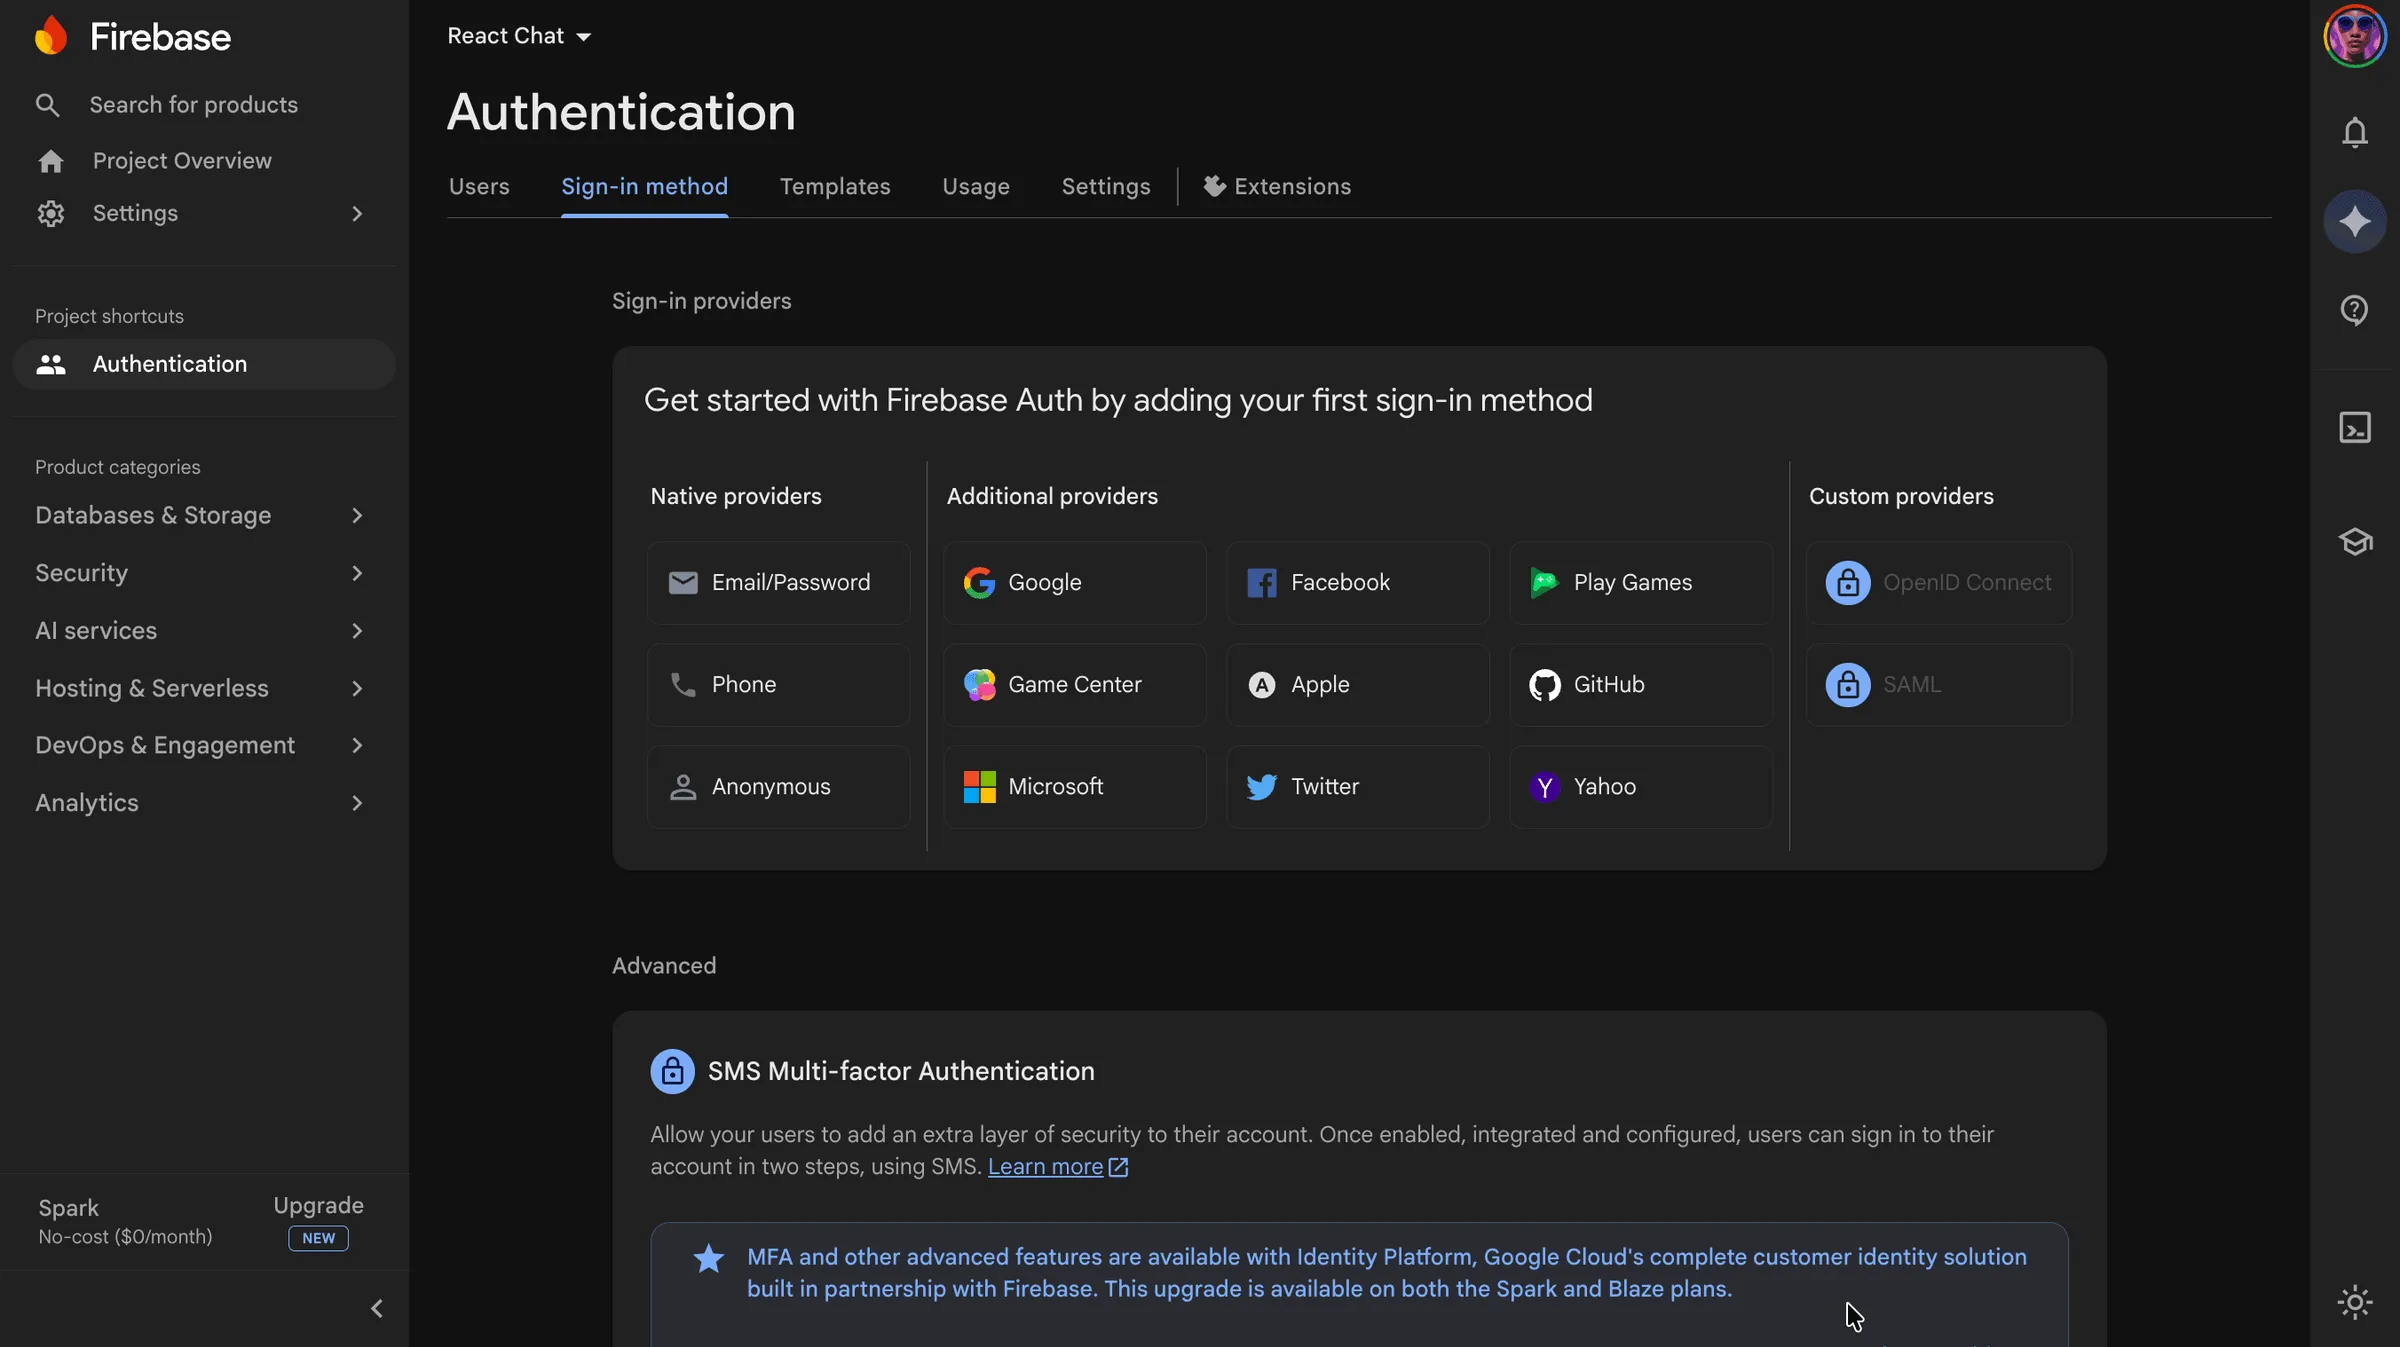
In the dialog that opens, toggle the Enable switch on, pick a project support email from the dropdown (your own email), and click Save.
That’s it for authentication — Google sign-in is now enabled for your project.
Setting up Cloud Firestore
We also need a database. In the left sidebar, click Databases & Storage → Firestore.
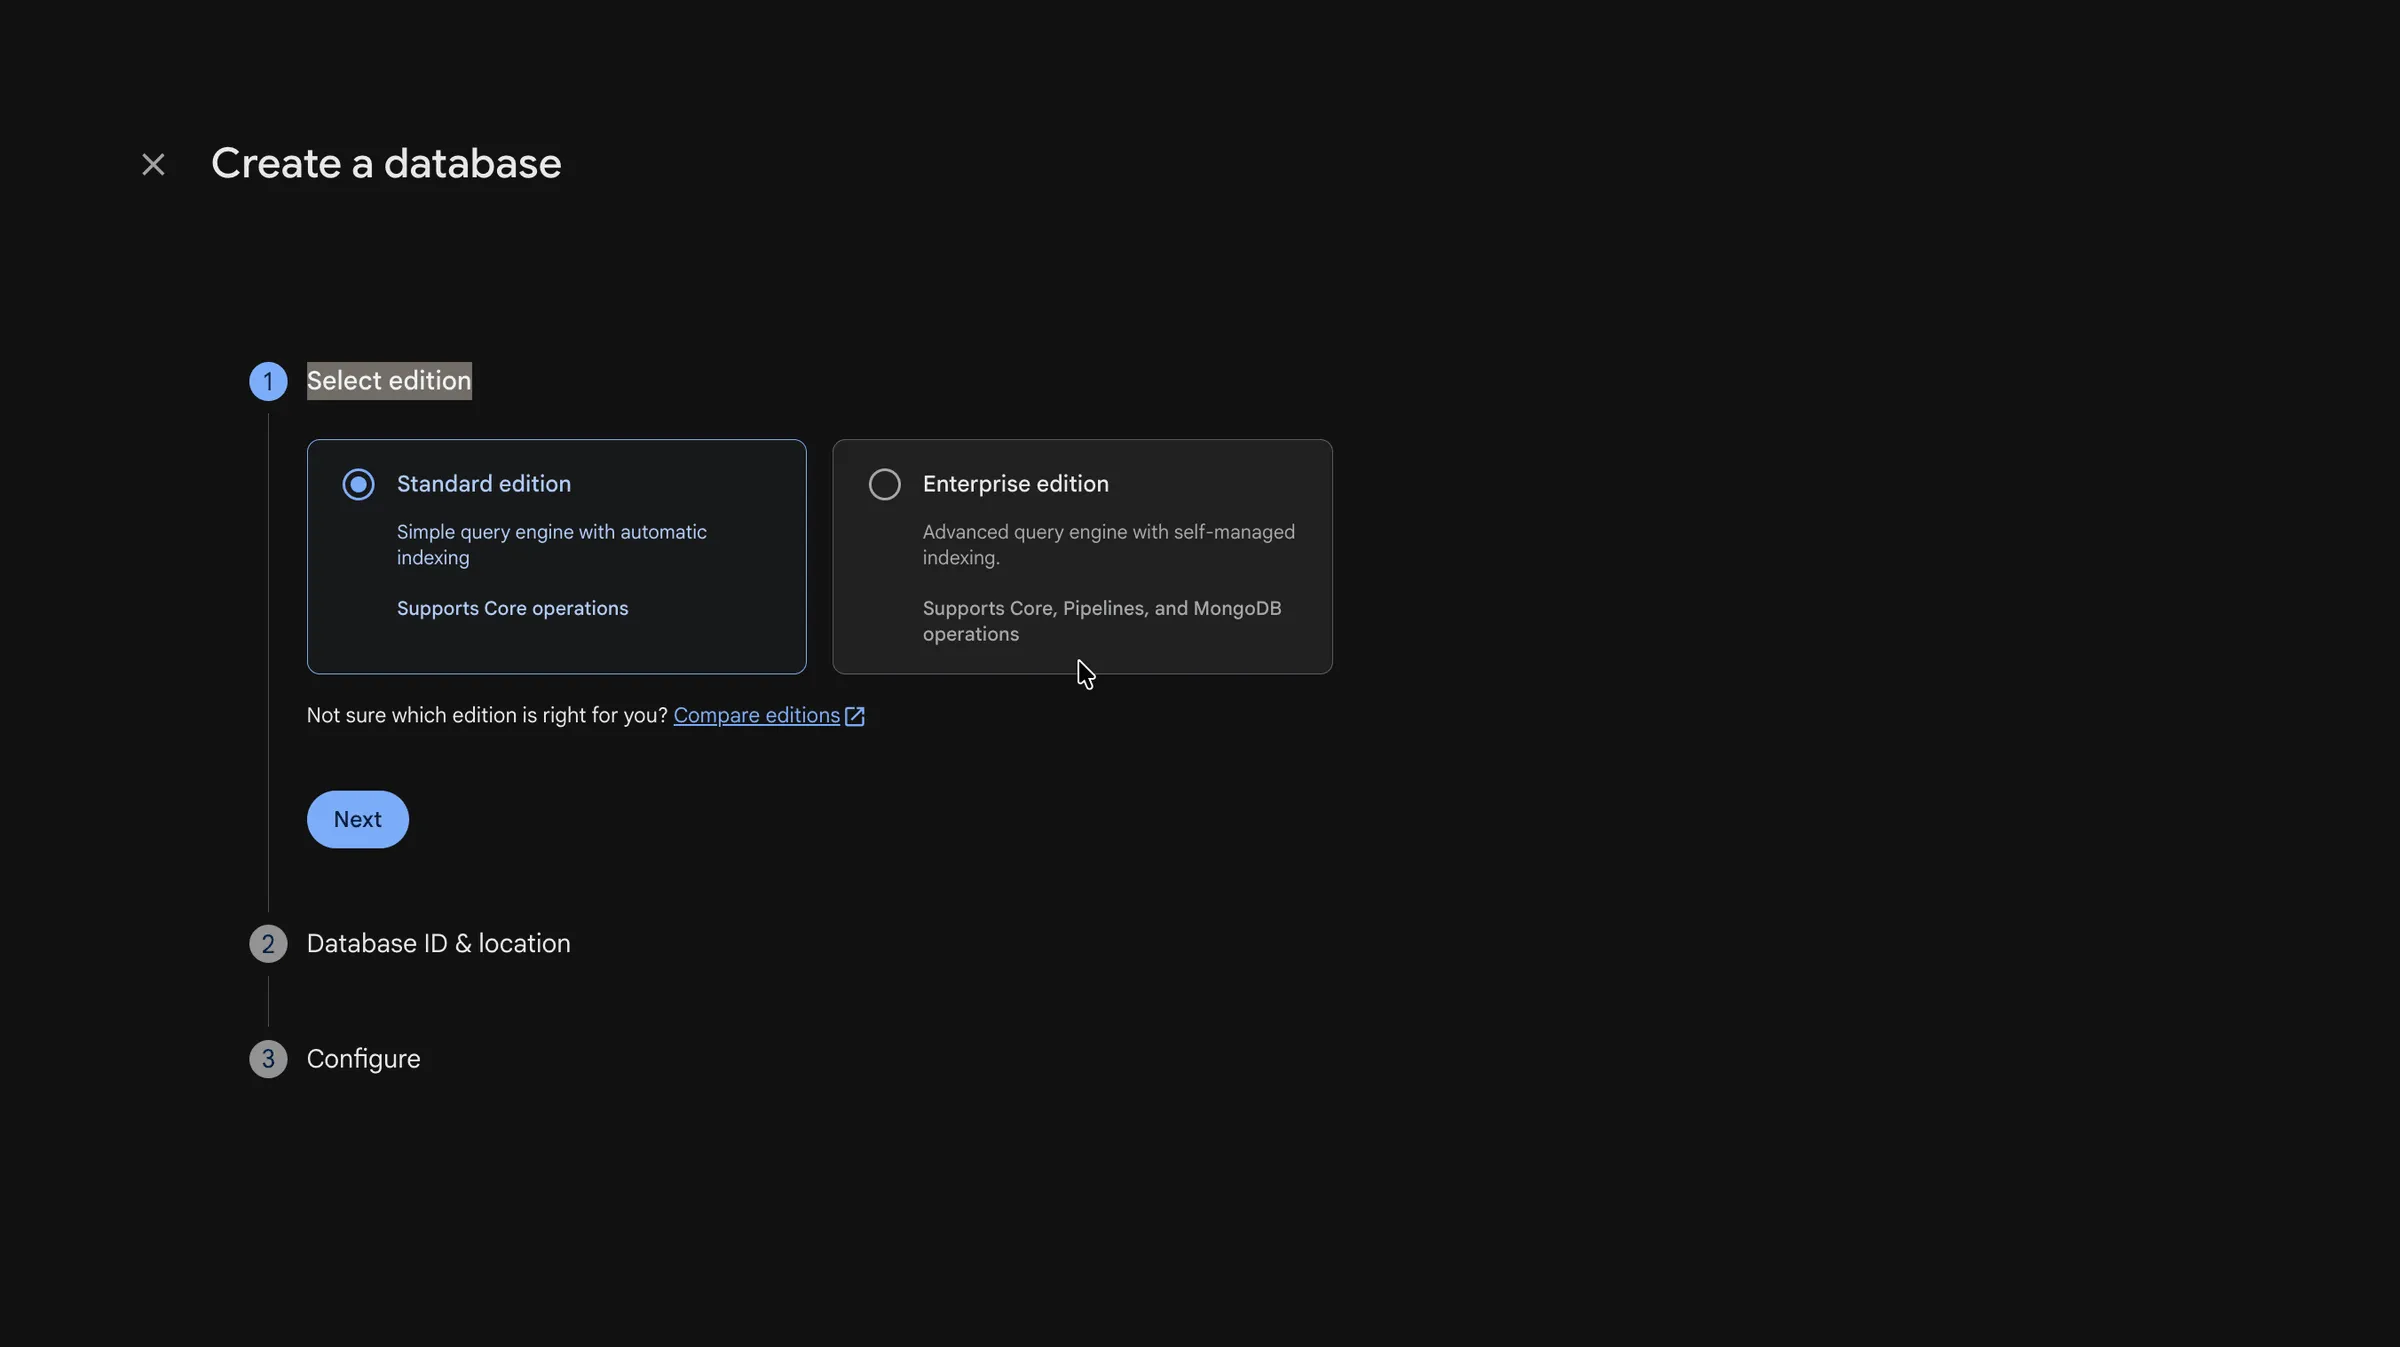
Click Create database.
Firebase will ask you to select an edition — choose “Standard edition” and click Next. Then specify a database ID and location (you can leave the ID blank to use the default). Pick the region closest to your users — this cannot be changed later. Click Next.
Now Firebase will ask whether you want to start in production mode or test mode. Pick test mode for now — it lets any signed-in client read and write for 30 days, which is great while we’re developing. We’ll lock things down properly with security rules at the end of the tutorial.
Click Create and wait for Firestore to provision. When it’s ready, you’ll land on the empty Firestore data viewer.
Our Firebase project is fully set up. Time to go back to React and start writing code.
Configuring Firebase in React
Storing your Firebase config in environment variables
In the root of your project (the same folder as package.json, not inside src), create a new file called .env. Paste the following template into it and replace each value with the matching value from the Firebase config snippet you saw earlier:
# .env
REACT_APP_API_KEY=AIza...your-api-key...
REACT_APP_AUTH_DOMAIN=your-project-12345.firebaseapp.com
REACT_APP_PROJECT_ID=your-project-12345
REACT_APP_STORAGE_BUCKET=your-project-12345.appspot.com
REACT_APP_MESSAGING_SENDER_ID=123456789012
REACT_APP_APP_ID=1:123456789012:web:abcdef123456
REACT_APP_MEASUREMENT_ID=G-XXXXXXXXXXMake sure .env is in your .gitignore so you don’t accidentally commit your keys. Open .gitignore and confirm you have these lines:
# misc
.env
.env.local
.env.development.local
.env.test.local
.env.production.local
If .env isn’t already there, add it now.
Creating the firebase.js file
Inside the src folder, create a new file called firebase.js. This file will initialize the Firebase SDK and export the two services we need — auth for authentication and db for Firestore.
Paste this into src/firebase.js:
// src/firebase.js
import { initializeApp } from "firebase/app";
import { getAuth } from "firebase/auth";
import { getFirestore } from "firebase/firestore";

const firebaseConfig = {
  apiKey: process.env.REACT_APP_API_KEY,
  authDomain: process.env.REACT_APP_AUTH_DOMAIN,
  projectId: process.env.REACT_APP_PROJECT_ID,
  storageBucket: process.env.REACT_APP_STORAGE_BUCKET,
  messagingSenderId: process.env.REACT_APP_MESSAGING_SENDER_ID,
  appId: process.env.REACT_APP_APP_ID,
  measurementId: process.env.REACT_APP_MEASUREMENT_ID,
};

const app = initializeApp(firebaseConfig);

export const auth = getAuth(app);
export const db = getFirestore(app);
Let’s break down what’s happening here:
- We import
initializeAppfromfirebase/app— that’s the function that boots up the Firebase SDK with our project’s config. - We import
getAuthfromfirebase/auth— that’s how we get a reference to the Authentication service. - We import
getFirestorefromfirebase/firestore— that’s how we get a reference to the Firestore database. - We build a
firebaseConfigobject using the values from our.envfile (read viaprocess.env). - We pass that config to
initializeAppto get our initialized Firebase app. - We export two things:
auth(which we’ll use for sign-in, sign-out, and tracking the current user) anddb(which we’ll use to read and write Firestore documents).
Now restart your dev server (stop it with Ctrl+C and run npm start again) so React picks up the new .env file. The app should still look the same in the browser — nothing visible has changed yet — but Firebase is now initialized and ready to use.
Planning the Firestore Data Model
Before we start writing data, it’s worth pausing to talk about how we’re going to structure our data in Firestore. The original 2023 article only had one global chatroom and used a single flat messages collection. This time we’re supporting multiple rooms (some public, some private), so the data model is a little more interesting.
Here’s the structure we’ll use:
rooms (collection)
├── general (document)
│   ├── name: "General"
│   ├── isPrivate: false
│   ├── createdAt: <timestamp>
│   ├── createdBy: "system"
│   └── messages (subcollection)
│       ├── msg1 (document)
│       │   ├── text: "Hello!"
│       │   ├── name: "Alice"
│       │   ├── avatar: "https://..."
│       │   ├── uid: "abc123"
│       │   └── createdAt: <timestamp>
│       └── msg2 (document) ...
├── {auto-id} (document) — a user-created room
│   ├── name: "Design Sprint"
│   ├── isPrivate: true
│   ├── joinCode: "AB12-CD34"
│   ├── joinCodeLower: "ab12-cd34"
│   ├── createdAt: <timestamp>
│   └── createdBy: "uid-of-creator"
└── ... more rooms

memberships (collection)
├── {roomId}_{uid} (document)
│   ├── roomId: "..."
│   ├── uid: "..."
│   └── joinedAt: <timestamp>
└── ...
A few notes about why we organized it this way:
-
roomsis a top-level collection. Every chat room is a single document in this collection. Each document stores metadata about the room — its name, whether it’s private, the join code (only for private rooms), who created it, and when. -
messagesis a subcollection inside each room document. This is the big change from the original article. Instead of one global flat collection, every room has its own messages. The advantage is that when we load messages for a room, we only fetch that room’s messages — we don’t have to filter or paginate over messages from every room ever. -
membershipsis a separate top-level collection used only for private rooms. Each document represents a single user’s membership in a single room. We use a deterministic document ID of the form{roomId}_{uid}so we can write or delete a membership without first looking it up. This collection lets us quickly answer “which private rooms can this user see?” by querying memberships whereuid == currentUser.uid. -
joinCodeLowerstores a lowercase copy of the join code so we can do case-insensitive lookups (Firestore doesn’t have a case-insensitive query operator).
With the data model in mind, let’s start wiring up real code.
The newsletter
Enjoying this build?
Join Timonwa's Notes for monthly React, Firebase, and web-dev tutorials delivered straight to your inbox.
Authenticating Users with Google
We want our app to behave like this:
- Signed-out users see the Welcome page with a Google sign-in button.
- Signed-in users see the chat layout (rooms list, chat box, create/join panel) and an avatar + “Sign Out” button in the navbar.
Right now the starter fakes this: App.js holds a placeholder user boolean and passes onSignIn/onSignOut callbacks down to NavBar and Welcome so the buttons can flip it. We’re going to tear that placeholder out and let each component read the real auth state directly from Firebase.
The single source of truth for “is the user signed in?” becomes react-firebase-hooks/auth’s useAuthState hook, which subscribes to Firebase’s auth state.
We’ll touch three files: NavBar.js, Welcome.js, and App.js.
Updating the NavBar component
Let’s start with the navbar. Open src/components/NavBar.js. Right now it takes user, onSignIn, and onSignOut as props from App and just renders whichever button matches that placeholder state. We’ll drop the props and let the navbar track the real user and handle sign-in and sign-out itself.
Add these imports at the top of the file:
import { auth } from "../firebase";
import { useAuthState } from "react-firebase-hooks/auth";
import { GoogleAuthProvider, signInWithPopup } from "firebase/auth";
import Avatar from "./Avatar";authis the Auth service we exported fromfirebase.js.useAuthStateis the React hook fromreact-firebase-hooks— it returns the currently signed-in user (ornullif no one is signed in) and automatically re-renders the component whenever the auth state changes.GoogleAuthProviderandsignInWithPopupare how we trigger a Google sign-in popup.Avataris the reusable avatar component we’ll use to show the signed-in user’s picture.
Now replace the prop-based signature with a version that reads the user from useAuthState and defines real googleSignIn and signOut functions:
const NavBar = () => {
  const [user] = useAuthState(auth);

  const googleSignIn = () => {
    const provider = new GoogleAuthProvider();
    signInWithPopup(auth, provider);
  };

  const signOut = () => {
    auth.signOut();
  };

  // ..rest of the component
};
useAuthState(auth) returns a tuple — the first element is the user. When no one is signed in, it’s null. When a user is signed in, it’s a Firebase User object that contains things like uid, displayName, email, and photoURL.
googleSignIn creates a Google auth provider and triggers a popup for the user to pick their Google account. After they pick one, Firebase saves the resulting credentials in auth.currentUser and useAuthState re-runs with the new user.
signOut clears those credentials.
Finally, update the JSX so the navbar shows the user’s avatar when they’re signed in, and switches the right-hand button between “Sign in with Google” and “Sign Out”:
return (
  <nav className="nav-bar">
    <div className="nav-bar__left">
      <h1>React Chat</h1>
      {user && (
        <Avatar
          photoURL={user.photoURL}
          name={user.displayName}
          size={32}
          className="nav-bar__avatar"
        />
      )}
    </div>
    {user ? (
      <button onClick={signOut} className="sign-out" type="button">
        Sign Out
      </button>
    ) : (
      <button className="sign-in" type="button" onClick={googleSignIn}>
        <img src={GoogleSignin} alt="sign in with google" type="button" />
      </button>
    )}
  </nav>
);
Updating the Welcome component
The Welcome page also has a Google sign-in button (the big one in the middle). It currently calls an onSignIn prop passed down from App; let’s remove that prop and give it its own real sign-in, just like the navbar.
Open src/components/Welcome.js and add these imports at the top:
import { auth } from "../firebase";
import { GoogleAuthProvider, signInWithPopup } from "firebase/auth";
Then drop the onSignIn prop from the component signature and add a real googleSignIn function in its place:
const Welcome = () => {
  const blogUrl = "https://tech.timonwa.com/blog";
  const termsUrl = "https://tech.timonwa.com/terms";

  const googleSignIn = () => {
    const provider = new GoogleAuthProvider();
    signInWithPopup(auth, provider);
  };

  // ...rest of the component
};
Finally, point the sign-in button at the new function — change its onClick={onSignIn} to onClick={googleSignIn}. The rest of the JSX (the welcome text, demo room codes, terms link) stays the same.
Updating App.js
App.js is what decides whether to show the Welcome page or the chat layout. Right now it holds the placeholder auth: a user boolean, handleSignIn/handleSignOut functions, and the props it passes down to NavBar and Welcome. Let’s rip all of that out and drive the app off the real auth state instead.
Open src/App.js. The auth-related parts currently look like this:
// src/App.js — before
import "./App.css";
import NavBar from "./components/NavBar";
import ChatBox from "./components/ChatBox";
import Welcome from "./components/Welcome";
import RoomsListPanel from "./components/RoomsListPanel";
import RoomsActionsPanel from "./components/RoomsActionsPanel";
import { useState } from "react";

function App() {
  const [user, setUser] = useState(false);
  // ...activeRoom and openPanel state...

  const handleSignIn = () => setUser(true);
  const handleSignOut = () => {
    setUser(false);
    setOpenPanel(null);
  };

  return (
    <div className="App">
      <NavBar user={user} onSignIn={handleSignIn} onSignOut={handleSignOut} />
      {!user ? <Welcome onSignIn={handleSignIn} /> : /* chat layout */}
      {/* ... */}
    </div>
  );
}
At the top of the file, keep the useState import (we still need it for activeRoom and openPanel) and add these imports:
import { auth } from "./firebase";
import { useAuthState } from "react-firebase-hooks/auth";
Then make three changes:
- Replace
const [user, setUser] = useState(false);withconst [user] = useAuthState(auth);. - Delete the
handleSignInandhandleSignOutfunctions —NavBarandWelcomenow sign in and out on their own. - Drop the auth props from both components so they render simply as
<NavBar />and<Welcome />.
With that, the auth gate runs off the real Firebase user — when useAuthState returns null, the Welcome page is rendered; when it returns a real user, the three-panel chat layout is rendered.
Save the file and head back to your browser. Click Sign in with Google, pick your Google account, and you should see the chat layout appear with your avatar in the top-left.
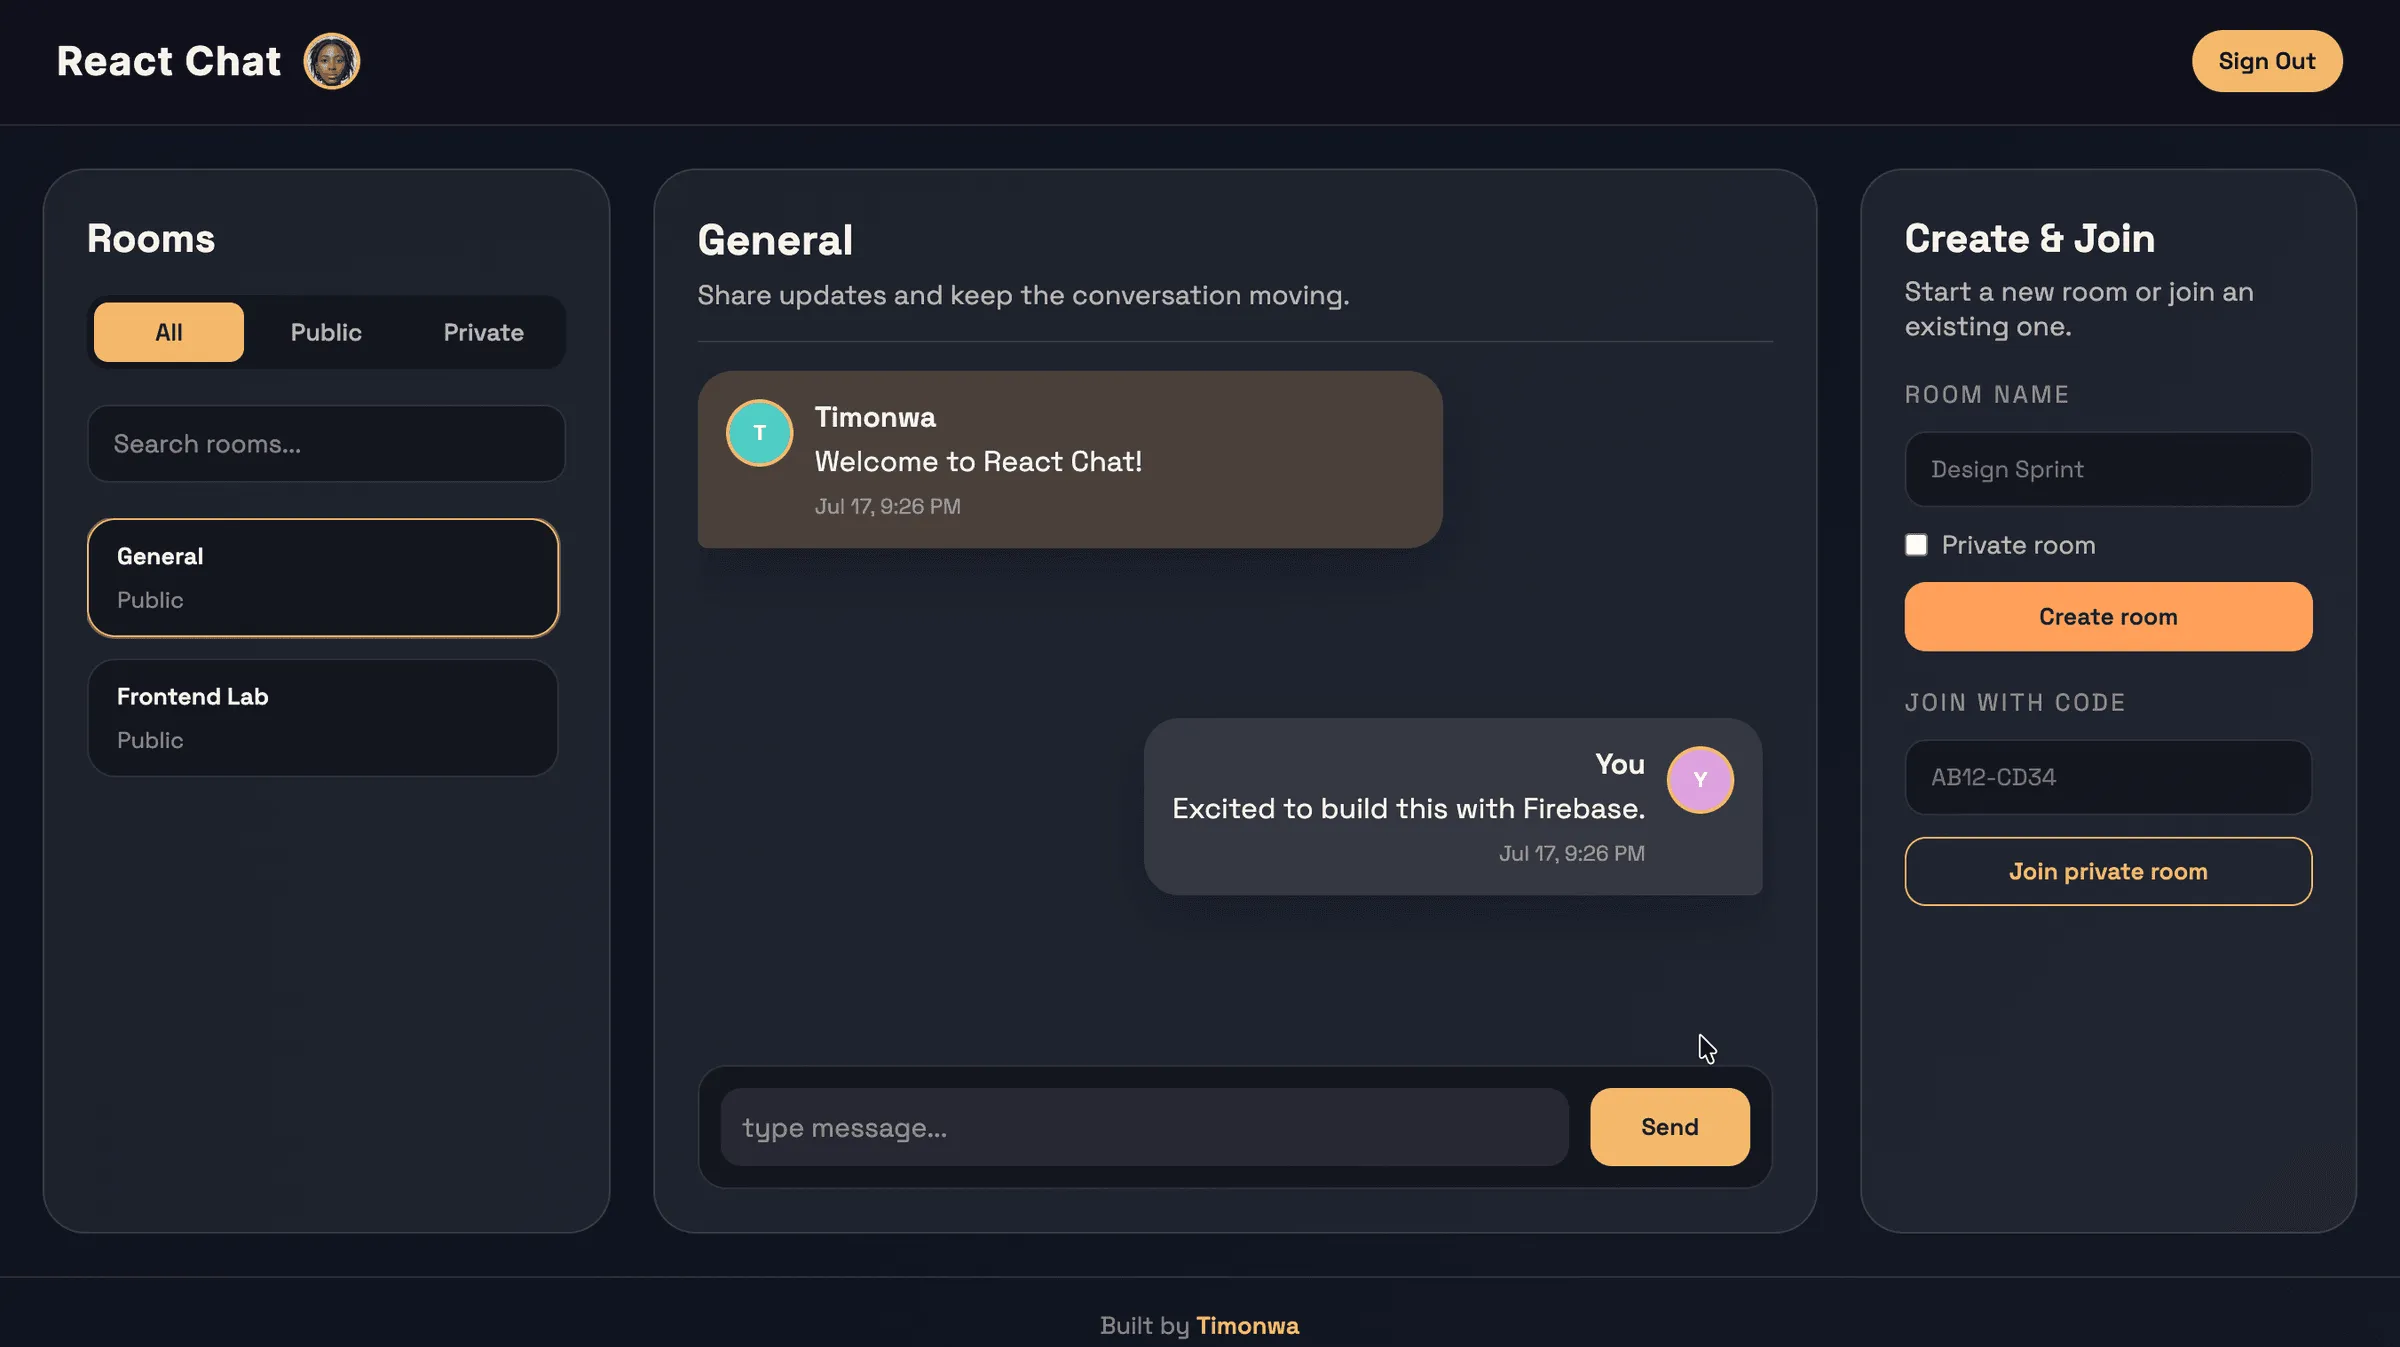
The “Sign Out” button works too — click it and you’re back on the Welcome screen.
Ensuring the “General” Room Exists
Every chat app needs a default room everyone can join. We want there to always be a room called “General” with the document ID general. The easiest way to guarantee that is to check on app start whether the document exists, and create it if it doesn’t.
We’ll do that in App.js using useEffect.
Open src/App.js and update the imports at the top so they look like this:
import "./App.css";
import NavBar from "./components/NavBar";
import ChatBox from "./components/ChatBox";
import Welcome from "./components/Welcome";
import RoomsListPanel from "./components/RoomsListPanel";
import RoomsActionsPanel from "./components/RoomsActionsPanel";
import { useEffect, useState } from "react";
import { auth, db } from "./firebase";
import { useAuthState } from "react-firebase-hooks/auth";
import { doc, getDoc, setDoc, serverTimestamp } from "firebase/firestore";
We’re pulling in four new Firestore helpers:
doc(db, "rooms", "general")returns a reference to the document atrooms/general. It doesn’t fetch anything yet — it’s just a pointer.getDoc(ref)actually fetches the document and returns a snapshot.setDoc(ref, data)writes data to the document at the given reference. If the document doesn’t exist it creates it; if it does, it overwrites it.serverTimestamp()returns a placeholder that Firestore replaces with the server’s timestamp when the document is written. This is the right way to set “created at” times — never usenew Date()for that, because the client’s clock might be different from the server’s clock and you want a consistent timestamp.
Now inside the App function, just below the useState for activeRoom, add this useEffect:
// Ensure the "general" room exists in Firestore once the user is signed in.
useEffect(() => {
  if (!user) return;

  const ensureGeneralRoom = async () => {
    const generalRef = doc(db, "rooms", "general");
    const generalSnap = await getDoc(generalRef);
    if (!generalSnap.exists()) {
      await setDoc(generalRef, {
        name: "General",
        isPrivate: false,
        createdAt: serverTimestamp(),
        createdBy: "system",
      });
    } else {
      const data = generalSnap.data();
      setActiveRoom(prev => ({
        ...prev,
        name: data.name || "General",
        isPrivate: Boolean(data.isPrivate),
      }));
    }
  };

  ensureGeneralRoom();
}, [user]);
Here’s what the effect does:
- It waits until someone is signed in —
if (!user) return;bails out otherwise — and runs when the auth state becomes available (the[user]dependency). Our Firestore rules require an authenticated request, so running it on mount before sign-in would fail with “Missing or insufficient permissions.” - It builds a reference to the
rooms/generaldocument. - It calls
getDocto check if it exists. - If it doesn’t exist, it calls
setDocto create it with the default fields. - If it does exist, it updates the local
activeRoomstate to match whatever name and privacy status are stored in Firestore (just in case you ever rename General manually).
The complete App.js should now look like this:
// src/App.js — after
import "./App.css";
import NavBar from "./components/NavBar";
import ChatBox from "./components/ChatBox";
import Welcome from "./components/Welcome";
import RoomsListPanel from "./components/RoomsListPanel";
import RoomsActionsPanel from "./components/RoomsActionsPanel";
import { useEffect, useState } from "react";
import { auth, db } from "./firebase";
import { useAuthState } from "react-firebase-hooks/auth";
import { doc, getDoc, setDoc, serverTimestamp } from "firebase/firestore";

function App() {
  const [user] = useAuthState(auth);
  const [activeRoom, setActiveRoom] = useState({
    id: "general",
    name: "General",
    isPrivate: false,
  });

  // Ensure the "general" room exists in Firestore once the user is signed in.
  useEffect(() => {
    if (!user) return;

    const ensureGeneralRoom = async () => {
      const generalRef = doc(db, "rooms", "general");
      const generalSnap = await getDoc(generalRef);
      if (!generalSnap.exists()) {
        await setDoc(generalRef, {
          name: "General",
          isPrivate: false,
          createdAt: serverTimestamp(),
          createdBy: "system",
        });
      } else {
        const data = generalSnap.data();
        setActiveRoom(prev => ({
          ...prev,
          name: data.name || "General",
          isPrivate: Boolean(data.isPrivate),
        }));
      }
    };

    ensureGeneralRoom();
  }, [user]);

  // Which side panel is open as a drawer on small screens: "rooms" | "actions" | null.
  const [openPanel, setOpenPanel] = useState(null);

  const handleSelectRoom = room => {
    setActiveRoom(room);
    setOpenPanel(null); // close the drawer after picking a room on mobile
  };

  return <div className="App">{/* ... rest of the JSX ... */}</div>;
}

export default App;
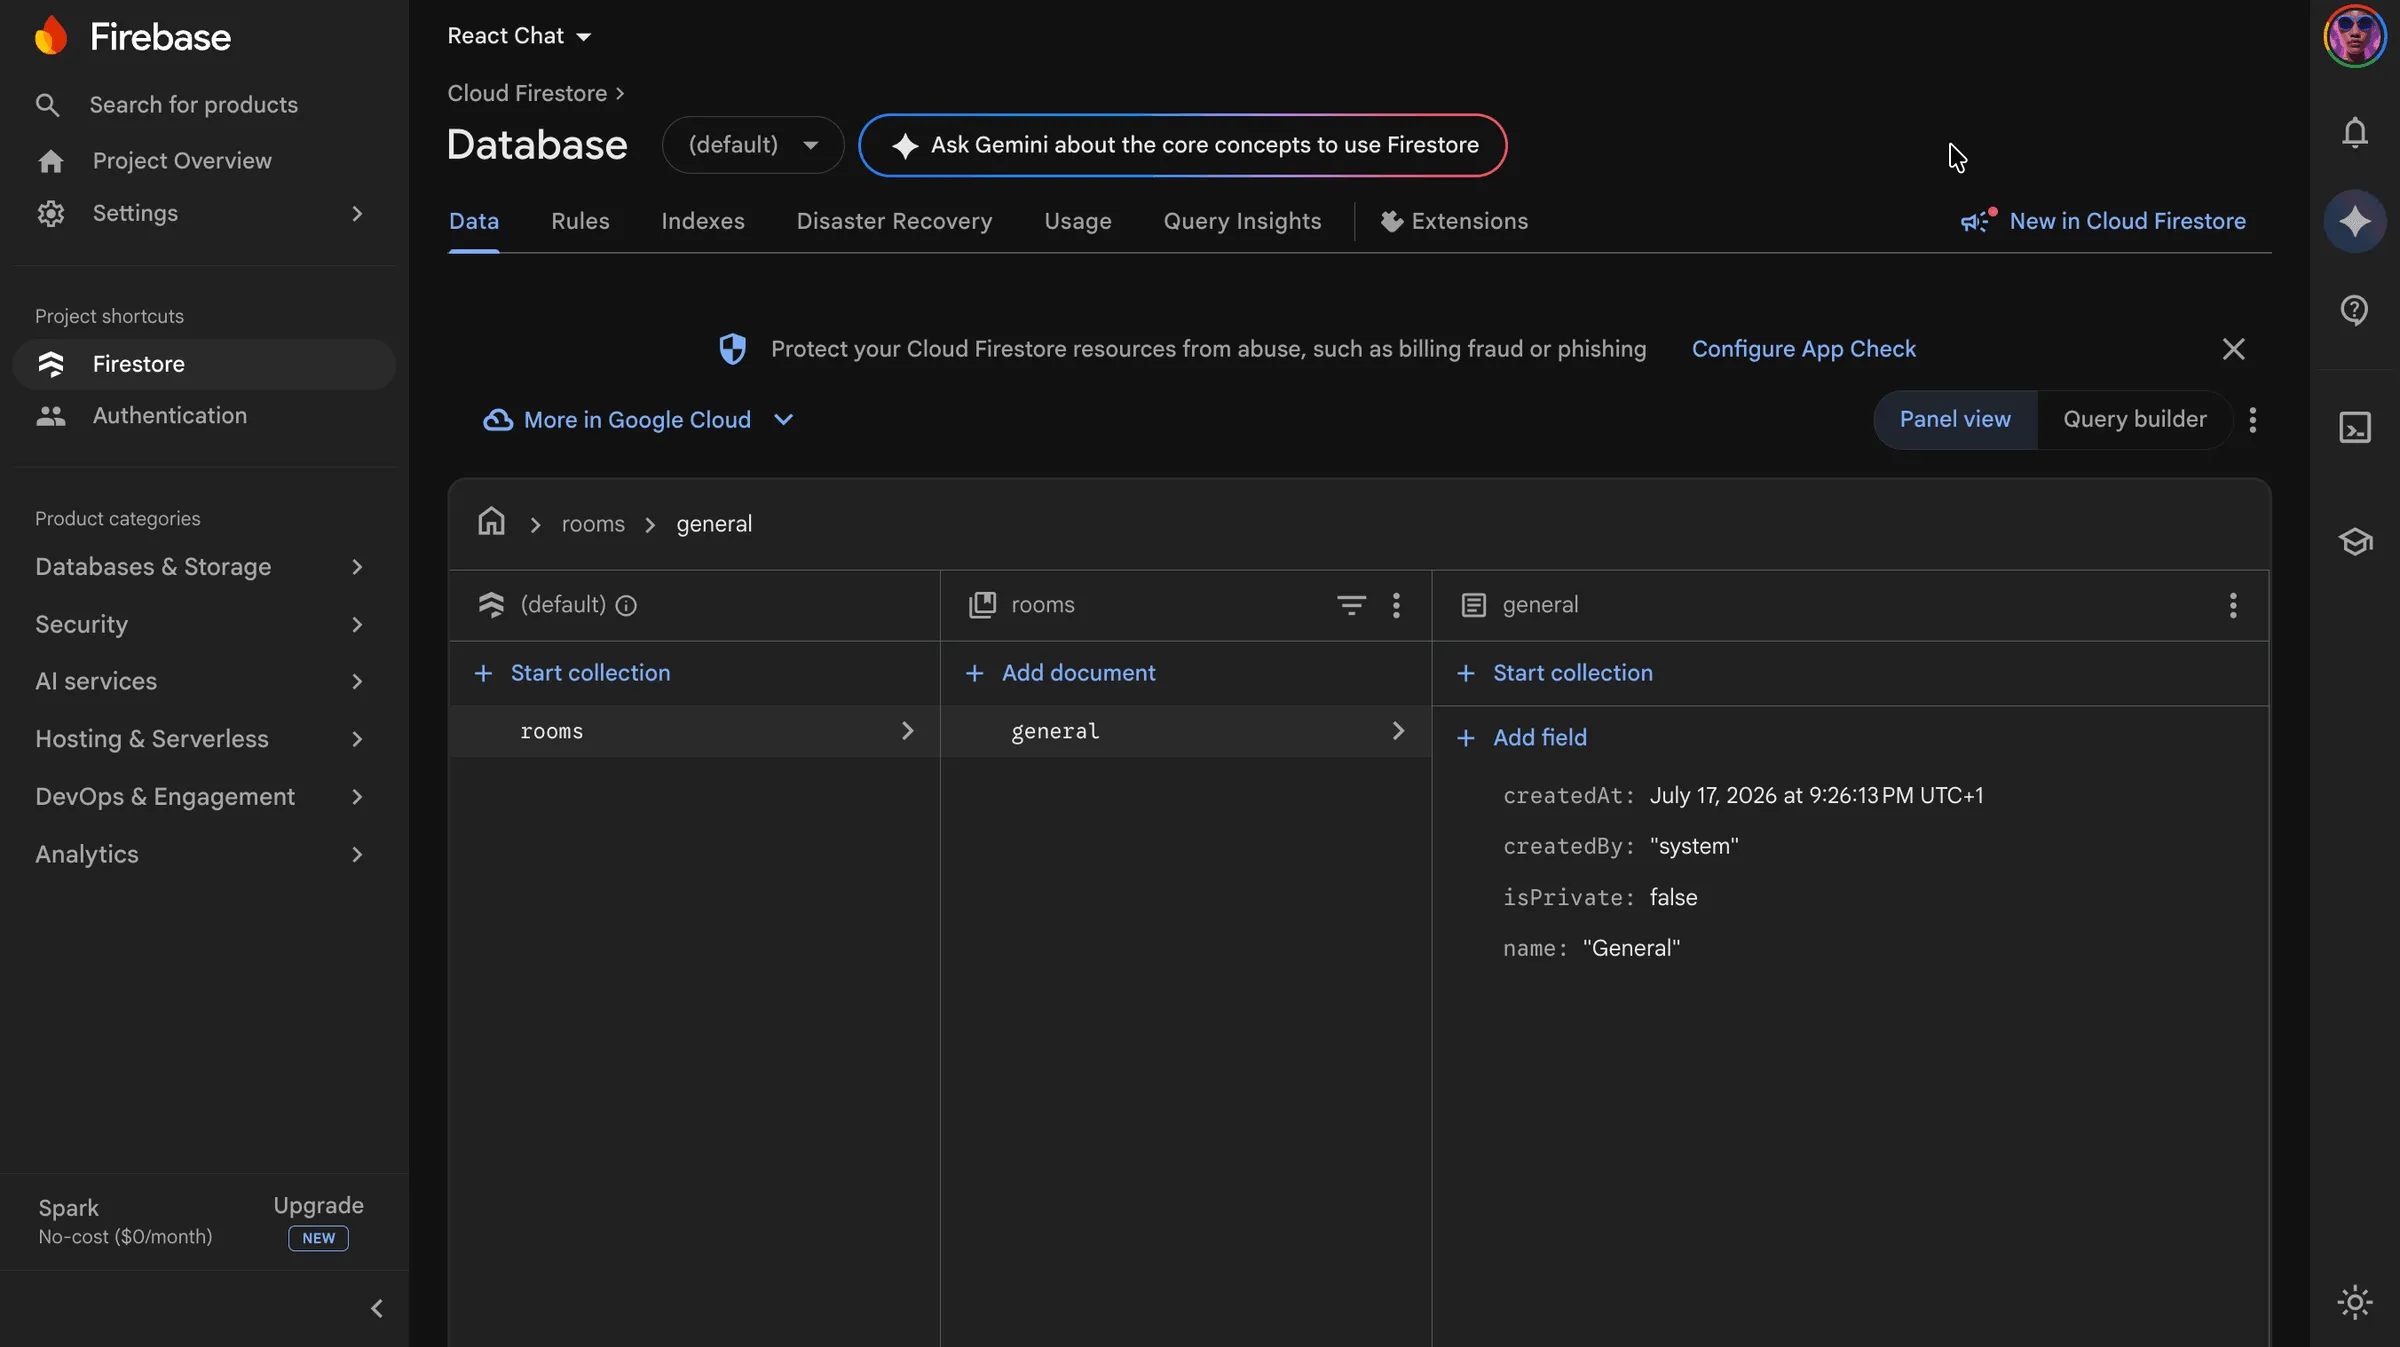
Save the file. The first time you reload the page after signing in, the app will create the General room in Firestore. Go to your Firebase console → Firestore, refresh, and you should see a rooms collection with a single general document inside it.
Loading Public and Private Rooms in Real-Time
Right now, the RoomsListPanel component uses a hardcoded array of rooms inside useMemo. We’re going to swap that out for a live Firestore subscription so the list always reflects what’s actually in the database.
We also need to load the user’s memberships — that’s how we know which private rooms they’re allowed to see in the list.
Open src/components/RoomsListPanel.js. The current top of the file looks like this:
import React, { useMemo, useState } from "react";

const RoomsListPanel = ({ activeRoomId, onSelectRoom }) => {
  const [searchTerm, setSearchTerm] = useState("");
  const [activeTab, setActiveTab] = useState("all");
  const [memberRoomIds, setMemberRoomIds] = useState(["general"]);

  const rooms = useMemo(
    () => [
      { id: "general", name: "General", isPrivate: false },
      // ... lots of hardcoded rooms ...
    ],
    []
  );

  // ...
};
We’re going to replace the imports and the top half of the component. Update the import line to:
import React, { useEffect, useMemo, useState } from "react";
import {
  collection,
  query,
  orderBy,
  where,
  onSnapshot,
  doc,
  setDoc,
  deleteDoc,
  serverTimestamp,
} from "firebase/firestore";
import { useAuthState } from "react-firebase-hooks/auth";
import { auth, db } from "../firebase";
That’s a lot of imports — let’s go through them:
collection(db, "rooms")returns a reference to a collection.query(collectionRef, ...constraints)builds a query you can pass toonSnapshotorgetDocs.orderBy("createdAt")sorts the query by thecreatedAtfield, oldest first.where("uid", "==", user.uid)filters a query.onSnapshot(query, callback)is the real-time listener. The callback fires once immediately with the current data and again every time anything matching the query changes. It returns anunsubscribefunction we can call to stop listening.doc(db, "memberships", id)returns a reference to a single document.setDocanddeleteDocwrite or delete a document at a reference.serverTimestampwe’ve seen before.
Now inside the component, delete the hardcoded the memberRoomIds state and and rooms useMemo. Replace them with these two state variables, two useEffect hooks, and the useAuthState hook:
const [memberships, setMemberships] = useState([]);
const [rooms, setRooms] = useState([]);
const [user] = useAuthState(auth);

// Get the list of room IDs that the user is a member of
useEffect(() => {
  const roomsQuery = query(collection(db, "rooms"), orderBy("createdAt"));
  const unsubscribe = onSnapshot(roomsQuery, snapshot => {
    const nextRooms = snapshot.docs.map(room => ({
      id: room.id,
      ...room.data(),
    }));
    setRooms(nextRooms);
  });

  return () => unsubscribe();
}, []);

// Get the list of room IDs that the user is a member of
useEffect(() => {
  if (!user) {
    setMemberships([]);
    return undefined;
  }

  const membershipQuery = query(
    collection(db, "memberships"),
    where("uid", "==", user.uid)
  );

  const unsubscribe = onSnapshot(membershipQuery, snapshot => {
    const nextMemberships = snapshot.docs.map(membership => ({
      id: membership.id,
      ...membership.data(),
    }));
    setMemberships(nextMemberships);
  });

  return () => unsubscribe();
}, [user]);
The first effect listens to all rooms in the database, ordered by creation time. Every time the rooms collection changes (a new room is added, or one is renamed), onSnapshot fires, we rebuild the rooms array, and React re-renders the panel.
The second effect listens to just this user’s memberships. We use where("uid", "==", user.uid) to filter the query. Whenever the user signs out, we clear memberships and stop there (returning undefined from the effect just means “no cleanup needed”).
Now update membershipSet to use the new memberships state:
const membershipSet = useMemo(
  () => new Set(memberships.map(membership => membership.roomId)),
  [memberships]
);
The rest of the filtering logic (filteredRooms) stays exactly the same — it works off rooms, membershipSet, activeTab, and searchTerm.
Joining and leaving private rooms
The component already has joinRoom and leaveRoom functions that updated the local state. We need to swap those for real Firestore writes.
Replace the existing joinRoom with:
const joinRoom = async (roomId, event) => {
  event.stopPropagation();
  if (!user) {
    return;
  }

  await setDoc(doc(db, "memberships", `${roomId}_${user.uid}`), {
    roomId,
    uid: user.uid,
    joinedAt: serverTimestamp(),
  });
};
And replace leaveRoom with:
const leaveRoom = async (roomId, event) => {
  event.stopPropagation();
  if (!user) {
    return;
  }

  await deleteDoc(doc(db, "memberships", `${roomId}_${user.uid}`));

  if (activeRoomId === roomId) {
    onSelectRoom({ id: "general", name: "General", isPrivate: false });
  }
};
The trick here is the deterministic membership ID: instead of letting Firestore auto-generate an ID, we use ${roomId}_${user.uid}. That gives every (user, room) pair exactly one membership document with a predictable ID, which means:
- Joining is just a
setDoc— no need to check if the membership already exists, becausesetDocoverwrites if it does. - Leaving is just a
deleteDocwith the same ID — no need to look it up first.
Notice that in leaveRoom we also redirect the user back to the General room if they leave the room they’re currently viewing. That prevents the chat box from showing messages from a room they no longer have access to.
The full RoomsListPanel.js is a long file, so here’s the complete result for reference:
// src/components/RoomsListPanel.js — final
import React, { useEffect, useMemo, useState } from "react";
import {
  collection,
  query,
  orderBy,
  where,
  onSnapshot,
  doc,
  setDoc,
  deleteDoc,
  serverTimestamp,
} from "firebase/firestore";
import { useAuthState } from "react-firebase-hooks/auth";
import { auth, db } from "../firebase";

const RoomsListPanel = ({ activeRoomId, onSelectRoom, isOpen, onClose }) => {
  const [searchTerm, setSearchTerm] = useState("");
  const [activeTab, setActiveTab] = useState("all");
  const [memberships, setMemberships] = useState([]);
  const [rooms, setRooms] = useState([]);
  const [user] = useAuthState(auth);

  // Get the list of room IDs that the user is a member of
  useEffect(() => {
    const roomsQuery = query(collection(db, "rooms"), orderBy("createdAt"));
    const unsubscribe = onSnapshot(roomsQuery, snapshot => {
      const nextRooms = snapshot.docs.map(room => ({
        id: room.id,
        ...room.data(),
      }));
      setRooms(nextRooms);
    });

    return () => unsubscribe();
  }, []);

  // Get the list of room IDs that the user is a member of
  useEffect(() => {
    if (!user) {
      setMemberships([]);
      return undefined;
    }

    const membershipQuery = query(
      collection(db, "memberships"),
      where("uid", "==", user.uid)
    );

    const unsubscribe = onSnapshot(membershipQuery, snapshot => {
      const nextMemberships = snapshot.docs.map(membership => ({
        id: membership.id,
        ...membership.data(),
      }));
      setMemberships(nextMemberships);
    });

    return () => unsubscribe();
  }, [user]);

  const membershipSet = useMemo(
    () => new Set(memberships.map(membership => membership.roomId)),
    [memberships]
  );

  const filteredRooms = useMemo(() => {
    let filtered = rooms.filter(
      room => !room.isPrivate || membershipSet.has(room.id)
    );

    if (activeTab === "public") {
      filtered = filtered.filter(room => !room.isPrivate);
    } else if (activeTab === "private") {
      filtered = filtered.filter(room => room.isPrivate);
    }

    if (searchTerm.trim()) {
      const term = searchTerm.toLowerCase();
      filtered = filtered.filter(
        room =>
          room.name.toLowerCase().includes(term) ||
          (room.joinCode && room.joinCode.toLowerCase().includes(term))
      );
    }

    return filtered;
  }, [rooms, membershipSet, activeTab, searchTerm]);

  const joinRoom = async (roomId, event) => {
    event.stopPropagation();
    if (!user) {
      return;
    }

    await setDoc(doc(db, "memberships", `${roomId}_${user.uid}`), {
      roomId,
      uid: user.uid,
      joinedAt: serverTimestamp(),
    });
  };

  const leaveRoom = async (roomId, event) => {
    event.stopPropagation();
    if (!user) {
      return;
    }

    await deleteDoc(doc(db, "memberships", `${roomId}_${user.uid}`));

    if (activeRoomId === roomId) {
      onSelectRoom({ id: "general", name: "General", isPrivate: false });
    }
  };

  return (
    <aside className={`rooms-list-panel ${isOpen ? "panel--open" : ""}`}>
      {/* ... rest of the JSX ... */}
    </aside>
  );
};

export default RoomsListPanel;
Save the file. Refresh the app. The left sidebar should now show General (the only room in the database right now), and switching between the “All” / “Public” / “Private” tabs should filter as expected.
It feels a little empty in there. Let’s wire up room creation so we have more to look at.
The newsletter
Want more real-world tutorials like this?
Subscribe to Timonwa's Notes for hands-on guides on React, Firebase, and shipping real projects.
Creating and Joining Rooms
RoomsActionsPanel has two forms: one for creating a new room (optionally private) and one for joining a private room by code. Right now both forms just update local state — let’s hook them up to Firestore.
Open src/components/RoomsActionsPanel.js.
Imports
Add these imports at the top:
import {
  addDoc,
  getDocs,
  limit,
  collection,
  doc,
  query,
  serverTimestamp,
  setDoc,
  where,
} from "firebase/firestore";
import { useAuthState } from "react-firebase-hooks/auth";
import { auth, db } from "../firebase";
Most of these you’ve seen. The new ones:
addDoc(collectionRef, data)is likesetDocbut Firestore generates a random ID for the new document.getDocs(query)is a one-shot read — it fetches whatever matches the query right now and returns. It does not subscribe to changes (unlikeonSnapshot).limit(n)caps how many docs a query returns.
Accept the onSelectRoom prop and read the current user
Update the component declaration to accept onSelectRoom as a prop and pull the signed-in user using useAuthState:
const RoomsActionsPanel = ({ onSelectRoom, isOpen, onClose }) => {
  const [user] = useAuthState(auth);
  // ... existing state ...
};
We’ll use onSelectRoom after a user successfully joins a private room by code to switch them to that room automatically.
Creating a room
Find the current handleCreateRoom function and replace it with an async version that actually creates the room in Firestore:
const handleCreateRoom = async event => {
  event.preventDefault();
  const trimmed = roomName.trim();
  if (!trimmed) {
    return;
  }

  const joinCodeValue = isPrivate ? createJoinCode() : null;
  const joinCodeLower = joinCodeValue ? joinCodeValue.toLowerCase() : null;

  const newRoom = await addDoc(collection(db, "rooms"), {
    name: trimmed,
    isPrivate,
    joinCode: joinCodeValue,
    joinCodeLower,
    createdAt: serverTimestamp(),
    createdBy: user?.uid ?? "anonymous",
  });

  if (isPrivate && user) {
    await setDoc(doc(db, "memberships", `${newRoom.id}_${user.uid}`), {
      roomId: newRoom.id,
      uid: user.uid,
      joinedAt: serverTimestamp(),
    });
    setCreatedRoomCode({
      roomId: newRoom.id,
      name: trimmed,
      code: joinCodeValue,
    });
  }

  setRoomName("");
  setIsPrivate(false);
};
Let’s walk through it:
- We trim the user’s input. If it’s empty, we bail.
- If the user ticked “Private room”, we generate a join code (the
createJoinCodehelper at the top of the file produces something likeAB12-CD34) and store both the original-case and lowercase versions. Storing both makes it easy to display the code with capital letters but search by it case-insensitively. - We call
addDoc(collection(db, "rooms"), { ... }). Firestore generates a random document ID for the new room and saves the data.addDocreturns a DocumentReference for the new doc, which gives us access to its auto-generatedid. - If the room is private, we also create a membership document so the creator is immediately a member of their own room. We use the same
${roomId}_${uid}ID pattern as before. We also pop up the “Private room code” UI so the user can copy and share the code. - We reset the form.
Joining a room by code
Now the handleJoinByCode function. The current version just shows a fake success message. Replace it with the real version:
const handleJoinByCode = async event => {
  event.preventDefault();
  if (!user) {
    return;
  }

  const normalized = joinCode.trim().toLowerCase();
  if (!normalized) {
    return;
  }

  setJoinStatus(null);
  const roomQuery = query(
    collection(db, "rooms"),
    where("joinCodeLower", "==", normalized),
    limit(1)
  );
  const snapshot = await getDocs(roomQuery);

  if (snapshot.empty) {
    setJoinStatus({ type: "error", message: "No private room found." });
    return;
  }

  const roomDoc = snapshot.docs[0];
  const roomData = roomDoc.data();
  if (!roomData?.isPrivate) {
    setJoinStatus({
      type: "error",
      message: "Code is not for a private room.",
    });
    return;
  }

  await setDoc(doc(db, "memberships", `${roomDoc.id}_${user.uid}`), {
    roomId: roomDoc.id,
    uid: user.uid,
    joinedAt: serverTimestamp(),
  });

  setJoinStatus({ type: "success", message: "Joined private room." });
  setJoinCode("");
  onSelectRoom({
    id: roomDoc.id,
    name: roomData.name || "Private room",
    isPrivate: true,
  });
};
Here’s what it does step by step:
- We return early if no user is signed in.
- We normalize the code (trim whitespace, lowercase it). If it’s empty after trimming, we exit.
- We clear any previous status message.
- We build a query: find documents in
roomswherejoinCodeLowerequals the normalized code. Welimit(1)because there should only ever be one match. - We call
getDocs(roomQuery)to actually run the query. This is a one-shot read — we don’t need a live subscription here, we just want to find the room once. - If the query returns nothing (
snapshot.empty), we show an error. - If the matching room isn’t actually private (someone might’ve shared a public code), we show a different error.
- Otherwise we create a membership for the current user using the now-familiar
${roomId}_${uid}pattern, show a success message, and immediately switch the active room to the one they just joined.
You should now have the complete RoomsActionsPanel.js component.
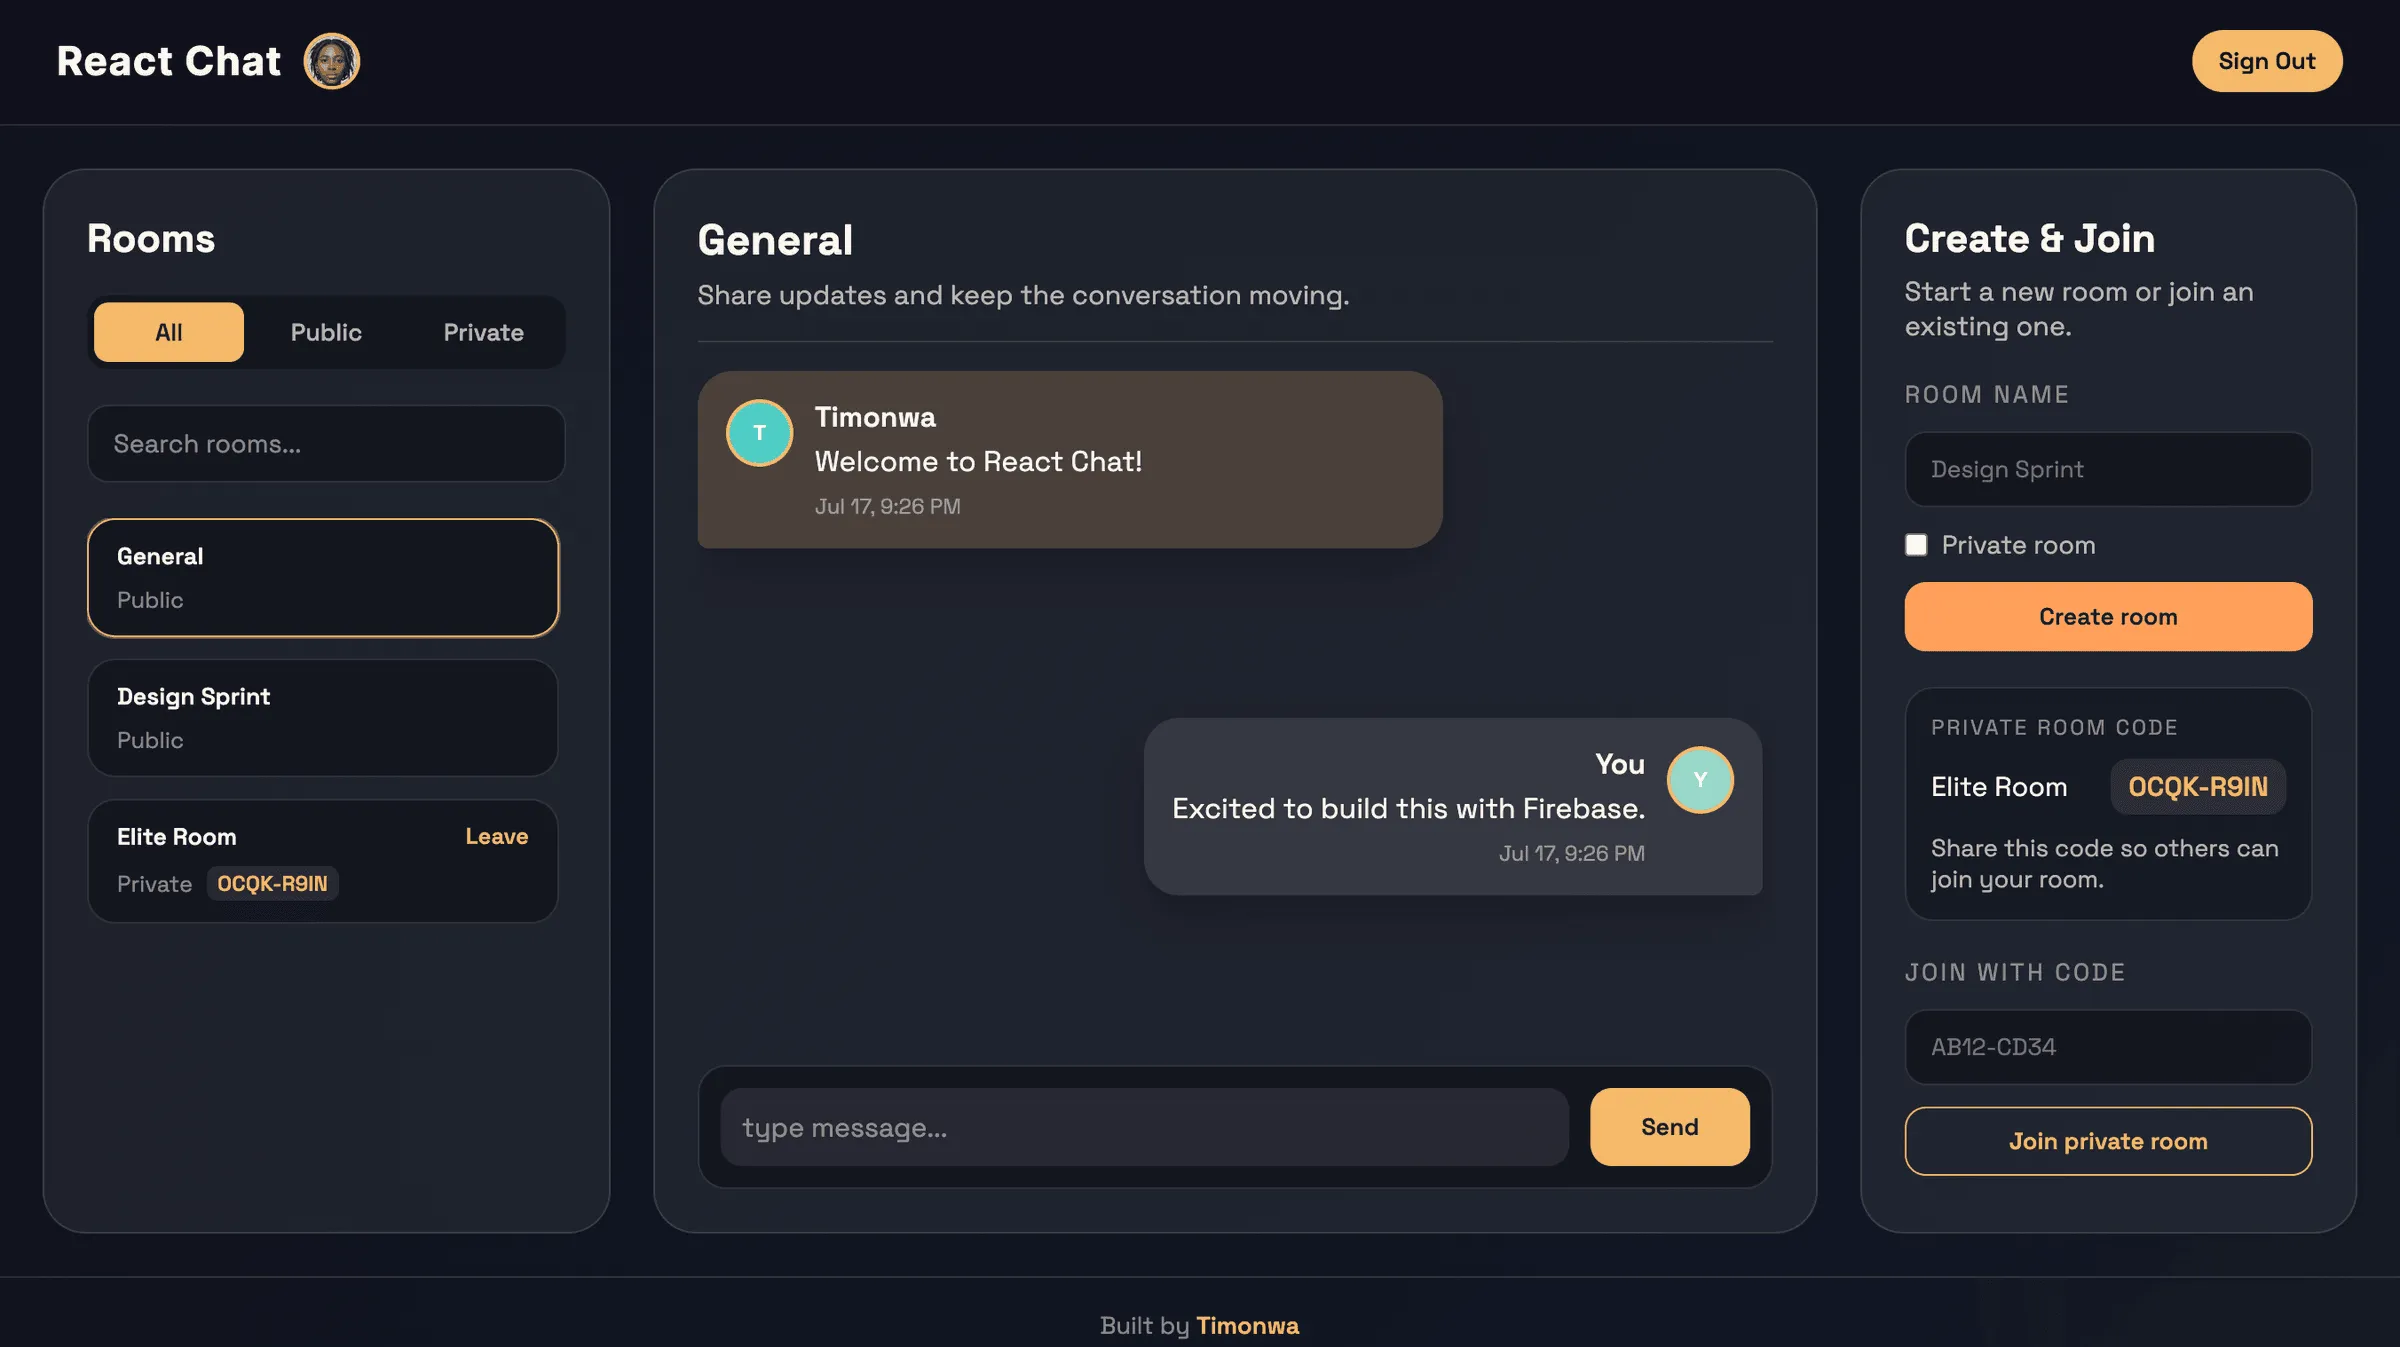
Save the file and try it out in the browser. Type a room name (say, “Design Sprint”), leave the Private room checkbox unchecked, and click Create room. A second later, the new room should appear in your left sidebar.
Now try a private room: type a name, tick the Private room checkbox, click Create room. You should see the room appear in the sidebar and a “Private room code” card appear underneath the form with a code like AB12-CD34.
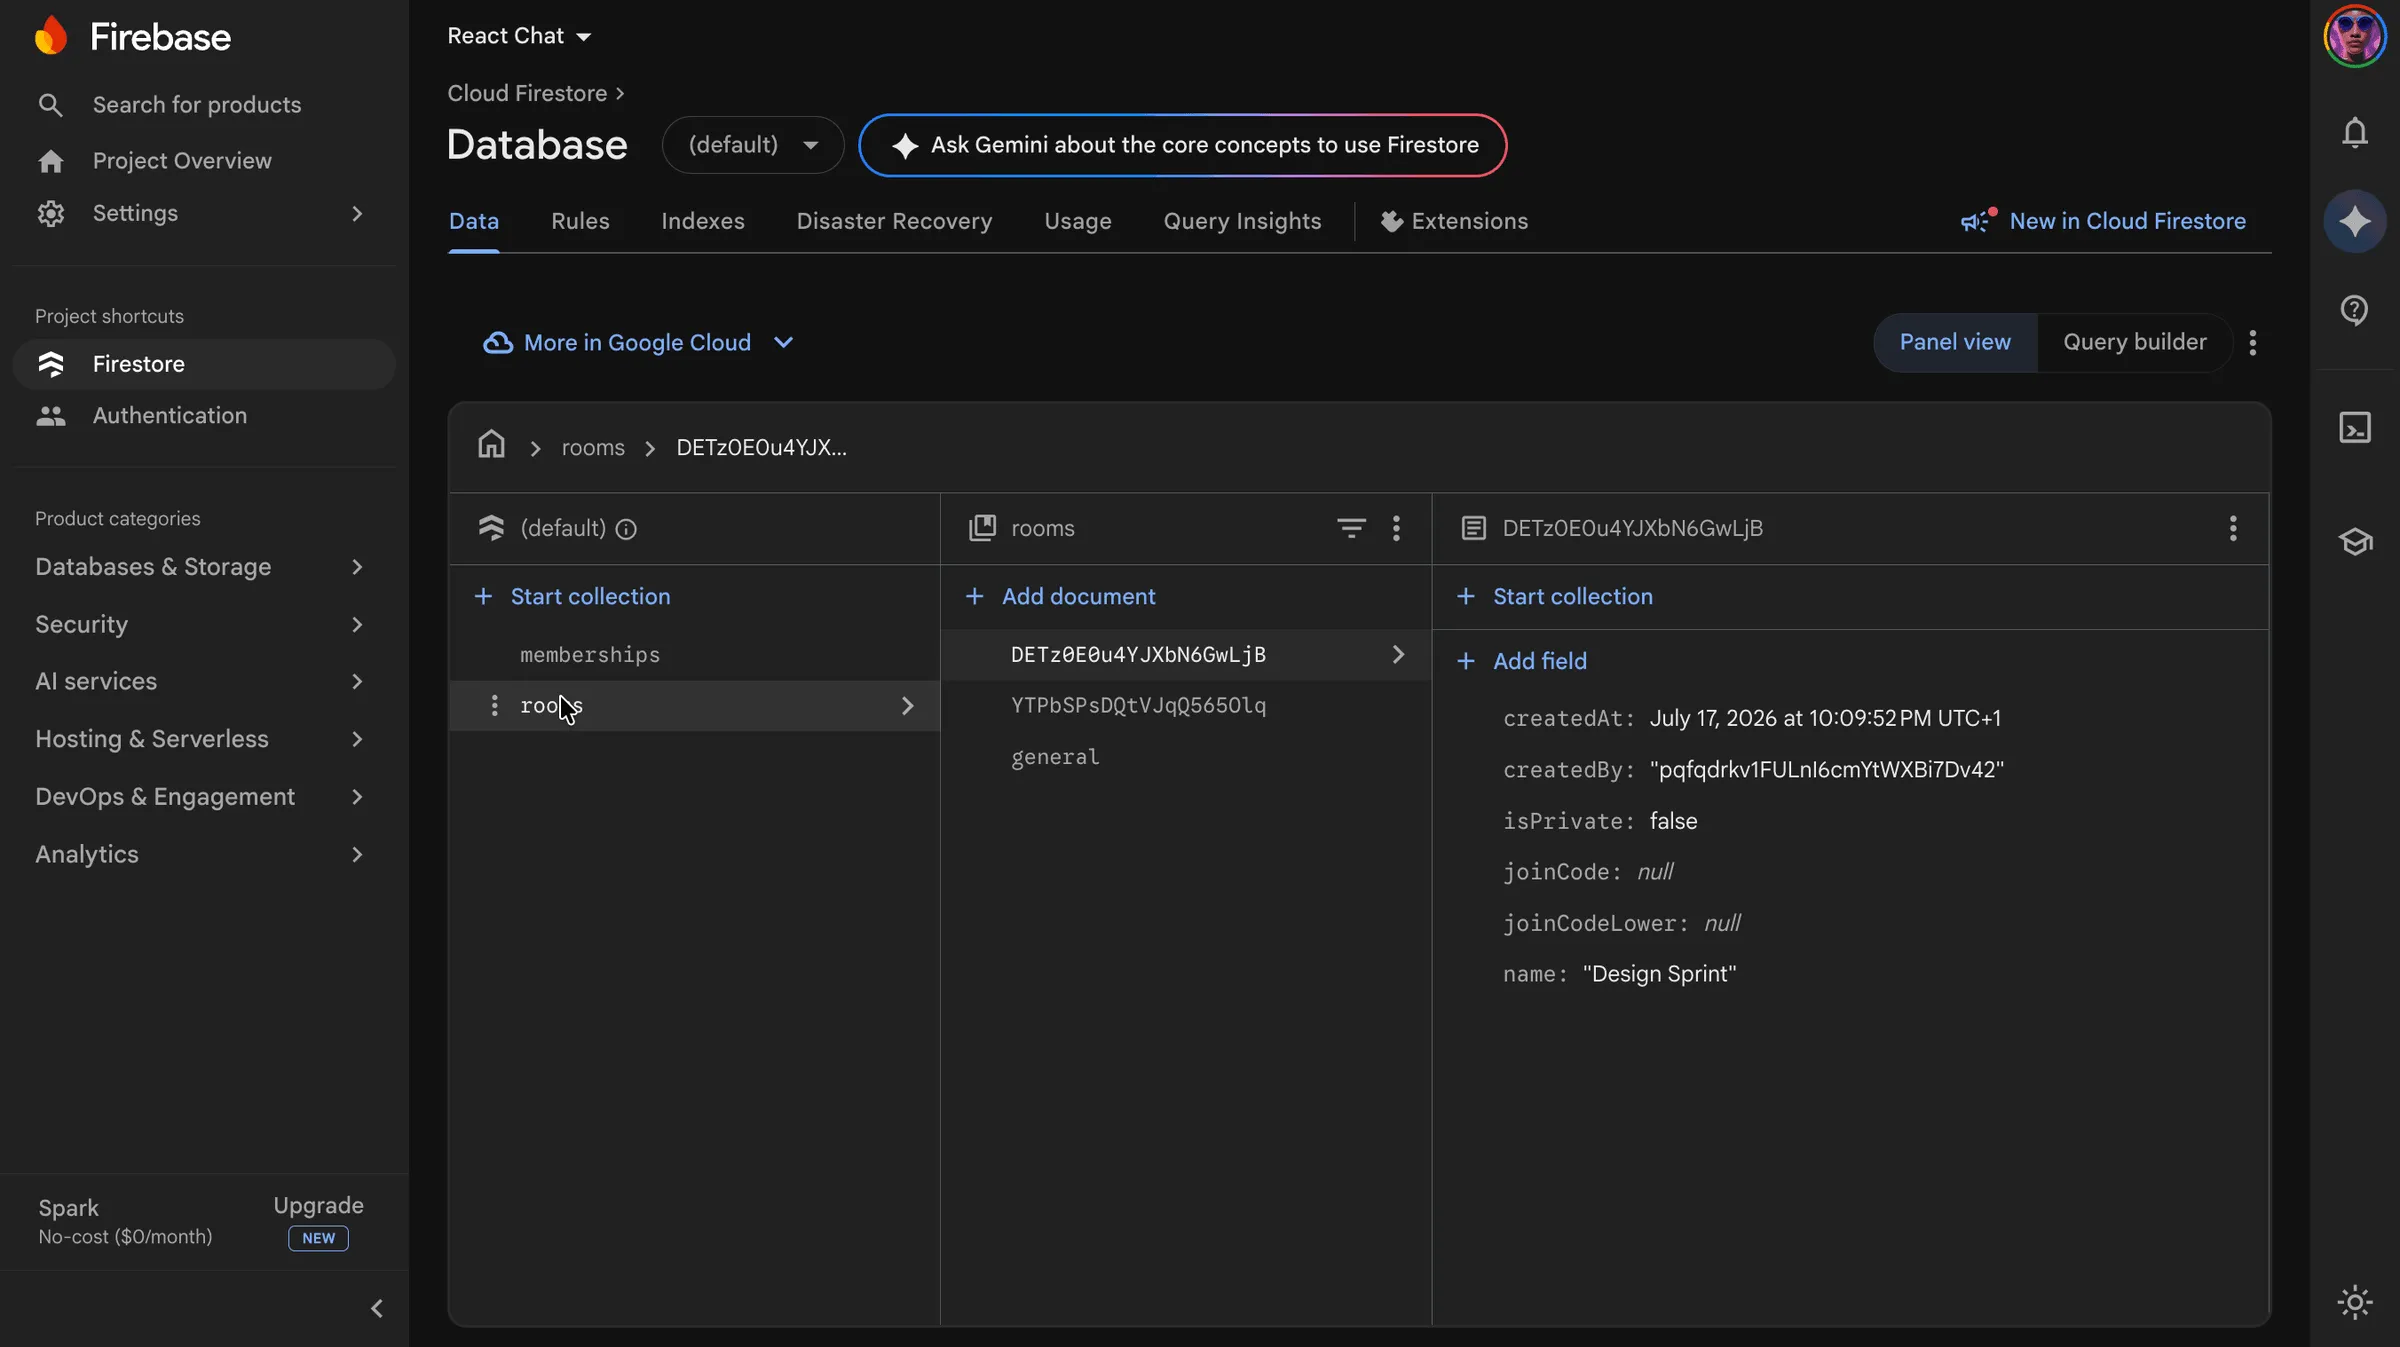
Open the Firebase console and look at your Firestore data. You should see your new rooms in the rooms collection, plus a memberships collection containing one document for the private room you created (since you’re automatically a member of rooms you create).
To test joining by code, open a second browser window in incognito mode, sign in with a different Google account, copy the join code from your first window, paste it into the “Join with code” form in the second window, and submit. The second account should be added to the private room and switched to it automatically.
Loading Messages from a Room
We’ve got rooms working. Now let’s actually display messages inside them.
Open src/components/ChatBox.js. Right now the component uses a hardcoded sampleMessages object at the top — let’s replace it with a live subscription.
Imports
Update the imports so they look like:
import React, { useEffect, useMemo, useRef, useState } from "react";
import {
  query,
  collection,
  orderBy,
  onSnapshot,
  limit,
} from "firebase/firestore";
import { db } from "../firebase";
import Message from "./Message";
import SendMessage from "./SendMessage";
You can delete the sampleMessages constant entirely — we won’t need it.
Subscribing to messages
The component already has a useEffect that sets messages from sampleMessages. Replace that effect with a Firestore subscription:
useEffect(() => {
  if (!activeRoom?.id) {
    setMessages([]);
    return undefined;
  }

  const q = query(
    collection(db, "rooms", activeRoom.id, "messages"),
    orderBy("createdAt", "desc"),
    limit(50)
  );

  const unsubscribe = onSnapshot(q, snapshot => {
    const fetchedMessages = snapshot.docs
      .map(docSnapshot => ({
        ...docSnapshot.data(),
        id: docSnapshot.id,
      }))
      .reverse();
    setMessages(fetchedMessages);
  });

  return () => unsubscribe();
}, [activeRoom?.id]);
A few things to notice:
collection(db, "rooms", activeRoom.id, "messages")is how we point at a subcollection. You alternate collection names and document IDs in the path:rooms(collection) →activeRoom.id(document) →messages(subcollection).- We
orderBy("createdAt", "desc")(newest first) together withlimit(50). This pairing matters: Firestore applies the limit after ordering, so ordering descending is what grabs the most recent 50 messages. If we ordered ascending (the default),limit(50)would return the oldest 50 — and a busy room would never show new messages. - Because the query hands us newest-first, we call
.reverse()on the results so they render oldest-first — the natural reading order for a chat, with the latest message at the bottom. In short: query descending, display ascending. - We
limit(50)so we don’t pull the entire message history if a room has thousands of messages. A real production app would add pagination (fetching older messages as you scroll up), but the last 50 is plenty for our demo. - The effect depends on
activeRoom?.id, not the wholeactiveRoomobject. That means we only resubscribe when the room ID actually changes — ifactiveRoomis re-created with the same ID, we don’t tear down the listener. - We clean up by calling
unsubscribe()so old listeners stop firing when the user switches rooms.
You can also remove the handleSend function and the onSend={handleSend} prop on <SendMessage /> — SendMessage will write to Firestore directly. The new <SendMessage /> line should just be:
<SendMessage roomId={activeRoom?.id} />For reference, the full ChatBox.js now:
// src/components/ChatBox.js — final
import React, { useEffect, useMemo, useRef, useState } from "react";
import {
  query,
  collection,
  orderBy,
  onSnapshot,
  limit,
} from "firebase/firestore";
import { db } from "../firebase";
import Message from "./Message";
import SendMessage from "./SendMessage";

const ChatBox = ({ activeRoom }) => {
  const [messages, setMessages] = useState([]);
  const messagesRef = useRef(null);

  const roomLabel = useMemo(() => {
    if (!activeRoom?.name) {
      return "Select a room";
    }
    return `${activeRoom.name}${activeRoom.isPrivate ? " · Private" : ""}`;
  }, [activeRoom]);

  useEffect(() => {
    if (!activeRoom?.id) {
      setMessages([]);
      return undefined;
    }

    const q = query(
      collection(db, "rooms", activeRoom.id, "messages"),
      orderBy("createdAt", "desc"),
      limit(50)
    );

    const unsubscribe = onSnapshot(q, snapshot => {
      const fetchedMessages = snapshot.docs
        .map(docSnapshot => ({
          ...docSnapshot.data(),
          id: docSnapshot.id,
        }))
        .reverse();
      setMessages(fetchedMessages);
    });

    return () => unsubscribe();
  }, [activeRoom?.id]);

  useEffect(() => {
    // Scroll the message list itself to the bottom — not the whole window.
    const el = messagesRef.current;
    if (el) {
      el.scrollTo({ top: el.scrollHeight, behavior: "smooth" });
    }
  }, [messages]);

  return (
    <main className="chat-box">
      {/* ... rest of the JSX ... */}
      <SendMessage roomId={activeRoom?.id} />
    </main>
  );
};

export default ChatBox;
There’s also a second useEffect that handles auto-scroll — every time the messages array changes, it drops the message list to the bottom so the newest message stays in view. We attach the messagesRef ref to the .messages-wrapper div, then call el.scrollTo({ top: el.scrollHeight, behavior: "smooth" }) on it. Scrolling that container (rather than the whole window with scrollIntoView) keeps the navbar and side panels fixed while only the message list moves. It won’t do much until messages actually start flowing in — which happens the moment we wire up SendMessage next.
The chat box now shows the empty state (“No messages yet. Start the conversation.”) for every room until we wire up SendMessage. Let’s do that now.
Sending Messages
Open src/components/SendMessage.js. It currently calls an onSend prop and updates local state. We want it to write directly to the active room’s messages subcollection.
Update the imports at the top:
import React, { useState } from "react";
import { auth, db } from "../firebase";
import { addDoc, collection, serverTimestamp } from "firebase/firestore";
We no longer need the onSend prop, so update the destructuring on the component:
const SendMessage = ({ roomId }) => {Now replace the sendMessage function with this:
const sendMessage = async event => {
  event.preventDefault();
  const trimmed = message.trim();
  if (!trimmed) {
    alert("Enter valid message");
    return;
  }
  if (!roomId) {
    alert("Select a room to send messages");
    return;
  }
  const { uid, displayName, photoURL } = auth.currentUser;
  await addDoc(collection(db, "rooms", roomId, "messages"), {
    text: trimmed,
    name: displayName,
    avatar: photoURL,
    createdAt: serverTimestamp(),
    uid,
  });
  setMessage("");
};
Walking through:
- We
preventDefaultso the form doesn’t reload the page. - We trim whitespace from the input. If it’s empty, we alert and stop.
- We stop here if no room is selected.
- We grab the uid, displayName, and photoURL from
auth.currentUser. These are the values Firebase gives us about the signed-in user. - We
addDoctorooms/{roomId}/messageswith the message text, the sender’s name and avatar, a server timestamp, and the sender’suid. Firestore auto-generates an ID for the new message. - We clear the input and scroll the chat to the bottom.
For reference, here’s the complete SendMessage.js:
// src/components/SendMessage.js — final
import React, { useState } from "react";
import { auth, db } from "../firebase";
import { addDoc, collection, serverTimestamp } from "firebase/firestore";

const SendMessage = ({ roomId }) => {
  const [message, setMessage] = useState("");

  const sendMessage = async event => {
    event.preventDefault();
    const trimmed = message.trim();
    if (!trimmed) {
      alert("Enter valid message");
      return;
    }
    if (!roomId) {
      alert("Select a room to send messages");
      return;
    }
    const { uid, displayName, photoURL } = auth.currentUser;
    await addDoc(collection(db, "rooms", roomId, "messages"), {
      text: trimmed,
      name: displayName,
      avatar: photoURL,
      createdAt: serverTimestamp(),
      uid,
    });
    setMessage("");
  };

  return (
    <form onSubmit={sendMessage} className="send-message">
      {/* ... rest of the JSX ... */}
    </form>
  );
};

export default SendMessage;
The send form now writes straight to Firestore — but hold off on testing it just yet. The Message component still expects the old sample-data shape: it keys off an isOwn flag and reads the timestamp without guarding against a createdAt that Firestore hasn’t stamped yet, so a real message would make it throw. It would also render every message on the left side, even your own. Let’s fix the Message component first, then send our first message.
Displaying Messages
Open src/components/Message.js. Right now it uses a static message.isOwn flag (which was true on some of the hardcoded sample messages and false on others). Real Firestore messages don’t have an isOwn field — we figure out “is this mine?” by comparing the message’s uid against the signed-in user’s uid.
Update the imports:
import React from "react";
import Avatar from "./Avatar";
import { auth } from "../firebase";
import { useAuthState } from "react-firebase-hooks/auth";
Inside the component, grab the user from useAuthState and switch from comparing message.isOwn to comparing UIDs:
const Message = ({ message }) => {
  const [user] = useAuthState(auth);
  const messageTime = message?.createdAt?.toDate
    ? new Intl.DateTimeFormat("en-US", {
        hour: "numeric",
        minute: "2-digit",
        month: "short",
        day: "numeric",
      }).format(message.createdAt.toDate())
    : "";

  return (
    <div className={`chat-bubble ${message.uid === user?.uid ? "right" : ""}`}>
      <Avatar
        photoURL={message.avatar}
        name={message.name}
        size={38}
        className="chat-bubble__left"
      />
      <div className="chat-bubble__right">
        <p className="user-name">{getFirstName(message.name)}</p>
        <p className="user-message">{message.text}</p>
        {messageTime ? (
          <time
            className="message-time"
            dateTime={message.createdAt.toDate().toISOString()}
          >
            {messageTime}
          </time>
        ) : null}
      </div>
    </div>
  );
};

export default Message;
There are two important things here:
-
message.createdAt.toDate()— Firestore stores timestamps as a specialTimestampobject, not a JavaScriptDate. You have to call.toDate()to convert it to a regularDatebefore you can format it withIntl.DateTimeFormat. We use optional chaining (message?.createdAt?.toDate) so the component doesn’t blow up while a message is still in flight (between the client adding the doc and the server stampingcreatedAt). -
message.uid === user?.uid— that’s how we decide whether the bubble should be aligned right (the user’s own messages) or left (everyone else’s). TherightCSS class flips the layout.
The Avatar component takes the user’s photo URL and name as props. If the photo URL is set, it renders a circular <img>. If it isn’t, it shows the user’s initials on a randomly-coloured background — that fallback was already implemented in the starter code, you don’t need to change it.
Now save and send your first message. As soon as you click Send, it appears in the chat box — the ChatBox’s onSnapshot listener fires automatically when the new message lands in the subcollection, so real-time updates come for free. And because we compare UIDs, your own messages line up on the right.
Then sign in with a different account (or have a friend sign in) and reply. Your messages should align right, theirs should align left, and each bubble should show the right avatar plus a timestamp like “Feb 10, 9:14 AM”.
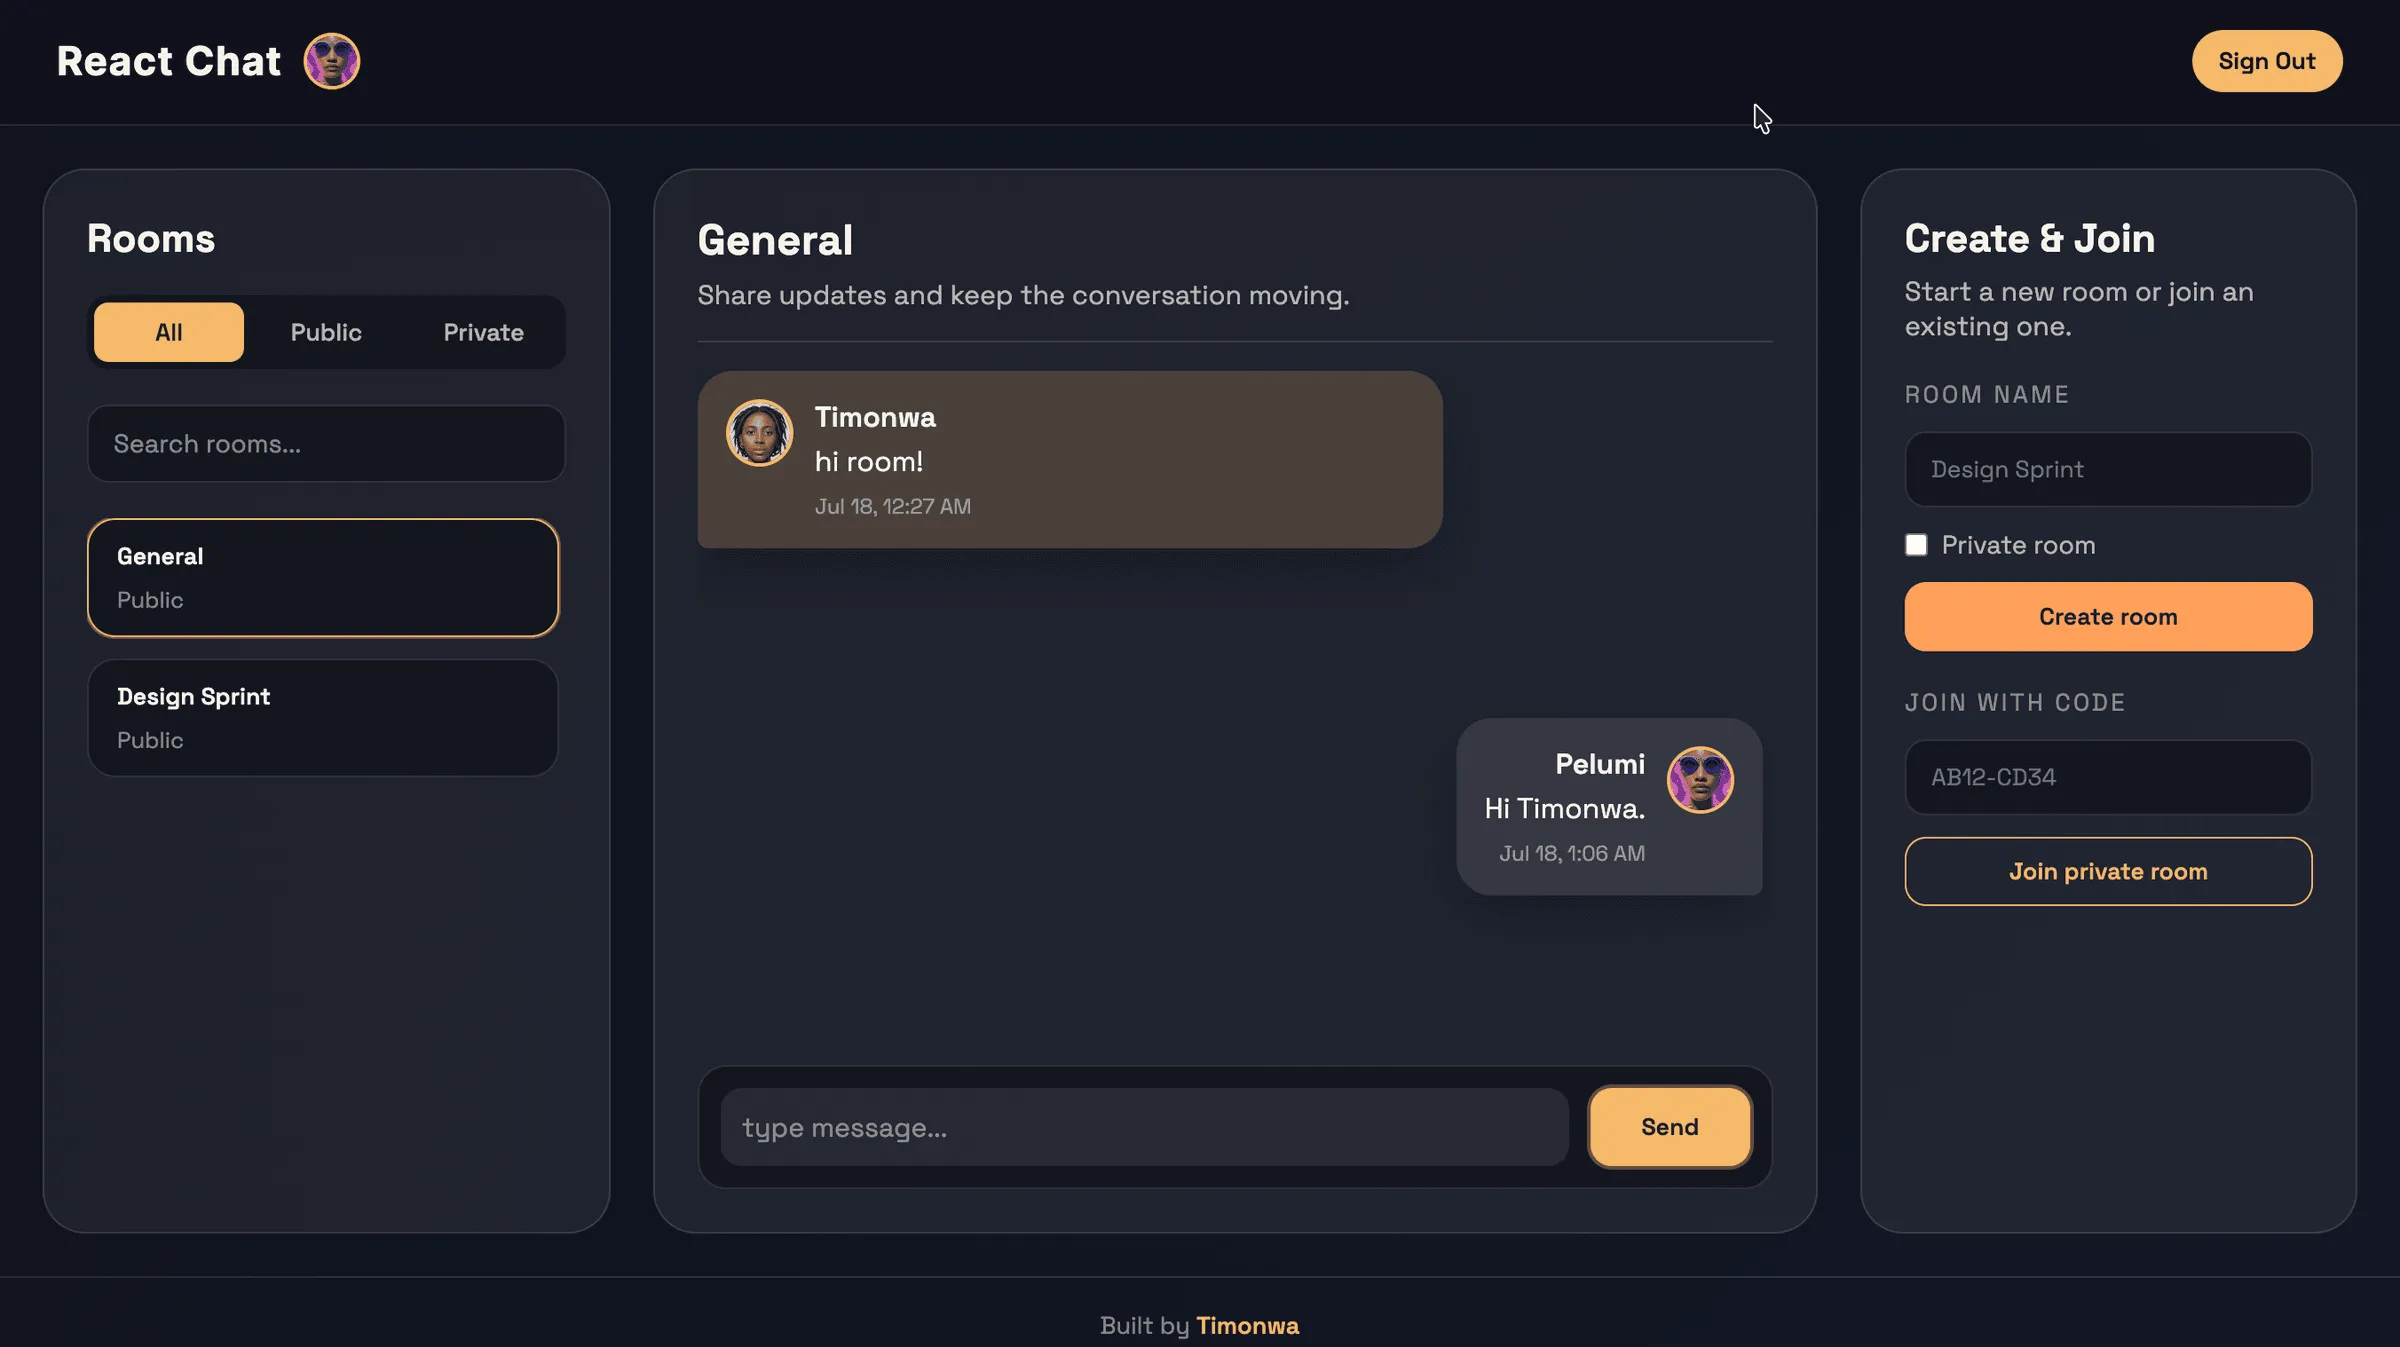
That’s the core chat experience working end-to-end — public and private rooms, real-time messages, join codes, and avatars, all flowing through Firestore.
Locking Things Down with Firestore Security Rules
Right now your Firestore is in test mode, which means anyone on the internet with your project’s API key can read and write any document. While we were developing that was fine, but you absolutely should not deploy this to production without locking things down.
Firestore lets you write security rules — a small DSL that runs server-side on every read and write to decide whether to allow it. Let’s add a basic set of rules that match how our app actually uses the data.
In the Firebase console, go to your project’s Firestore and click the Rules tab.
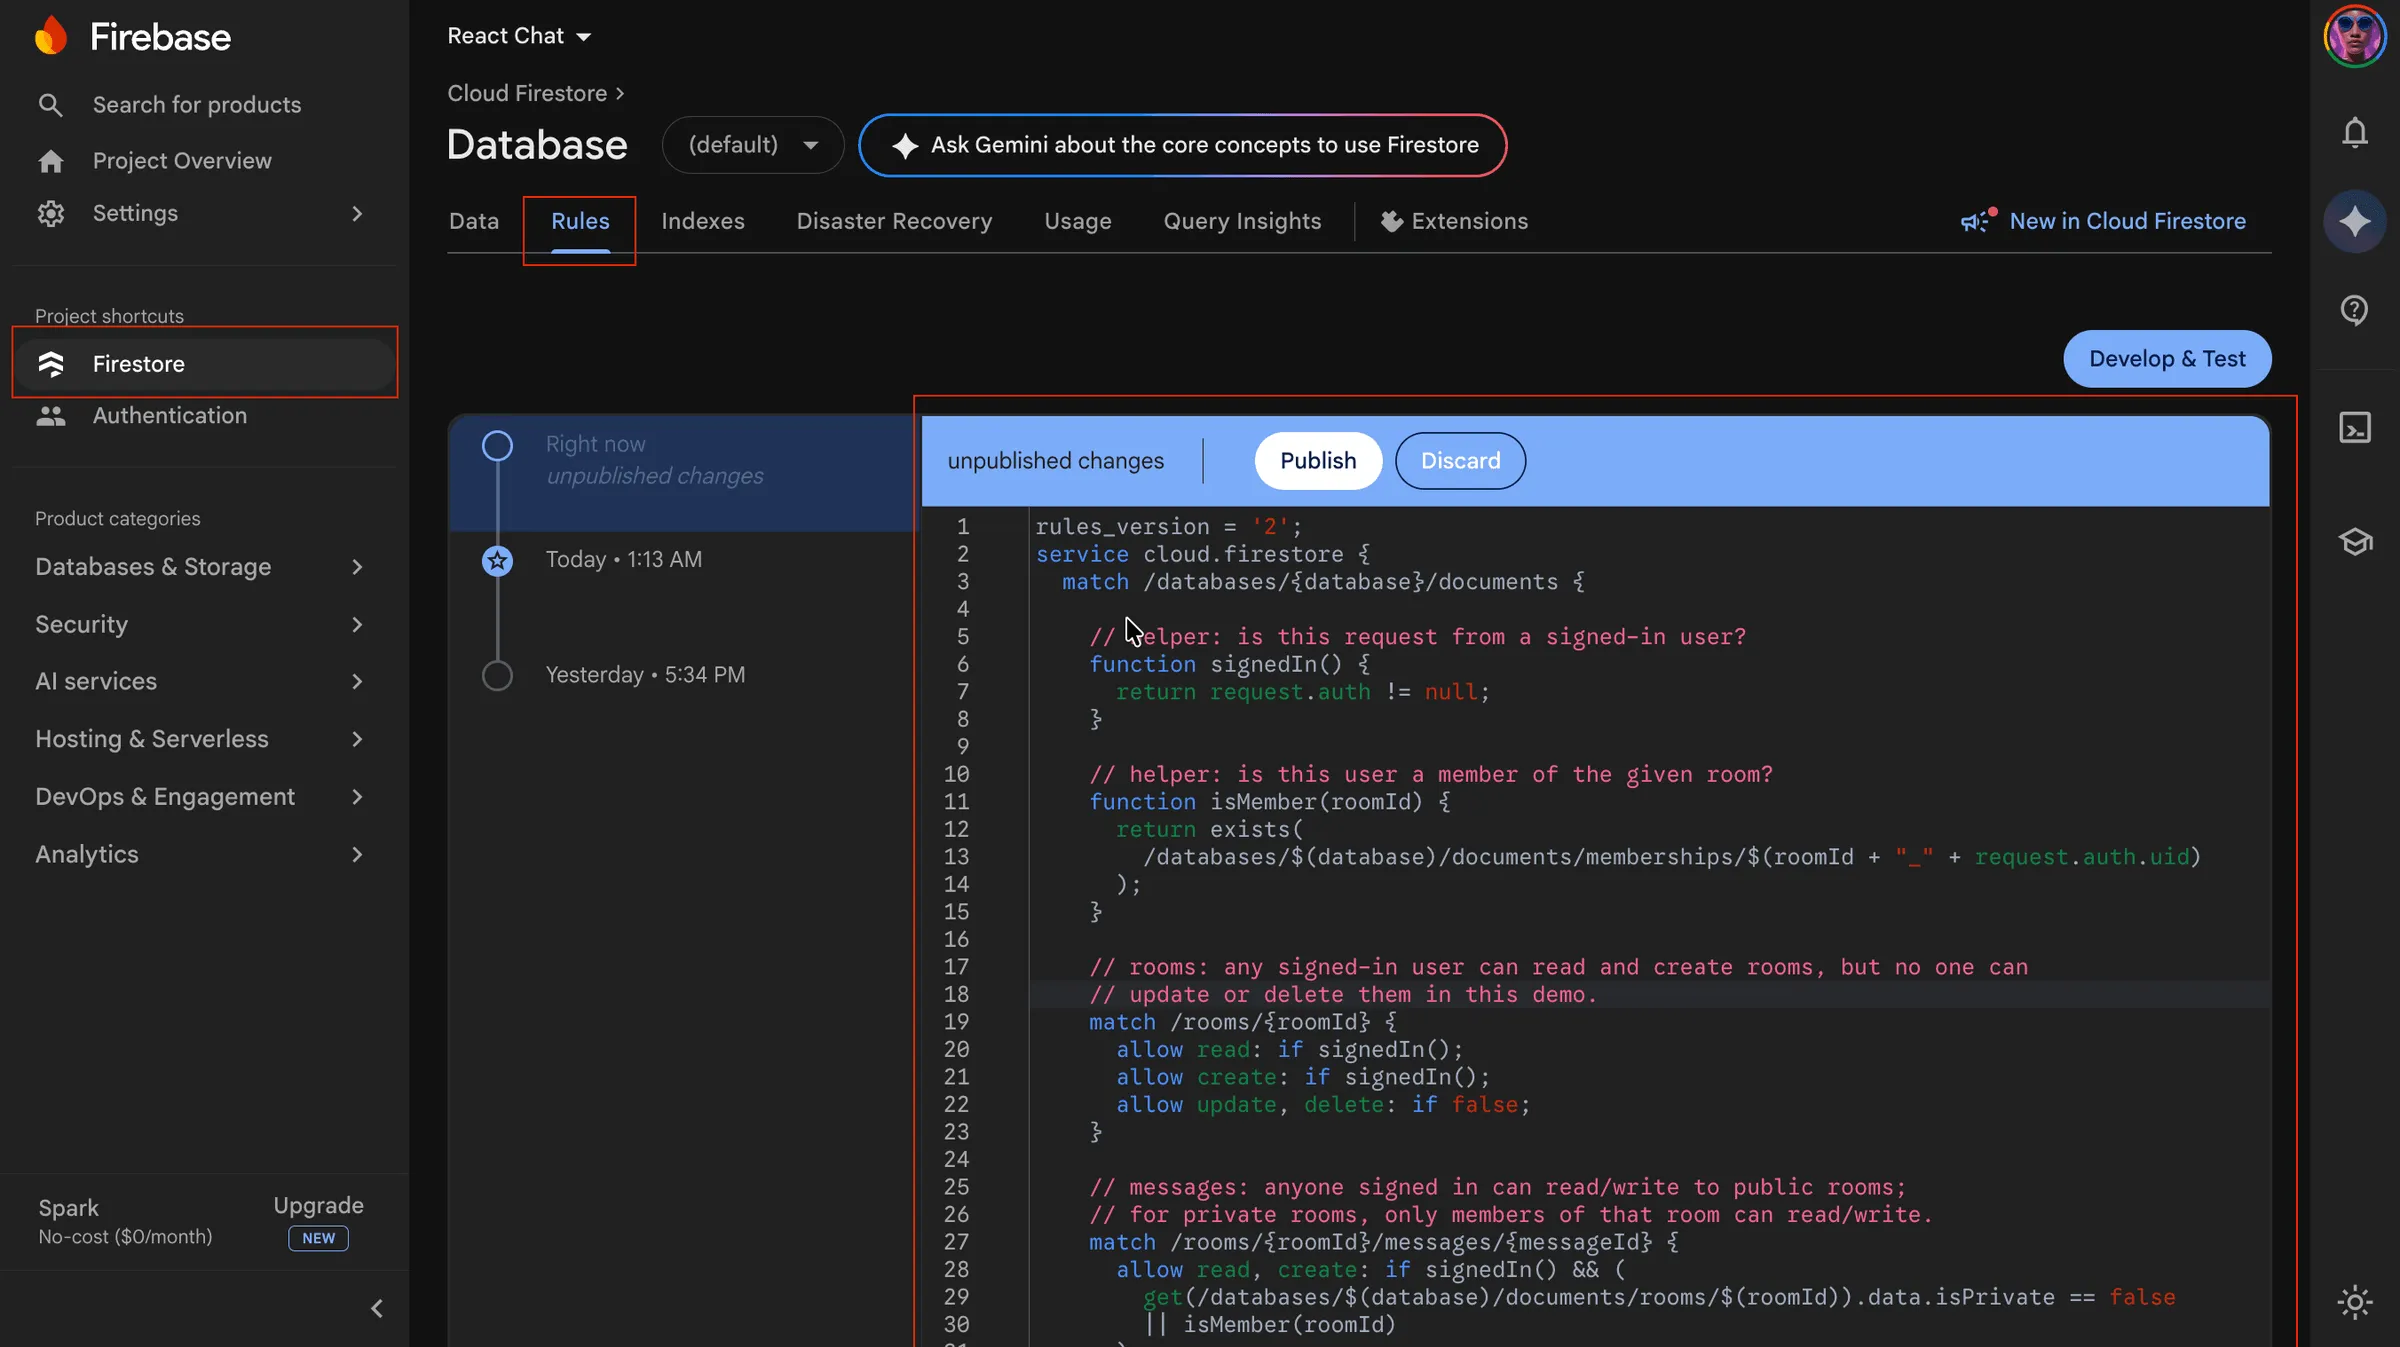
Replace the contents with:
rules_version = '2';
service cloud.firestore {
  match /databases/{database}/documents {

    // helper: is this request from a signed-in user?
    function signedIn() {
      return request.auth != null;
    }

    // helper: is this user a member of the given room?
    function isMember(roomId) {
      return exists(
        /databases/$(database)/documents/memberships/$(roomId + "_" + request.auth.uid)
      );
    }

    // rooms: any signed-in user can read and create rooms, but no one can
    // update or delete them in this demo.
    match /rooms/{roomId} {
      allow read: if signedIn();
      allow create: if signedIn();
      allow update, delete: if false;
    }

    // messages: anyone signed in can read/write to public rooms;
    // for private rooms, only members of that room can read/write.
    match /rooms/{roomId}/messages/{messageId} {
      allow read, create: if signedIn() && (
        get(/databases/$(database)/documents/rooms/$(roomId)).data.isPrivate == false
        || isMember(roomId)
      );
      allow update, delete: if false;
    }

    // memberships: users can only create or delete their own memberships.
    match /memberships/{membershipId} {
      allow read: if signedIn() && request.auth.uid == resource.data.uid;
      allow create: if signedIn() && request.auth.uid == request.resource.data.uid;
      allow delete: if signedIn() && request.auth.uid == resource.data.uid;
      allow update: if false;
    }
  }
}
Click Publish to save the rules.
A few things worth highlighting:
signedIn()is a helper function that returns true if there’s an authenticated user.isMember(roomId)checks whether the membership document for the current user and that room exists. The${roomId}_${uid}ID format we chose earlier pays off here — we can synthesize the document ID inside the rules without doing a query.- For rooms, anyone signed in can read the metadata (the rooms list panel needs this) and create new rooms. We don’t allow updates or deletes in this demo.
- For messages in a public room, any signed-in user can read and post. For messages in a private room, only members of that room can read or post.
- For memberships, users can only see their own memberships, can only create memberships with their own
uid, and can only delete their own. They can never edit one.
After publishing, go back to your app and click around — send a message, create a room, join a private one. Everything should still work. If a rule is wrong, you’ll see “Missing or insufficient permissions” errors in the browser console, which point you at exactly which rule failed. If reading those errors feels unfamiliar, my guide on how to debug React code walks through the browser tooling.
Adding Authorized Domains for Deployment
When you deploy your app (to Vercel, Netlify, Firebase Hosting, or anywhere else), Firebase Authentication will refuse to sign anyone in unless your deployment domain is in the authorized domains list.
In the Firebase console, go to your project’s Authentication and click the Settings tab. Then, under the Authorized domains section, add your production domains.
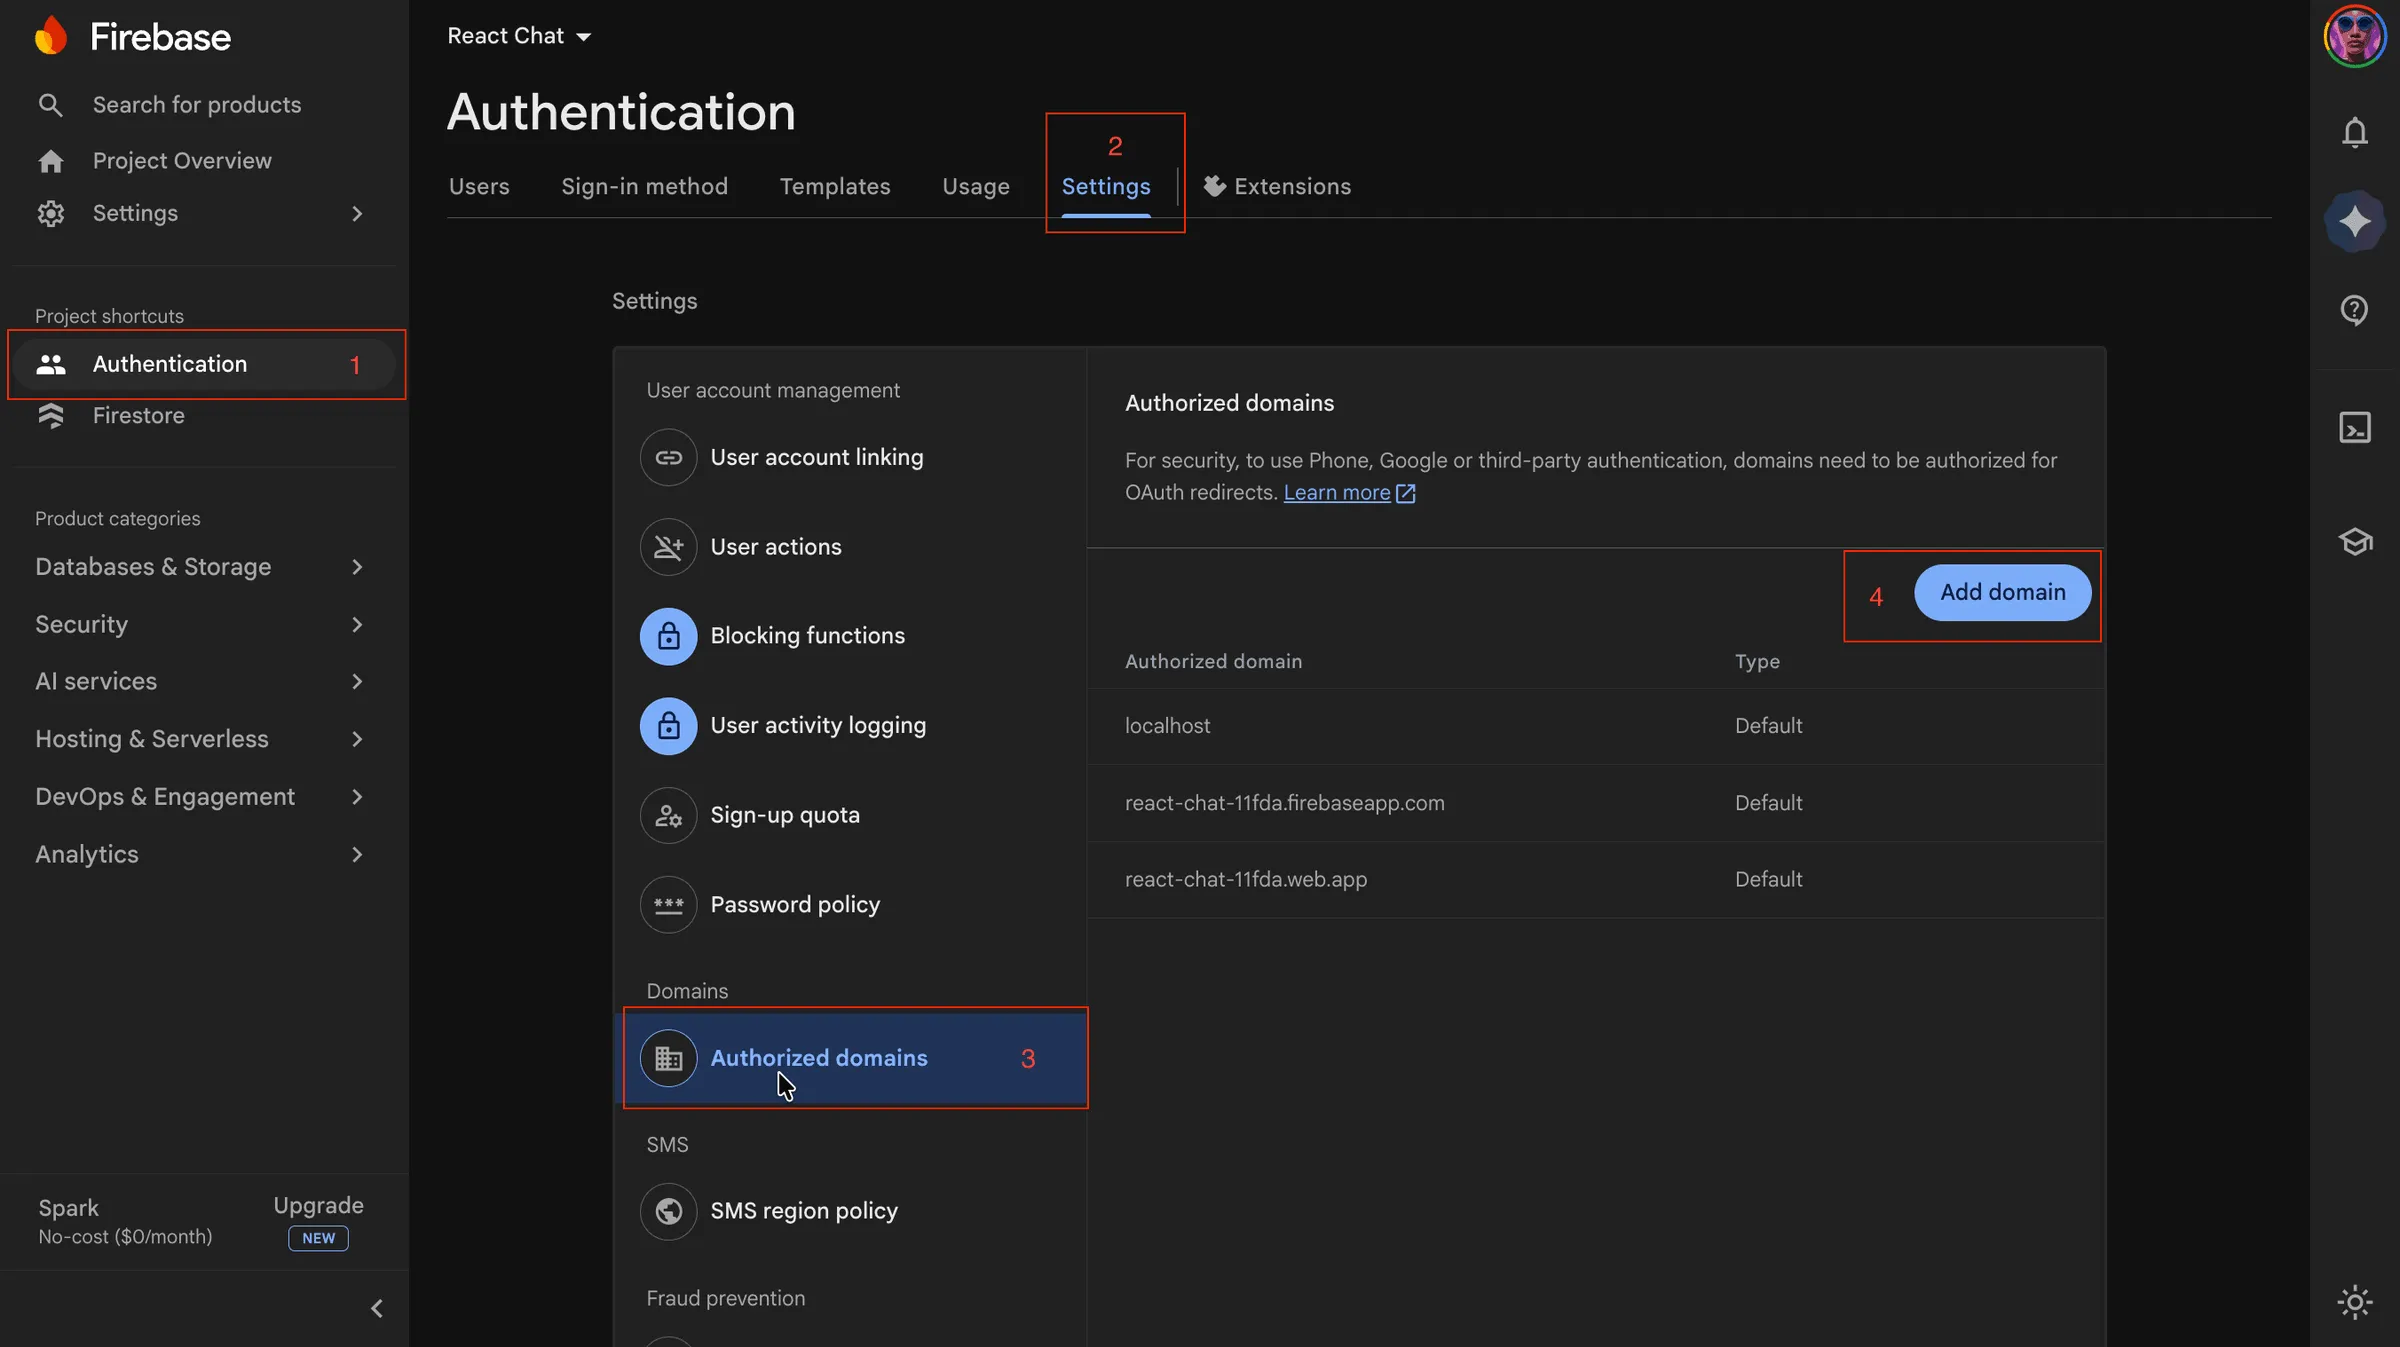
localhost should already be in the list. Click Add domain and add your production domain (for example, react-chat-yourname.vercel.app if you deployed to Vercel). Without this, you’ll see an auth/unauthorized-domain error when you try to sign in from your deployed site.
Don’t forget to also set the same REACT_APP_* environment variables on your hosting provider’s dashboard — without them, Firebase won’t initialize on the deployed app.
Wrapping Up
And that’s it! Here’s a quick recap of everything we built:
- A Google sign-in flow with
useAuthState,GoogleAuthProvider, andsignInWithPopup. - A room-based Firestore data model with
rooms, amessagessubcollection inside each room, and amembershipscollection for private-room access. - A rooms list panel that subscribes to rooms and memberships in real time, supports search, tab filtering, and joining/leaving private rooms.
- A create-and-join panel that creates public and private rooms (with shareable join codes) and lets users join private rooms by code.
- A real-time chat box that streams the active room’s messages with
onSnapshot, scrolls to new messages automatically, and aligns each bubble based on whether you sent it. - A set of Firestore security rules that enforce who can read and write each collection.
You now have a solid foundation for building real-time, multi-room chat experiences. From here you could keep going and add:
- Typing indicators — write a short-lived
typing/{roomId}_{uid}document and listen for it inChatBox. - Read receipts — track the last-read message ID per user per room.
- Pagination — use
startAfterto load older messages in batches instead of capping at 50. - Direct messages — encode a DM as a room whose ID is a sorted pair of UIDs.
- Push notifications — wire up Firebase Cloud Messaging so users get notified about new messages in rooms they’re not actively viewing.
The complete code for this project is on GitHub — switch to the main branch for the final version or the setup branch if you want to start over. You can try the live app at react-chat-timonwa.vercel.app.
If you want to compare this with the original 2023 version, the legacy code lives on the freecodecamp-original branch.
Useful Resources
Official documentation
- Firebase Authentication and Sign in with Google (web) — everything the sign-in flow builds on.
- Cloud Firestore data model — documents, collections, and the subcollections we used for messages.
- Listen to realtime updates — the
onSnapshotbehaviour that powers our live chat. - Get started with Firestore Security Rules — the rules DSL we used to lock the app down.
react-firebase-hooks— theuseAuthStatehook for tracking the signed-in user.
More from the blog
- How to Build a Real-time Chat App with React and Firebase — the original single-room version this tutorial expands on.
- Best Practices for Securing Your React Application — go deeper on client-side hardening.
- How to Debug React Code — tools and tricks for when something breaks.
- JavaScript Projects for Beginners — more build-along projects to keep the momentum going.
Frequently Asked Questions
1. How do you build a real-time chat app with React and Firebase?
To build a real-time chat app with React and Firebase:
- Create a Firebase project and enable Google Authentication and Cloud Firestore.
- Initialize the Firebase SDK in your React app and export
authanddb. - Sign users in with
signInWithPopupand track them with theuseAuthStatehook. - Store messages in a Firestore
messagessubcollection and stream them live withonSnapshot. - Add Firestore security rules before you deploy.
2. Is Firebase free to use?
Yes. Firebase’s free Spark plan includes Authentication and a generous daily quota of Cloud Firestore reads, writes, and storage — more than enough for a demo chat app or a small side project. You only pay after upgrading to the pay-as-you-go Blaze plan to exceed those limits or use additional Firebase services like Cloud Functions or Cloud Messaging.
3. What is the difference between Cloud Firestore and the Firebase Realtime Database?
Both are real-time NoSQL databases, but Cloud Firestore stores data as documents inside collections and subcollections, supports richer queries, and scales more predictably. The older Realtime Database stores everything as one large JSON tree. For most new apps — including this chat app — Firestore is the recommended choice.
4. How do you add Google sign-in to a React app with Firebase?
Enable the Google provider under Authentication in the Firebase console, then create a provider and call signInWithPopup in your app:
const provider = new GoogleAuthProvider();
signInWithPopup(auth, provider);
Use the useAuthState hook from react-firebase-hooks to read the signed-in user and re-render automatically when the auth state changes.
5. Is it safe to expose your Firebase API key in the browser?
Yes. A Firebase API key only identifies your project — it is not a secret and cannot grant access on its own. Your data is protected by Firestore security rules that run on Firebase’s servers. As good hygiene, still keep your config out of public Git repositories and screenshots.
6. How should you structure chat data in Firestore?
A scalable structure for a multi-room chat uses three parts:
- A
roomscollection, where each document is a single chat room. - A
messagessubcollection inside each room, so you only load one room’s messages at a time. - A
membershipscollection that tracks which users can access which private rooms.
This keeps every query small instead of loading all messages in the app at once.
7. How do you get real-time updates from Firestore?
Use onSnapshot instead of a one-time getDocs read. onSnapshot(query, callback) fires immediately with the current data and again every time a matching document changes, so your UI updates live. It returns an unsubscribe function — call it during cleanup to stop listening and avoid memory leaks.
8. Why does Firestore’s limit() return the oldest documents instead of the newest?
Because limit() runs after orderBy(). With the default ascending order, limit(50) keeps the first (oldest) 50 documents. To get the newest ones, order descending with orderBy("createdAt", "desc"), apply the limit, then call .reverse() on the results so they still display oldest-first.
9. Why should you use serverTimestamp() instead of new Date() in Firestore?
serverTimestamp() is set by Firebase’s servers, so every document gets a consistent, trustworthy time regardless of a user’s device clock. new Date() relies on the client’s clock, which can be wrong or manipulated — causing messages to appear out of order.
10. How do you fix “Missing or insufficient permissions” errors in Firestore?
This error means your security rules blocked the read or write. Check that the user is signed in, that your rules allow the operation, and — for private data — that the required document (such as a membership) exists. The browser console names the exact path and operation that failed.