Setting up a subscription form on your website is a great way to collect emails from your visitors. You can then use these emails to send them newsletters, updates, and other important information about your website. And one of the best ways to do this is by using Sender.
Sender is a powerful email marketing tool that allows you to create and send beautiful emails to your subscribers. With its easy-to-understand API documentation, you can easily integrate it with your website to collect and deliver emails using plain JavaScript or a JavaScript framework like React, Vue, or Angular.
This article will show you how to integrate Sender with React for free to collect and deliver emails. You can apply these steps to any JavaScript framework, not just React. You can use the same steps to integrate Sender with Vue, Angular, or any other JavaScript framework. Let’s get started.
Sender integrates seamlessly with any JavaScript framework
Follow these steps to integrate Sender with React, plain HTML/JavaScript forms, or any JavaScript framework like Vue and Angular. The process is flexible and applies seamlessly across different frameworks.
What is Sender?
Sender is an email marketing tool that allows you to create and send beautiful emails to your subscribers. You can use it to collect emails from your website visitors, create and send automated email campaigns like newsletters and updates, track the performance of your emails, and more.
Its generous free tier offers up to 2500 subscribers and 15,000 emails per month, making it an excellent option for small businesses, bloggers, and anyone who wants to connect with their audience through email. Its user-friendly drag-and-drop editor makes it easy to create stunning emails.
Prerequisites
Before you get started, you’ll need a Sender account. If you don’t have one, you can sign up for free at Sender. You’ll also need a basic understanding of React and JavaScript. If you’re new to React, check out the official React documentation to get started.
How to integrate Sender with a React form
Step 1: Create a React project
If you do not have a React project yet, you can create a new one by running the following command in your terminal:
npx create-react-app sender-react-integrationThis will create a new directory called sender-react-integration and create a new React project inside it. Once the project is set up, open the project directory in your code editor and create a new file called SubscriptionForm.js inside the src directory. This file will contain the subscription form you’ll use to collect emails from your visitors.
Note: You can find the complete code for this article on GitHub. If you already have a React project, you can skip this step and use your existing project.
Step 2: Create an API access token in Sender
To connect your React app with Sender, you must create an API access token in Sender. To do this, log in to your Sender account and go to your “Settings”. Click the “API access tokens” tab and then the “Create API token” button. A prompt will be displayed to choose how long the token is valid. Choose the duration that best suits your needs and click the “Create” button.
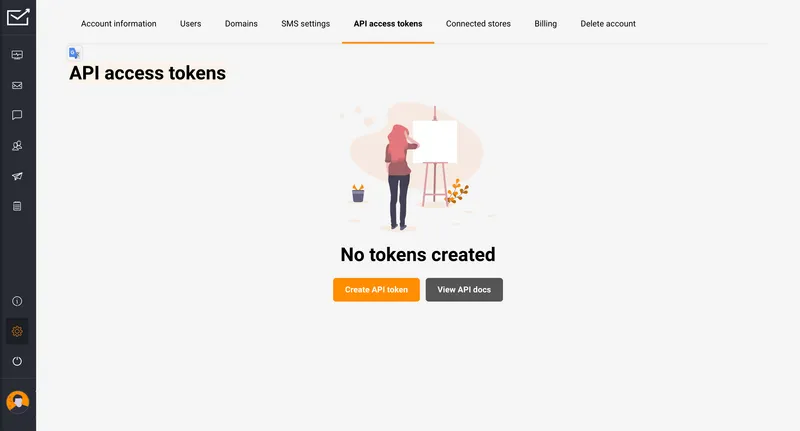
After creating the token, you will be given an API key. Copy this key, as you will need it later to connect your form with Sender.
Step 3: Create a subscription form
Now that you have created your React project and API access token, you can make a subscription form to collect emails from your visitors. You can use the following code as a starting point:
// src/SubscriptionForm.js
import React, { useState } from "react";

const SubscriptionForm = () => {
  const [isLoading, setIsLoading] = useState(false);
  const [firstname, setFirstname] = useState("");
  const [email, setEmail] = useState("");

  const handleSubmit = async e => {
    e.preventDefault();

    // Send the email to Sender
  };

  return (
    <form onSubmit={handleSubmit}>
      <h1>Subscribe to my newsletter</h1>
      <label htmlFor="first_name">First name:</label>
      <input
        type="first_name"
        value={firstname}
        onChange={e => setFirstname(e.target.value)}
        placeholder="Your first name"
      />
      <label htmlFor="email">Email:</label>
      <input
        type="email"
        value={email}
        onChange={e => setEmail(e.target.value)}
        placeholder="Enter your email"
      />
      <button type="submit" disabled={isLoading}>
        {isLoading ? "Subscribing..." : "Subscribe"}
      </button>
    </form>
  );
};

export default SubscriptionForm;
And here is some basic CSS to style the form:
form {
  display: flex;
  flex-direction: column;
  max-width: 300px;
  margin: 20px auto;
}

h1 {
  text-align: center;
  margin-bottom: 20px;
  font-size: 1.5em;
}

label {
  margin-bottom: 5px;
  font-size: 0.8em;
}

input {
  margin-bottom: 10px;
  padding: 10px;
  border: 1px solid #ccc;
  border-radius: 5px;
}

button {
  padding: 10px;
  border: none;
  border-radius: 5px;
  background-color: #007bff;
  color: #fff;
  cursor: pointer;
}
This code creates a simple subscription form with fields for the user’s first name and email address. When the form is submitted, it calls the handleSubmit function, which is responsible for sending the email to the Sender.
Step 4: Send the form data to Sender
To send the form data to Sender, you must make a POST request to the Sender API. You can use the fetch function to do this. Here’s an example of how you can send the data to Sender:
const handleSubscribe = async () => {
  try {
    const url = "https://api.sender.net/v2/subscribers";
    const apiKey = "YOUR_API_KEY"; // Replace with your API key

    const data = {
      email: email,
      firstname: firstname,
      groups: ["group_id"], // Replace with your group ID(s)
      trigger_automation: false,
    };

    const headers = {
      Authorization: `Bearer ${apiKey}`,
      "Content-Type": "application/json",
      Accept: "application/json",
    };

    const response = await fetch(url, {
      method: "POST",
      headers,
      body: JSON.stringify(data),
    });

    if (response.status === 200) {
      alert("You have successfully subscribed to my newsletter.");
    } else {
      alert("Failed to subscribe. Please try again.");
    }
  } catch (error) {
    console.error("Error:", error);
  } finally {
    setIsLoading(false);
  }
};

const handleSubmit = e => {
  e.preventDefault();
  setIsLoading(true);
  handleSubscribe();
};
In this code, we’re making a POST request to the Sender API with the user’s email and first name. We’re also passing in the group ID(s) to which the user should be added. You’ll need to replace YOUR_API_KEY with the API key you got from Sender and group_id with the ID of the group(s) you want to add the user to.
A group ID is a unique identifier for a group of subscribers in Sender or any other email marketing tool. You can use group IDs to organize your subscribers and send targeted emails to specific groups. You can find the group ID by visiting the “Subscribers” page Sender account and clicking the “Groups” tab. Click on the group you want to add the user to, and you’ll see the group ID in the top left of the page, below the group name.

I have also set the trigger_automation to false in this example. But by default, it is set to true. This means that when a user subscribes, it will trigger an automation in Sender.
An email automation is a series of emails sent automatically to the user based on certain conditions. For example, you could set up an automation in Sender to send a welcome email to new subscribers.
There are other options you can pass to the data object. More information about the options is in the Sender API documentation. (Their API documentation is very detailed and easy to understand.)
Step 5: Test the subscription form
Now that you’ve set up the subscription form and the code to send the data to Sender, you can test it.
Start your React app by running the following command in your terminal:
npm startThis will start your React app and open it in your default web browser. You should see the subscription form on the page. Enter your first name and email address, and click the “Subscribe” button. If everything is set up correctly, you should see an alert saying that you have successfully subscribed to the newsletter.

Conclusion
Sender is an excellent tool for collecting and delivering emails. Its generous free tier makes it a fantastic option for small businesses, bloggers, and anyone else who wants to connect with their audience through email. Following this article’s steps, you can seamlessly integrate Sender with React or any other JavaScript framework to collect and deliver emails for free. You can find the complete code for this article on GitHub. And if you’d like to learn more about Sender, you can check out their official website.
If this article helped you, it might help someone else too. Click the share
button below to spread the word!
Got thoughts or questions? Lets connect on
X or
LinkedIn.
Till next time, happy coding! 😊

Useful Links
- GitHub repository for this article
- Official Sender website
- Official React documentation
- Sender API documentation
- How to create a welcome series automation inside Sender
- Top 5 reasons why you need to collect more email addresses
- Beginner’s guide to email marketing
Frequently Asked Questions
1. How to send an email after a form is submitted using JavaScript
You can send an email after submitting a form in JavaScript using email marketing tools like Sender, Brevo, or MailChimp. These services provide APIs that you can use to send emails from your JavaScript app. You can follow the steps in this article to integrate Sender with your JavaScript app and send emails after a form is submitted.
2. How do I create an email automation in Sender?
You can create an email automation in Sender by going to your Sender account, visiting the “Automation” page, and clicking on the “Create new workflow” button. You can then set up the conditions and actions for your automation, such as when to trigger the automation and what emails to send. You can find more information about creating automations in the Sender documentation.
3. How do I create a contact form in React that sends emails?
You can create a contact form in React that sends emails using a service like Sender, Brevo, MailChimp, or SendGrid. These services provide APIs that you can use to send emails from your React app. You can follow the steps in this article to integrate Sender with your React app and create a contact form that sends emails.
4. Can I use Sender with Vue or Angular?
Yes, you can use Sender with Vue, Angular, or any other JavaScript framework. The steps in this article can be applied to any JavaScript framework, not just React. You can use the same steps to integrate Sender with Vue, Angular, or any other JavaScript framework. You can also use it with plain JavaScript.
5. What is an API access token?
An API access token is a unique identifier that allows you to connect your application with an API. It’s like a password that your application uses to authenticate itself with the API. You can create an API access token in the settings of your Sender account.
6. How do I find my API key in Sender?
You can find your API key in the settings of your Sender account. Log in to your Sender account, go to your settings, and click on the API access tokens tab. You can then create a new API access token or view your existing tokens.
7. How do I create a contact form in react JS?
You can create a contact form in React by using the form element and the input element to create the form fields. You can then use the fetch function to send the form data to an API like the Sender API. You can follow the steps in this article to create a contact form that sends emails using the Sender API.
8. How do I send a form data URL?
You can send form data to a URL using JavaScript’s fetch function. You can pass the form data as an object to the body property of the fetch function and the fetch function will send the data to the specified URL. You can follow the steps in this article to send form data to the Sender API using the fetch function.
